It is time to say goodbye: This version of Elastic Cloud Enterprise has reached end-of-life (EOL) and is no longer supported.
The documentation for this version is no longer being maintained. If you are running this version, we strongly advise you to upgrade. For the latest information, see the current release documentation.
Example: A Small Baseline Installation
editExample: A Small Baseline Installation
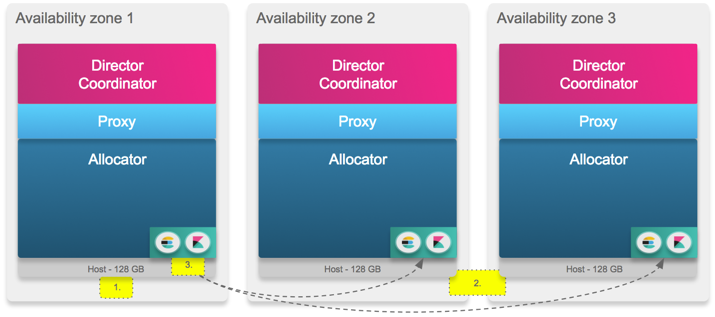
editWhat you get: A simple baseline Elastic Cloud Enterprise installation that is recommended for development, test, and small-scale use cases. Three hosts spread across three availability zones provide high availability.
A drawback of this example is that it places the ECE management services provided by the directors and coordinators onto the same hosts as your allocators and proxies. See Separation of Roles to learn why we do not recommend this approach for anything but small-scale use cases in production. All the same, we fully support small setups like this one and we think they are a great way to get started with Elastic Cloud Enterprise. (You can always scale your installation to the medium playbook example later on.)

The numbered steps in the illustration match the steps in our instructions that begin with  . You need to perform some steps on more than one host, as indicated. Don’t forget to substitute the coordinator host and other information that is specific to your installation when you run the commands.
What you need:
- 3 hosts with 128 GB RAM each
-
We recommend the following JVM heap sizes:
Service JVM Heap Size (Xms and Xmx) runner1 GB
allocator4 GB
proxy8 GB
zookeeper4 GB
director1 GB
constructor4 GB
admin-console4 GB
To deploy this Elastic Cloud Enterprise installation:
-
Install Elastic Cloud Enterprise on the first host to start a new installation with your first availability zone. This first host holds all runner roles to help bootstrap the rest of the installation. After installation completes, copy down the coordinator host IP address, user credentials and roles token information. Keep this information safe.
bash <(curl -fsSL https://download.elastic.co/cloud/elastic-cloud-enterprise.sh) install --availability-zone MY_ZONE-1 --memory-settings '{"runner":{"xms":"1G","xmx":"1G"},"allocator":{"xms":"4G","xmx":"4G"},"proxy":{"xms":"8G","xmx":"8G"},"zookeeper":{"xms":"4G","xmx":"4G"},"director":{"xms":"1G","xmx":"1G"},"constructor":{"xms":"4G","xmx":"4G"},"admin-console":{"xms":"4G","xmx":"4G"}}' -
Generate a new roles token that persists for one hour on the first host, so that other hosts can join your installation with the right role permissions in the next step (referred to as
MY_TOKEN). The new token needs to enable all runner roles, which none of the tokens automatically generated by the installation on the first host provide.curl -k -H 'Content-Type: application/json' -u root:PASSWORD https://localhost:12443/api/v1/platform/configuration/security/enrollment-tokens -d '{ "persistent": false, "roles": ["director", "coordinator", "proxy", "allocator"] }' -
Install Elastic Cloud Enterprise on a second and third host, placing them into a second and a third availability zone, and assign them the same roles and memory settings as the first host. Make sure you include the coordinator host IP information from Step 1 and the new roles token from Step 2.
bash <(curl -fsSL https://download.elastic.co/cloud/elastic-cloud-enterprise.sh) install --coordinator-host HOST_IP --roles-token 'MY_TOKEN' --roles "director,coordinator,proxy,allocator" --availability-zone MY_ZONE-2 --memory-settings '{"runner":{"xms":"1G","xmx":"1G"},"allocator":{"xms":"4G","xmx":"4G"},"proxy":{"xms":"8G","xmx":"8G"},"zookeeper":{"xms":"4G","xmx":"4G"},"director":{"xms":"1G","xmx":"1G"},"constructor":{"xms":"4G","xmx":"4G"},"admin-console":{"xms":"4G","xmx":"4G"}}' bash <(curl -fsSL https://download.elastic.co/cloud/elastic-cloud-enterprise.sh) install --coordinator-host HOST_IP --roles-token 'MY_TOKEN' --roles "director,coordinator,proxy,allocator" --availability-zone MY_ZONE-3 --memory-settings '{"runner":{"xms":"1G","xmx":"1G"},"allocator":{"xms":"4G","xmx":"4G"},"proxy":{"xms":"8G","xmx":"8G"},"zookeeper":{"xms":"4G","xmx":"4G"},"director":{"xms":"1G","xmx":"1G"},"constructor":{"xms":"4G","xmx":"4G"},"admin-console":{"xms":"4G","xmx":"4G"}}' -
Change the cluster configuration for the
admin-console-elasticsearchandlogging-and-metricsclusters to use three availability zones and resize the cluster to use at least 4 GB of RAM. This change makes sure that the clusters used by the administration console are highly available and provisioned sufficiently.
After your Elastic Cloud Enterprise installation is up, some additional steps might be required:
- Add your own load balancer. Load balancers are user supplied and we do not currently provide configuration steps for you.
- Install your security certificate to enable TLS/SSL authentication for secure connections over HTTPS.