Add a Fleet Server
editAdd a Fleet Server
editTo use Fleet for central management, a Fleet Server must be running and accessible to your hosts. This page describes how to add a Fleet Server to an Elastic Cloud or self-managed deployment.
Compatibility and prerequisites
editFleet Server is compatible with the following Elastic products:
-
Elastic Stack 7.13 or later (hosted Elasticsearch Service on Elastic Cloud, or a self-managed cluster).
- For version compatibility: Elasticsearch >= Fleet Server >= Elastic Agent (except for bugfix releases)
- Kibana should be on the same minor version as Elasticsearch.
- Elastic Cloud Enterprise 2.9—requires you to self-manage the Fleet Server.
-
Elastic Cloud Enterprise 2.10 or later—allows you to use a hosted Fleet Server on Elastic Cloud.
-
Requires additional wildcard domains and certificates (which normally only
cover
*.cname, not*.*.cname). This enables us to provide the URL for Fleet Server ofhttps://.fleet.. - The deployment template must contain an APM & Fleet node.
For more information about hosting Fleet Server on Elastic Cloud Enterprise, refer to Manage your APM & Fleet Server.
-
Requires additional wildcard domains and certificates (which normally only
cover
How to add a Fleet Server
editThe steps for running Fleet Server on our hosted Elasticsearch Service on Elastic Cloud are different from the steps for running it as self-managed.
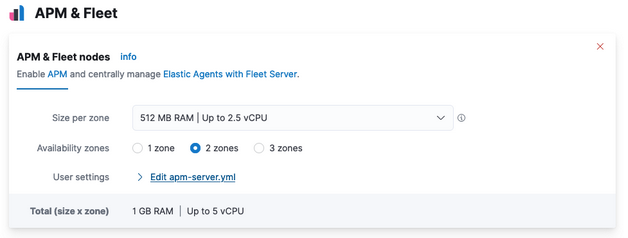
Elastic Cloud runs a hosted version of Fleet Server. No extra setup is required unless you want to scale your deployment.
To confirm that Fleet Server is available in your deployment:
- Log in to Kibana and go to Management > Fleet.
- Click the Agents tab.
- Under Agent policy, look for Elastic Cloud agent policy — Fleet Server is the agent enrolled in the Elastic Cloud agent policy. This policy is managed by Elastic Cloud. You cannot modify it. Confirm that the agent status is Healthy.
Don’t see the Fleet Server agent? Make sure your deployment includes an APM & Fleet node. This node is required to use Fleet Server.

When using our hosted Elasticsearch Service, it’s recommended that you use our hosted version of Fleet Server. However, you can choose to deploy and self-manage Fleet Servers.
To deploy a self-managed Fleet Server, install an Elastic Agent and enroll it in an agent policy containing the Fleet Server integration.
- Log in to Kibana and go to Management > Fleet. The first time you visit this page, it might take a minute to load.
-
Click Fleet settings, and in the Fleet Server hosts field, specify the
URLs Elastic Agents will use to connect to Fleet Server. For example,
https://192.0.2.1:8220, where192.0.2.1is the host IP where you will install Fleet Server. -
In the Elasticsearch hosts field, specify the Elasticsearch URLs where Elastic Agents will send data. For example,
https://192.0.2.0:9200.For more information about these settings, see Fleet settings.
- Save and apply the settings.
-
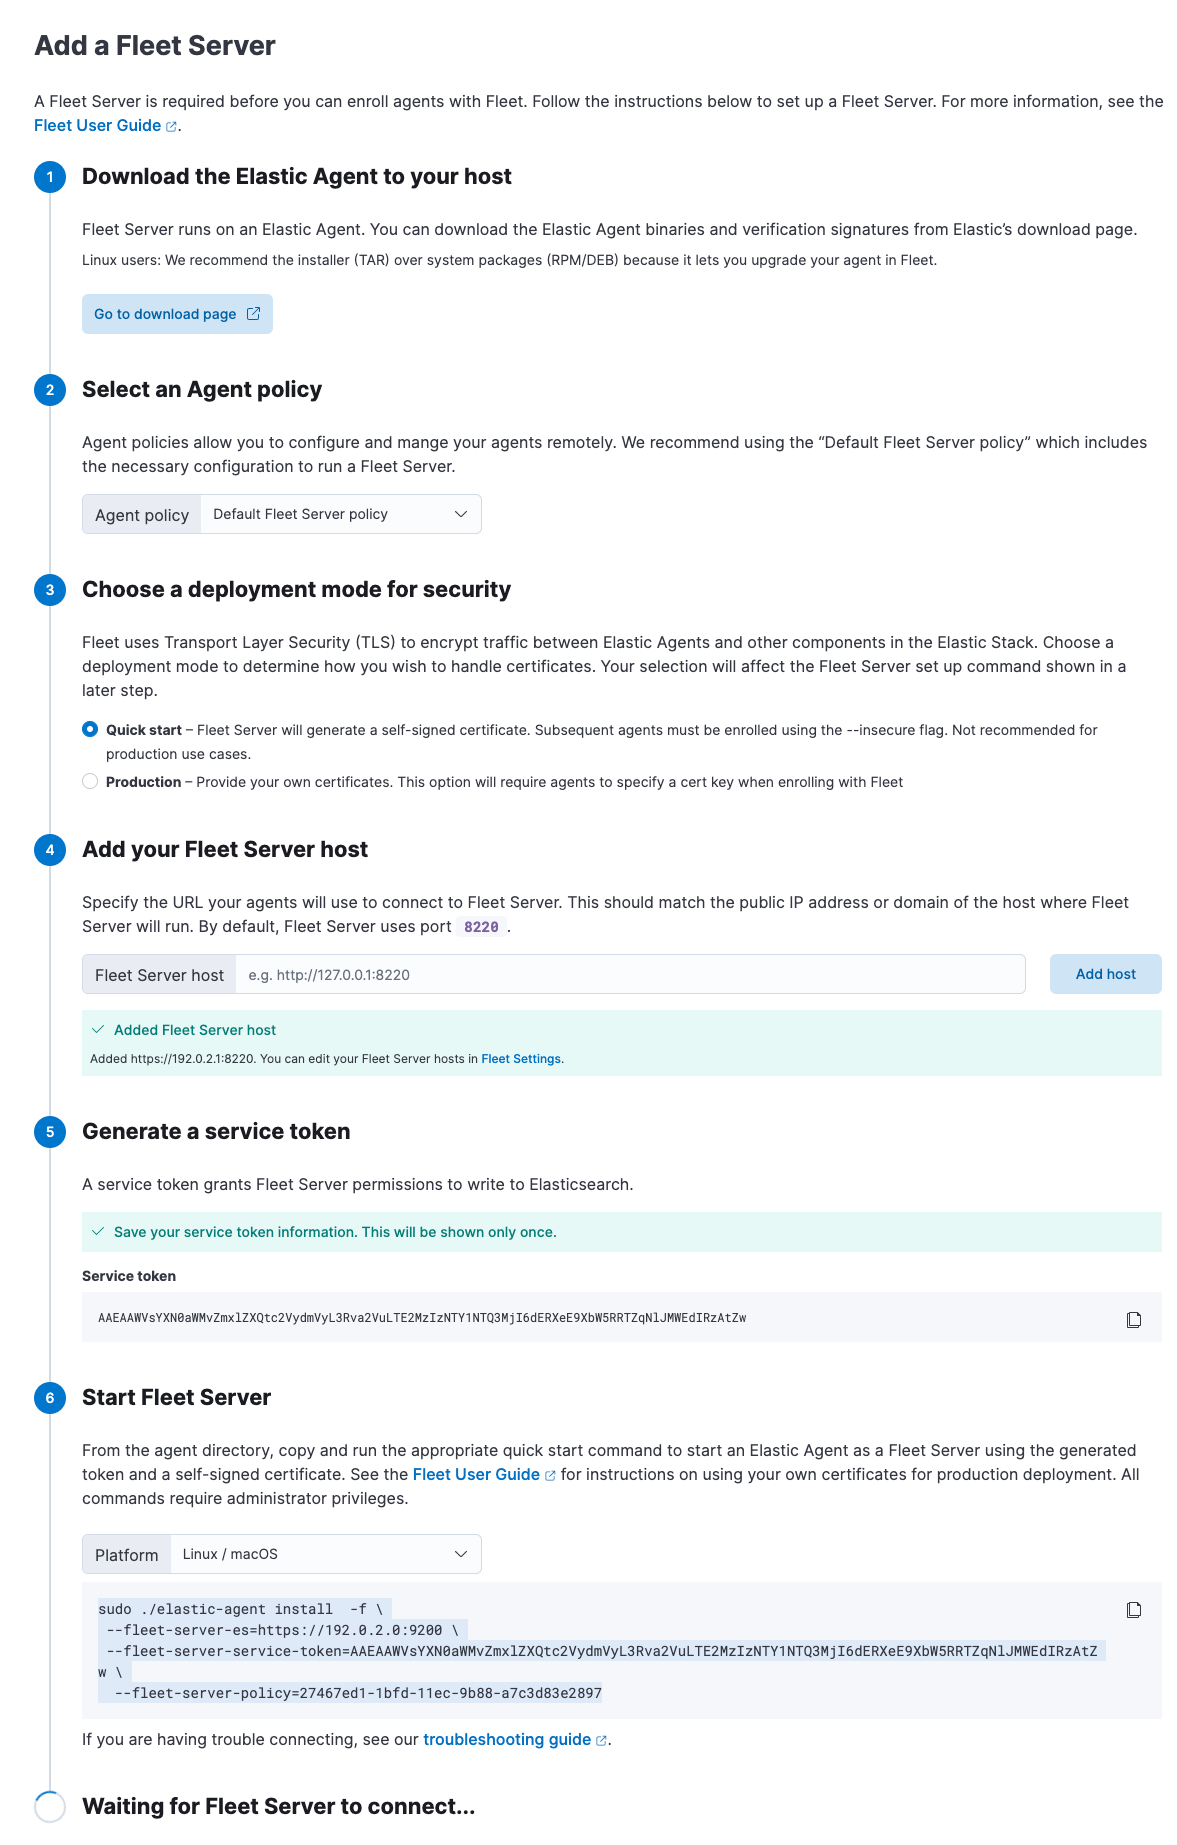
Click the Agents tab and follow the in-product instructions to add a Fleet server:

Notes:
- Make sure you download an x64 architecture installation package.
-
For the agent policy, choose one with a Fleet Server integration. If one doesn’t exist, create it.
- If you choose Production deployment mode, learn how to generate certs in Encrypt traffic in clusters with a self-managed Fleet Server.
-
It’s recommended you generate a unique service token for each
Fleet Server. For other ways to generate service tokens, see
elasticsearch-service-tokens. -
The
installcommand installs the Elastic Agent as a managed service and enrolls it in a Fleet Server policy. For example, the following command installs a Fleet Server and uses self-signed certs:sudo ./elastic-agent install -f \ --fleet-server-es=http://localhost:9200 \ --fleet-server-service-token=AAEbAWVsYXN0aWMvZmxlaXQtc2VydmVzL3Rva2VuLTE2MeIzNTY1NTQ3Mji6dERXeE9XbW5RRTZqNlJMWEdIRzAtZw \ --fleet-server-policy=27467ed1-1bfd-11ec-9b88-a7c3d83e2897 --fleet-server-insecure-http
The following command installs a Fleet Server and uses certificates you provide. Make sure you replace the values in angle brackets.
sudo ./elastic-agent install --url=https://192.0.2.1:8220 \
 -f \
 --fleet-server-es=https://192.0.2.0:9200 \
 --fleet-server-service-token=AAEAaWVsYXN0aWcvZmxlZXQtc2VydmVyL3rva2VuLTE2MzIzNTYcNTQ3MjI6dER1eE9XbW5RRTZqNlJMWEdIRzAtZw \
  --fleet-server-policy=27467ed1-1bfd-11ec-9b88-a7c3d83e2897 \
  --certificate-authorities=<PATH_TO_CA> \
  --fleet-server-es-ca=<PATH_TO_ES_CERT> \
  --fleet-server-cert=<PATH_TO_FLEET_SERVER_CERT> \
  --fleet-server-cert-key=<PATH_TO_FLEET_SERVER_CERT_KEY>
For more Fleet Server commands, see Elastic Agent command reference.
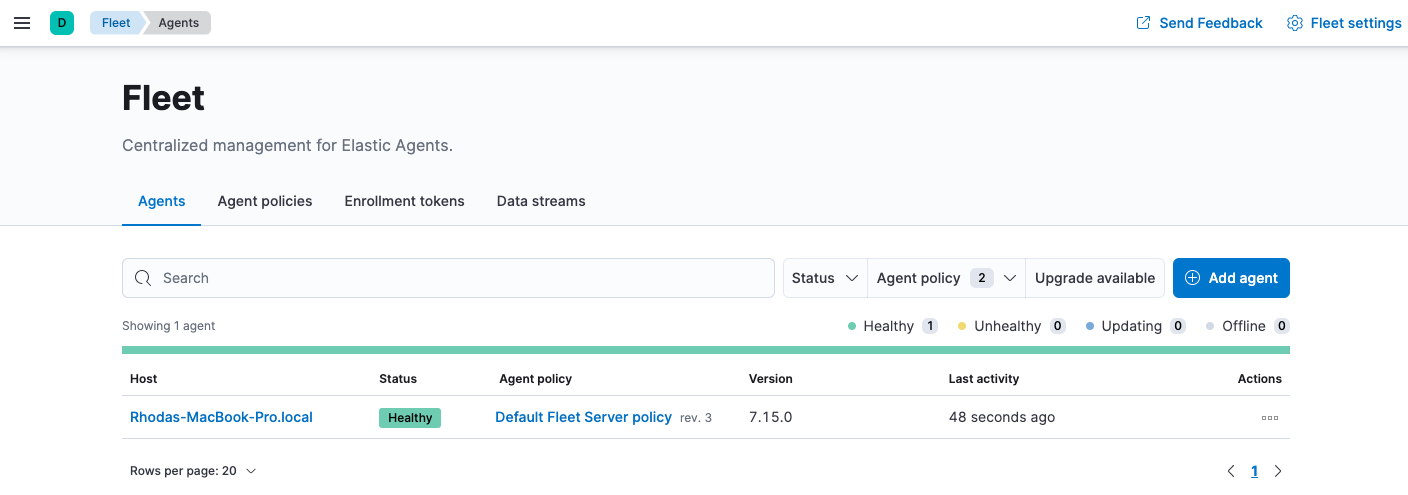
If installation is successful, you’ll see the Fleet Server Elastic Agent on the Agents tab in Fleet. Notice that the Default Fleet Server Policy is assigned to the Elastic Agent. This policy is created when you run Fleet for the first time.

Now you’re ready to add Elastic Agents to your host systems. To learn how, see Install Fleet-managed Elastic Agents.