Connecting GitHub
editConnecting GitHub
editConnector configuration instructions provided in this guide apply both to GitHub and GitHub Enterprise Server.
GitHub is a development platform, version control and collaboration platform for teams of all sizes. From open source to business, you can host and review code, manage projects, and build software across departments and continents. The GitHub connectors provided with Workplace Search automatically capture, sync and index the following items:
Issues |
Including ID, Content, Status, Repository, Created By, and timestamps |
Pull Requests |
Including ID, Content, Status, Repository, Created By, and timestamps |
Repositories |
Including ID, Name, and README content as description. Repository content (e.g. code, files, wiki) is excluded. |
Configuring the GitHub Connector
editConfiguring the GitHub connector is the first step prior to connecting the GitHub service to Workplace Search, and requires that you create an OAuth App from the GitHub platform. To get started, first log in to GitHub and access your administrative dashboard:
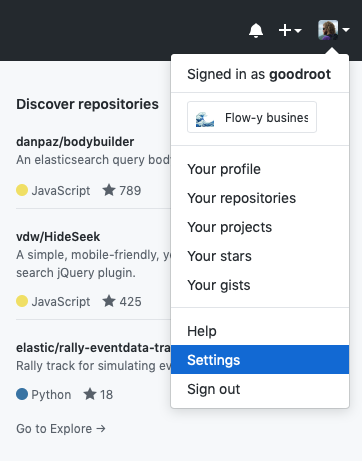
Step 1. Locate the Account drop-down menu in the top-right area and navigate to Settings:

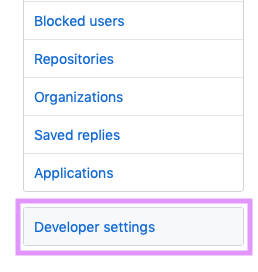
Step 2. From here, you’ll see a set of menu items on the left under Personal Settings. Click Developer Settings:

Workplace Search needs an OAuth App with which to interface. There are two important things to understand before you create one:
- The app can stay in developer mode. You do not need to publish it.
- Make sure that you create this app with a trusted and stable GitHub account.
We recommend creating a team-owned account for only this app. If access is lost, a new one must be created and the configuration updated in Workplace Search.
Step 3. Click New OAuth App:

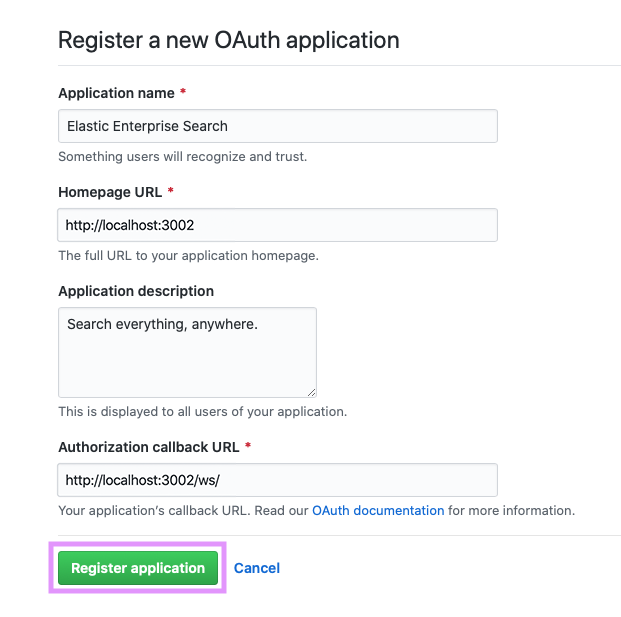
You’ll need to fill in specific values:
- Application Name: A name to help you identify the application. It’s best to make it explicit: Workplace Search, or something like that.
- Description (Optional): More information will help you remember the application’s purpose.
- Homepage URL: Must match the address which you’ve used to host Workplace Search.
# Important note: the hostname should be relative to the one you have configured.
http://localhost:3002/
- Authorization callback URL: A callback URL lets the application know how to reach the right Workplace Search endpoint.
# Important note: the hostname should be relative to the one you have configured.
http://localhost:3002/ws/
Step 4. Once the form is complete, click Register Application:

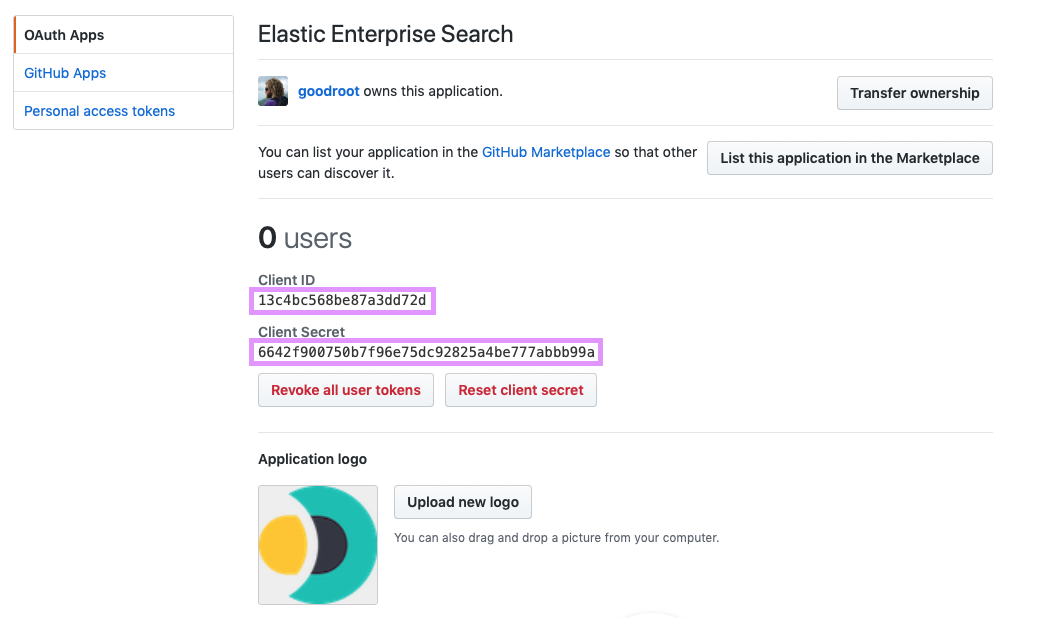
Step 5. The app is created, and we may now retrieve the Client ID and Client Secret.

Step 6. From the Workplace Search administrative dashboard’s Sources area, locate GitHub and provide both the Client ID and Client Secret.
Voilà! The GitHub connector is now configured, and ready to be used to synchronize content. In order to capture data, you must now connect a GitHub instance with the adequate authentication credentials.
Connecting GitHub to Workplace Search
editOnce the GitHub connector has been configured, you may connect a GitHub instance to your organization.
Step 1. Head to your organization’s Workplace Search administrative dashboard, and locate the Sources tab.
Step 2. Click Add a new source.
Step 3. Select GitHub (or GitHub Enterprise) in the Configured Sources list, and follow the GitHub authentication flow as presented.
Step 4. Upon the successful authentication flow, you will be redirected to Workplace Search, and will be prompted to select the Organization you would like to synchronize.
GitHub content will now be captured and will be ready for search gradually as it is synced. Once successfully configured and connected, the GitHub synchronization automatically occurs every 2 hours.
Adding GitHub requires that you belong to and have OAuth permissions within a GitHub organization, usually as a GitHub organization admin-level user.