WARNING: Version 6.2 of the Elastic Stack has passed its EOL date.
This documentation is no longer being maintained and may be removed. If you are running this version, we strongly advise you to upgrade. For the latest information, see the current release documentation.
Managing Jobs
editManaging Jobs
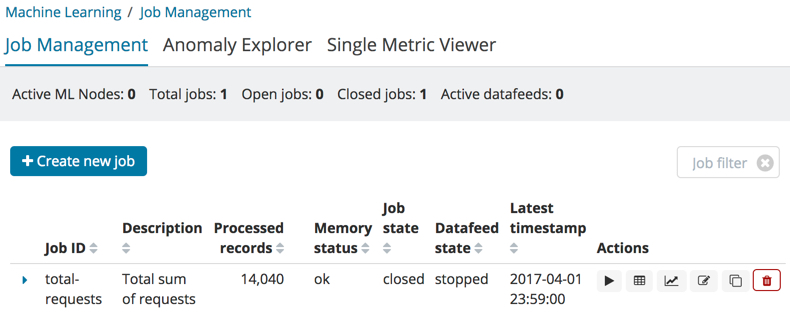
editAfter you create a job, you can see its status in the Job Management tab:

The following information is provided for each job:
- Job ID
- The unique identifier for the job.
- Description
- The optional description of the job.
- Processed records
- The number of records that have been processed by the job.
- Memory status
-
The status of the mathematical models. When you create jobs by using the APIs or by using the advanced options in Kibana, you can specify a
model_memory_limit. That value is the maximum amount of memory resources that the mathematical models can use. Once that limit is approached, data pruning becomes more aggressive. Upon exceeding that limit, new entities are not modeled. For more information about this setting, see Analysis Limits. The memory status field reflects whether you have reached or exceeded the model memory limit. It can have one of the following values:
-
ok - The models stayed below the configured value.
-
soft_limit - The models used more than 60% of the configured memory limit and older unused models will be pruned to free up space.
-
hard_limit - The models used more space than the configured memory limit. As a result, not all incoming data was processed.
-
- Job state
-
The status of the job, which can be one of the following values:
-
opened - The job is available to receive and process data.
-
closed - The job finished successfully with its model state persisted. The job must be opened before it can accept further data.
-
closing - The job close action is in progress and has not yet completed. A closing job cannot accept further data.
-
failed - The job did not finish successfully due to an error. This situation can occur due to invalid input data. If the job had irrevocably failed, it must be force closed and then deleted. If the datafeed can be corrected, the job can be closed and then re-opened.
-
- Datafeed state
-
The status of the datafeed, which can be one of the following values:
- started
- The datafeed is actively receiving data.
- stopped
- The datafeed is stopped and will not receive data until it is re-started.
- Latest timestamp
- The timestamp of the last processed record.
If you click the arrow beside the name of job, you can show or hide additional information, such as the settings, configuration information, or messages for the job.
You can also click one of the Actions buttons to start the datafeed, edit the job or datafeed, and clone or delete the job, for example.
Managing Datafeeds
editA datafeed can be started and stopped multiple times throughout its lifecycle. If you want to retrieve more data from Elasticsearch and the datafeed is stopped, you must restart it.
For example, if you did not use the full data when you created the job, you can now process the remaining data by restarting the datafeed:
-
In the Machine Learning / Job Management tab, click the following
button to start the datafeed:

-
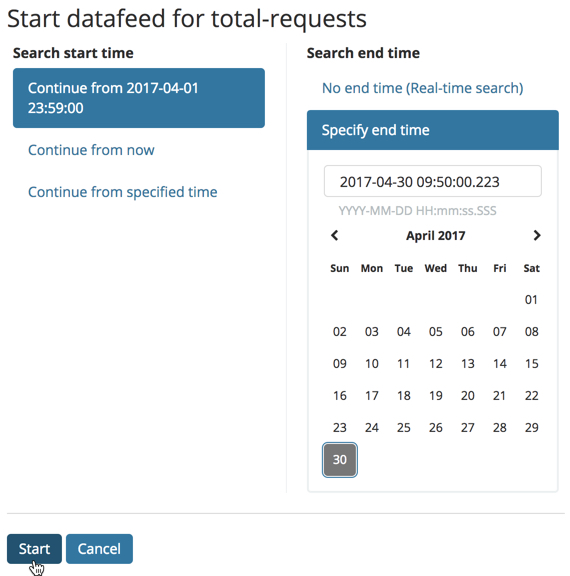
Choose a start time and end time. For example, click Continue from 2017-04-01 23:59:00 and select 2017-04-30 as the search end time. Then click Start. The date picker defaults to the latest timestamp of processed data. Be careful not to leave any gaps in the analysis, otherwise you might miss anomalies.

The datafeed state changes to started, the job state changes to opened,
and the number of processed records increases as the new data is analyzed. The
latest timestamp information also increases.
If your data is being loaded continuously, you can continue running the job in real time. For this, start your datafeed and select No end time.
If you want to stop the datafeed at this point, you can click the following
button: 
Now that you have processed all the data, let’s start exploring the job results.