Building a Real-World Alarm with Elasticsearch and Raspberry Pi
Editor's Note: With the release of Elastic Stack 7.11, the new alerting framework is now generally available. In addition to existing connectors to 3rd party platforms like Slack PagerDuty, and Servicenow, 7.11 adds Microsoft Teams to the list of built-in alerting integrations. Read more about this update in our alerting release blog.
Do you remember the last time when you saw a fire alarm or the police turning on a patrol car's flashing lights? That kind of warning light or loud sound simply notifies you that something is very important, or gives some some sense of danger, and that you must pay attention to it.
Sometimes, you may also want to do a similar thing with your data, like when your server is down. That’s a big thing and you should call your admin as soon as possible to get it fixed. If your admin is nearby, you could even directly shout out to him/her.
“Aha!” you might say, let’s use Elasticsearch to monitor our infrastructure and use the alerting feature to notify our admin via email or Slack. Wow, that’s great, but it can be better. Sometimes, the admin’s mobile phone maybe needs to be charged or it’s been left on the table, or the admin may be having a conversation and they may not pay attention to the message, so how can we bring it up?
What if we used a real world warning light, like what we see during a fire alarm, and even add a loud sound that will be interesting and noticeable, so no one will miss it?
In this post I will explain how to wire a Raspberry Pi with an alarm light and integrate it with the Elastic Stack to make this happen.
Intro to Raspberry Pi
Raspberry Pi is a very small, but fully featured computer on a single board. You may plug in a monitor with an HDMI cable and attach a keyboard, mouse, camera, or even speakers via USB ports. It can also connect to your network through Wi-Fi or an ethernet port.

The first generation of Raspberry Pi was developed in 2012, with the intention of making computer learning easy for school students. It is cheap, with the newest model, the 3B+, costing you under USD$40. You can install a Linux OS on it, use your favourite language to do programming, and all with very low power consumption.
The most important feature that Raspberry Pi has is the row of GPIO (General-Purpose Input/Output) pins along the top edge of the board.

The GPIO pins can be used with a variety of alternative functions, some are available on all pins, others on specific pins. This list below details the functions:
- PWM (pulse-width modulation)
- Software PWM available on all pins
- Hardware PWM available on GPIO12, GPIO13, GPIO18, GPIO19
- SPI
- SPI0: MOSI (GPIO10); MISO (GPIO9); SCLK (GPIO11); CE0 (GPIO8), CE1 (GPIO7)
- SPI1: MOSI (GPIO20); MISO (GPIO19); SCLK (GPIO21); CE0 (GPIO18); CE1 (GPIO17); CE2 (GPIO16)
- I2C
- Data: (GPIO2); Clock (GPIO3)
- EEPROM Data: (GPIO0); EEPROM Clock (GPIO1)
- Serial
- TX (GPIO14); RX (GPIO15)
Basically, GPIO lets us connect to physical electronic device like alarm lights and also allows us to control these easily.
How it works
So how it does this all work? The idea of this blog post is to use Raspberry Pi to control a relay module and light up a warning light. There are many alarm lights available to buy and they are very simple. You plug it in, it starts to flash, you unplug it, it stops flashing. More than simple enough for us to use. But wait! They usually are powered with higher voltages, like 12 V, 36 V, or even 220 V, and the Pi can only support 5 V or 3.3 V, which means we can’t control it directly with the Pi, but with a relay we can make it happen. A relay is an electrically operated switch. It uses a very low power electromagnet to mechanically operate a switch, and that switch can be the bridge to connect the high power power supply and our warning light.
Then we will build a webhook service to send the command to the relay, tell the relay to switch on or off, and control the alarm light.
And finally, we will use Elasticsearch’s alerting feature to trigger the webhook when we find some interesting events in Elasticsearch.
Are you interested? If so, let’s get started!
Materials required
So besides the Raspberry Pi, what materials are needed?, We also need some other electronics items, all of them are available at most electronic stores. Here is the list:
Name | Unit | Comments |
Raspberry Pi 3 model B+ | 1 | You know, for Pi |
16GB MicroSD card + reader | 1 | Storage for Raspberry Pi |
5V USB power supply + USB cable | 1 | Power for Raspberry Pi |
Warning light with 12 V power | 1 | The light to do the alarm |
5 V Relay module | 1 | Control the lights |
Breadboard | 1 | Connect all the wires |
GPIO Breakout Expansion Board + Ribbon Cable | 1 | Connect breadboard and Pi |
3.3 V Active Piezo Buzzer Module | 1 | Let’s make some noise |
Female – Female jumper cable | ~5 | Wire stuff together |
Male – Female jumper cable | ~5 | Wire stuff together |
Hardware setup
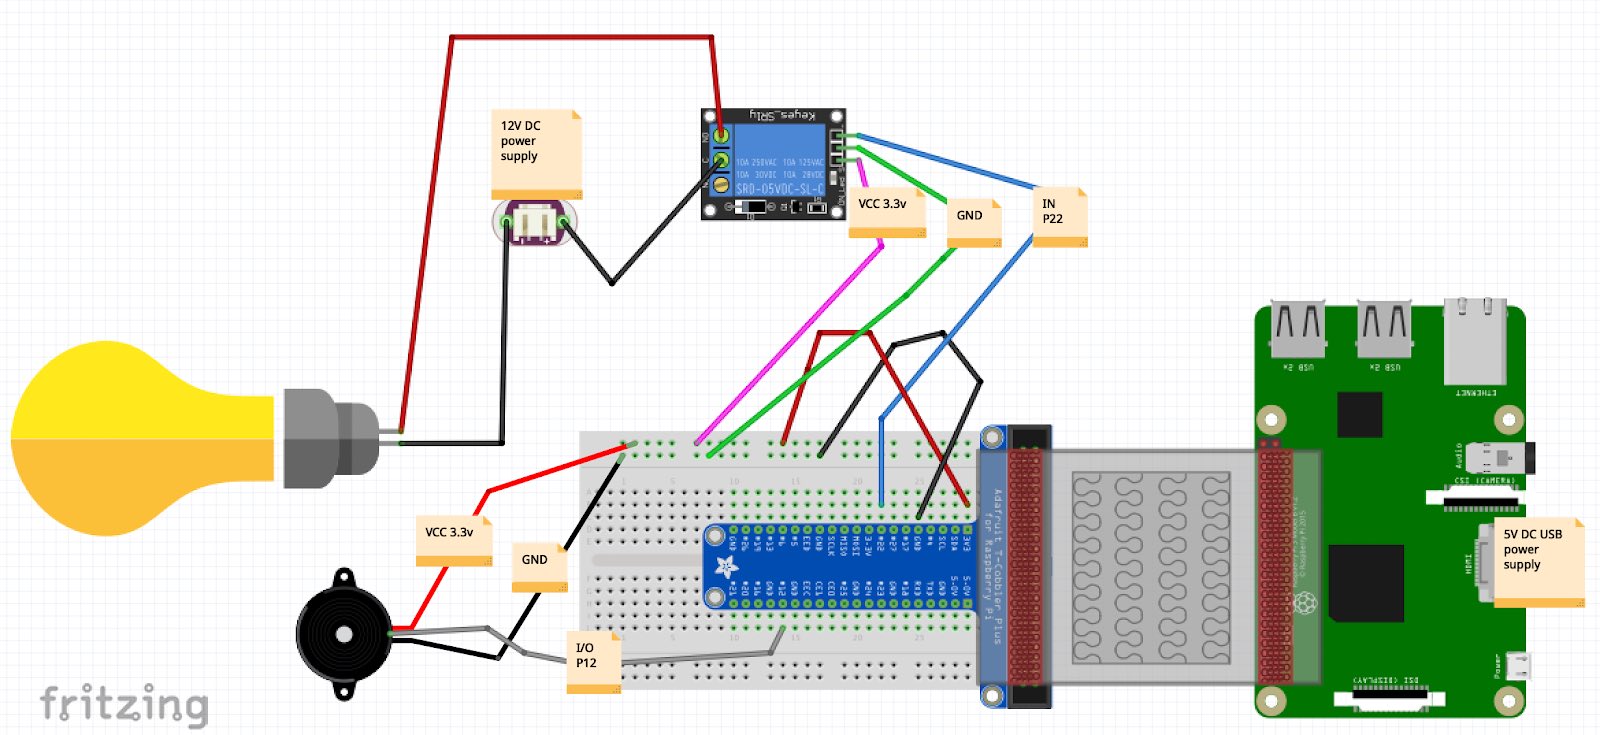
Below is the diagram of how to connect them together. As you can see, we are using a ribbon cable to connect the Pi and the breadboard, also make sure the GPIO breakout aligns with the breadboard.

The breadboard allow us to easily connect all the parts together, but you should be very careful. If you misconnect the VCC to GND, some bad things may happen (parts could get burned). The relay has two types of connection, one is for our warning light, the other side is connected to the breadboard, and there is an IO pin which should be connected to the breadboard labelled with P22. Remember that as we will be using it later.
We also have put in a buzzer connected to the breadboard, the I/O pin is connected to P12, which has a PWM feature, and we will use it to control the sound buzzer later.
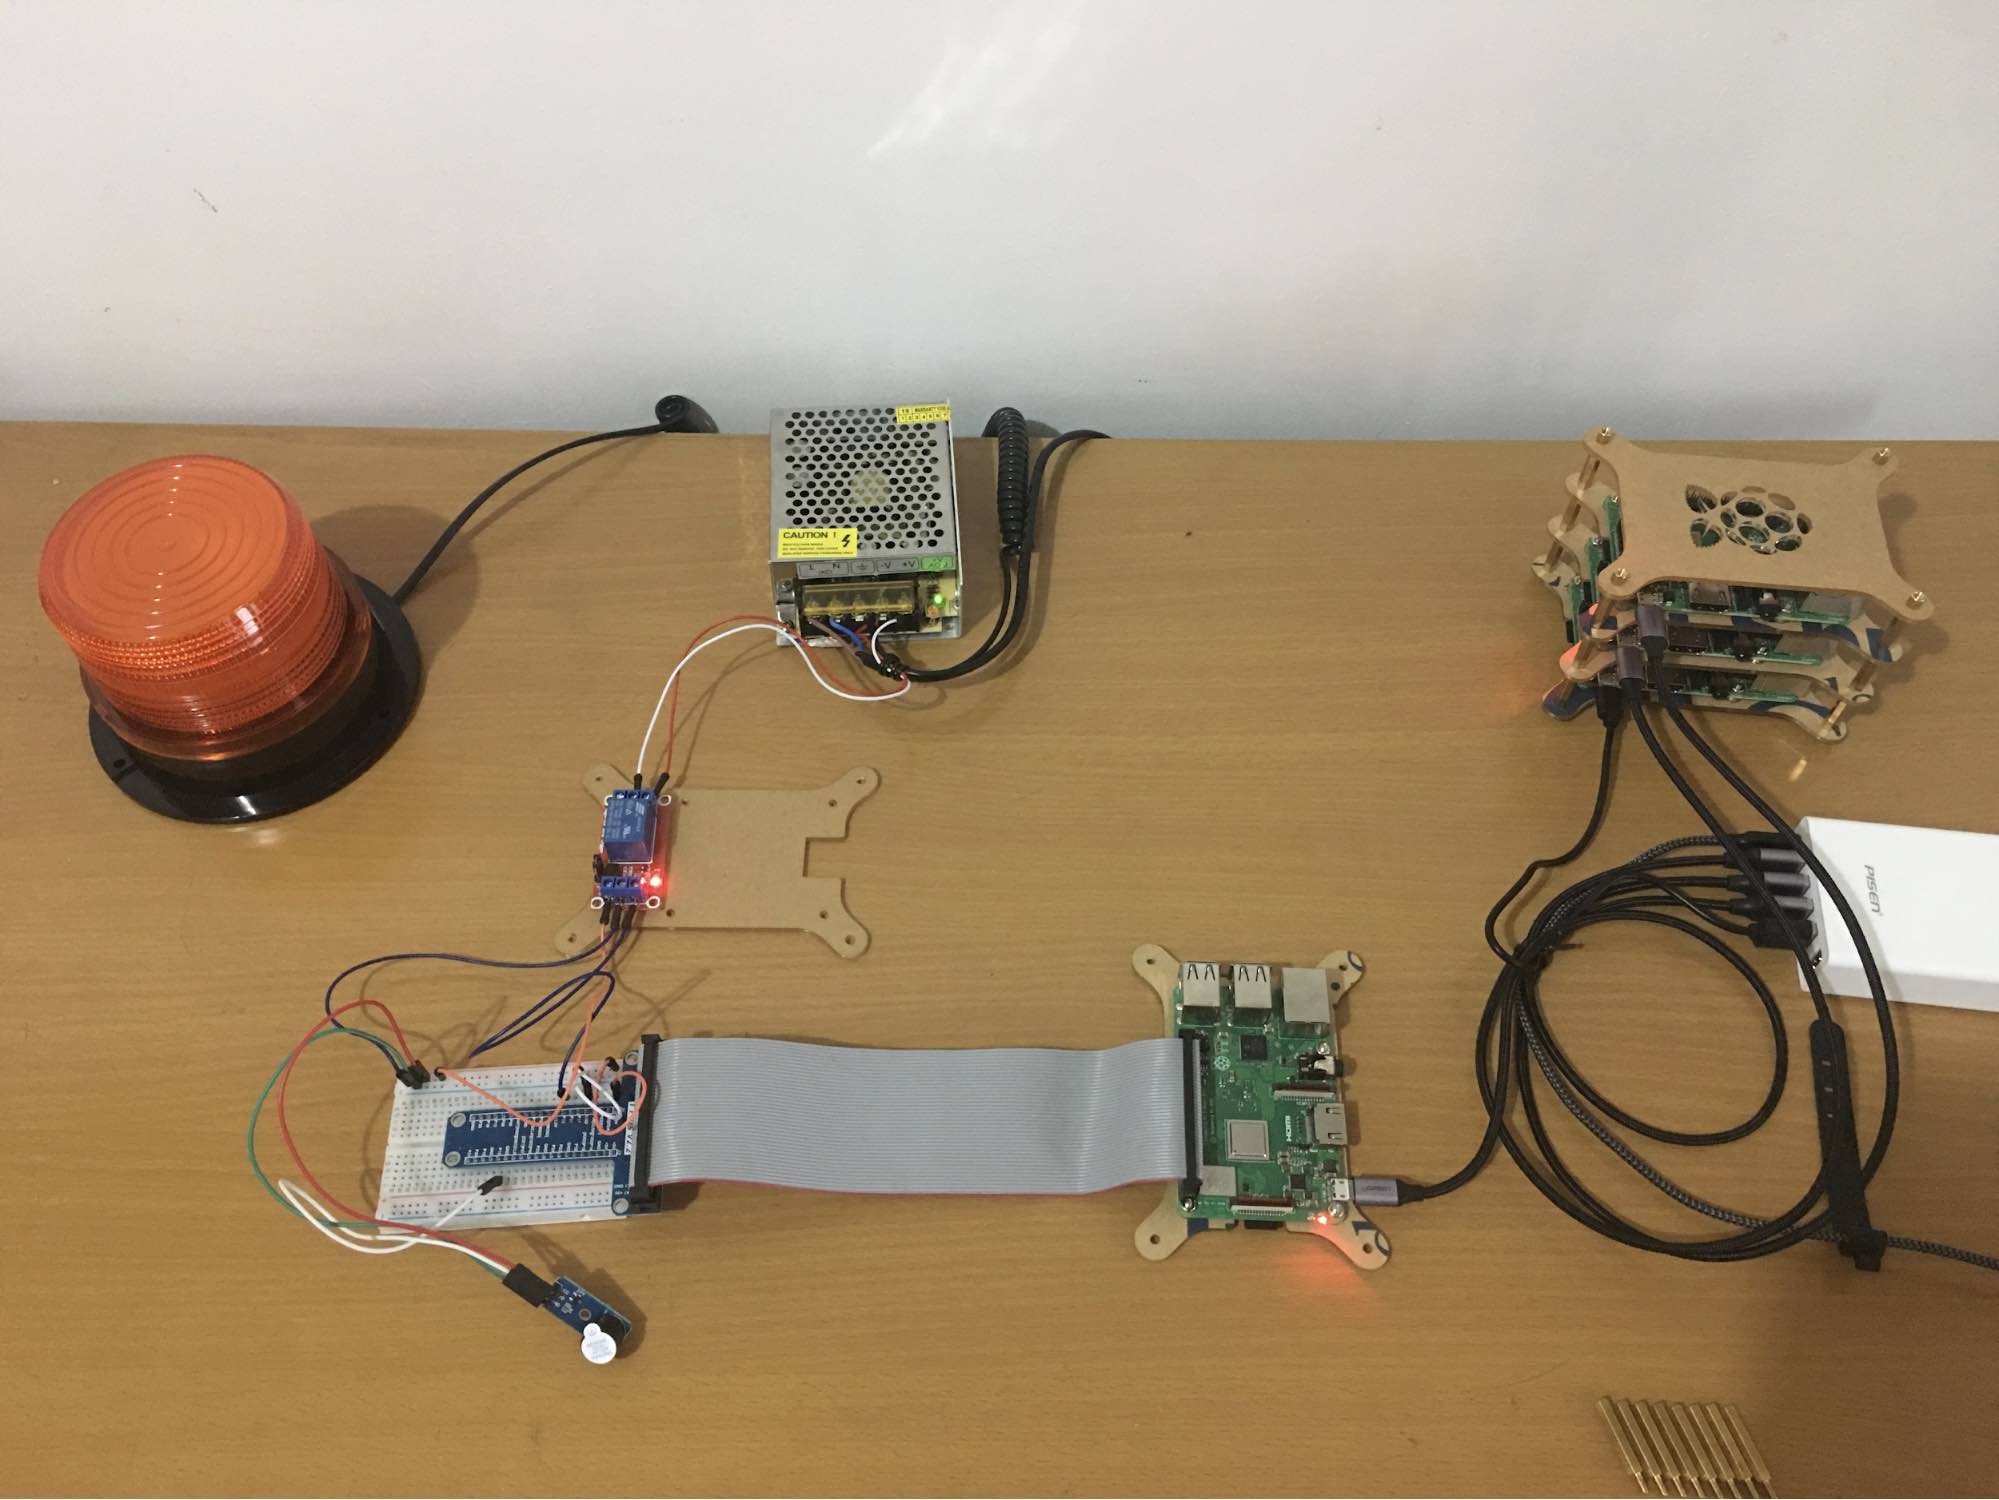
After some wiring up, here is what it looks like:

Software setup
Now the hardware is ready, let’s jump to the software part. The Raspberry Pi is based on the ARM CPU architecture and supports the Linux operating system. I will not teach you how to install a OS in Pi, because you can get very detailed instructions from Raspberry Pi’s official site.
I have chosen RASPBIAN OS instead.
And now you should be able to use your favourite terminal tool to log into the Pi.
Controlling the Alarm with Python
OK, let’s have some Python scripting fun by creating a script like this:
#!/usr/bin/env python
import RPi.GPIO as GPIO
PIN_RELAY =  22
GPIO.setmode(GPIO.BCM)
GPIO.setwarnings(False)
GPIO.setup(PIN_RELAY, GPIO.OUT)
GPIO.output(PIN_RELAY, GPIO.LOW)
At first, we imported a Python library RPi.GPIO, which is a neat Python package allowing you to operate the GPIO easily.
Then, we set which GPIO pin we are going to operate. Our relay is connected on pin 22 so we set the variable PIN_RELAY to 22. We then setup the pin to GPIO.OUT mode, which means we are going to write out some data to this pin and we set a value GPIO.LOW to this pin. GPIO.LOW is the new state value of the pin, there is the other state GPIO.HIGH which we will use to control the relay, and relay will be switched on after you set the state to GPIO.LOW. If you set it back to GPIO.HIGH, the relay will be switched off. There is also a jumper on the relay to set the default state.
Note that if you set it to GPIO.LOW before you set it to GPIO.HIGH, the relay will keep this state, which means that the alarm light keeps flashing. You can turn it off after a while, like this:
time.sleep(2)
GPIO.output(PIN_RELAY, GPIO.HIGH)
Now let’s see how to make a sound. It is pretty similar to the relay, the only difference is the pin code, since the sound buzzer is connected to pin 12. Let’s see the code below:
PIN_AUDIO = 12  #gpio 12
GPIO.setup(PIN_AUDIO, GPIO.OUT)
GPIO.output(PIN_AUDIO, GPIO.LOW)
time.sleep(0.5)
GPIO.output(PIN_AUDIO, GPIO.HIGH)
An alerting webhook service
Building a webhook service is easy. We need to make sure that we call the webhook and it then calls the relay and buzzer. Let’s put it together using the code we built above, and a few extra sections:
import os
import time
import RPi.GPIO as GPIO
from socket import *
PIN_AUDIO = 12  #gpio 12
PIN_RELAY = 22  #gpio 22
def setup():
  GPIO.setmode(GPIO.BCM)
  GPIO.setwarnings(False)
  GPIO.setup(PIN_RELAY, GPIO.OUT)
  GPIO.setup(PIN_AUDIO, GPIO.OUT)
def alarm():
  GPIO.output(PIN_AUDIO, GPIO.LOW)
  GPIO.output(PIN_RELAY, GPIO.LOW)
  time.sleep(2)
  GPIO.output(PIN_RELAY, GPIO.HIGH)
  GPIO.output(PIN_AUDIO, GPIO.HIGH)
def createServer():
    serversocket = socket(AF_INET, SOCK_STREAM)
    serversocket.bind(('0.0.0.0',9000))
    serversocket.listen(3)
    while(1):
        (clientsocket, address) = serversocket.accept()
        alarm()
        clientsocket.send("HTTP/1.1 200 OK\n"
         +"Content-Type:application/json\n"
         +"\n" # Important!
         + '{"success":true}'
         +"\n")
        clientsocket.shutdown(SHUT_WR)
        clientsocket.close()
    serversocket.close()
def destroy():
  GPIO.output(PIN_RELAY, GPIO.HIGH)
  GPIO.output(PIN_RELAY, GPIO.HIGH)
  GPIO.cleanup()
if __name__ == '__main__':
  setup()
  try:
    createServer()
  except KeyboardInterrupt:
    destroy()
Yay! We’ve just created a simple web server. You can start the webhook easily, just run: python web.py, it listens on port 9000, each time we access this port it will return a success message. Can’t be easier. But for our alerting usage this is enough.
Integrate with alerting
We have a small Elasticsearch cluster running on Pi, but it can be on Elastic Cloud or on your own hardware. We also have Heartbeat to monitor several services, and we will create a Watch in Elasticsearch to watch the Heartbeat indices, and will be using our new webhook endpoint (192.168.1.200:9000) in the alerting action. Here is the full Watch:
PUT _xpack/watcher/watch/server_is_down
{
 "trigger": {
   "schedule": {
     "interval": "1s"
   }
 },
 "input": {
   "search": {
     "request": {
       "search_type": "query_then_fetch",
       "indices": [
         "heartbeat-*"
       ],
       "types": [],
       "body": {
         "size": 0,
         "query": {
           "bool": {
             "must": [
               {
                 "range": {
                   "@timestamp": {
                     "gte": "now-3s"
                   }
                 }
               },
               {
                 "match": {
                   "monitor.status": "down"
                 }
               }
             ]
           }
         }
       }
     }
   }
 },
 "condition": {
   "compare": {
     "ctx.payload.hits.total": {
       "gte": 1
     }
   }
 },
 "actions": {
   "alarm_webhook": {
     "webhook": {
       "scheme": "http",
       "host": "192.168.1.200",
       "port": 9000,
       "method": "post",
       "params": {},
       "headers": {},
       "body": "SOS, server is down!"
     }
   }
 },
 "throttle_period_in_millis": 5000
}
As you can see the request above, the Watch will check the Heartbeat index every second. If it finds that at least one service is down in the most recent 3 seconds, the Watch will trigger a webhook action, and also we set the throttle period to 5 seconds to reduce repeat alerts.
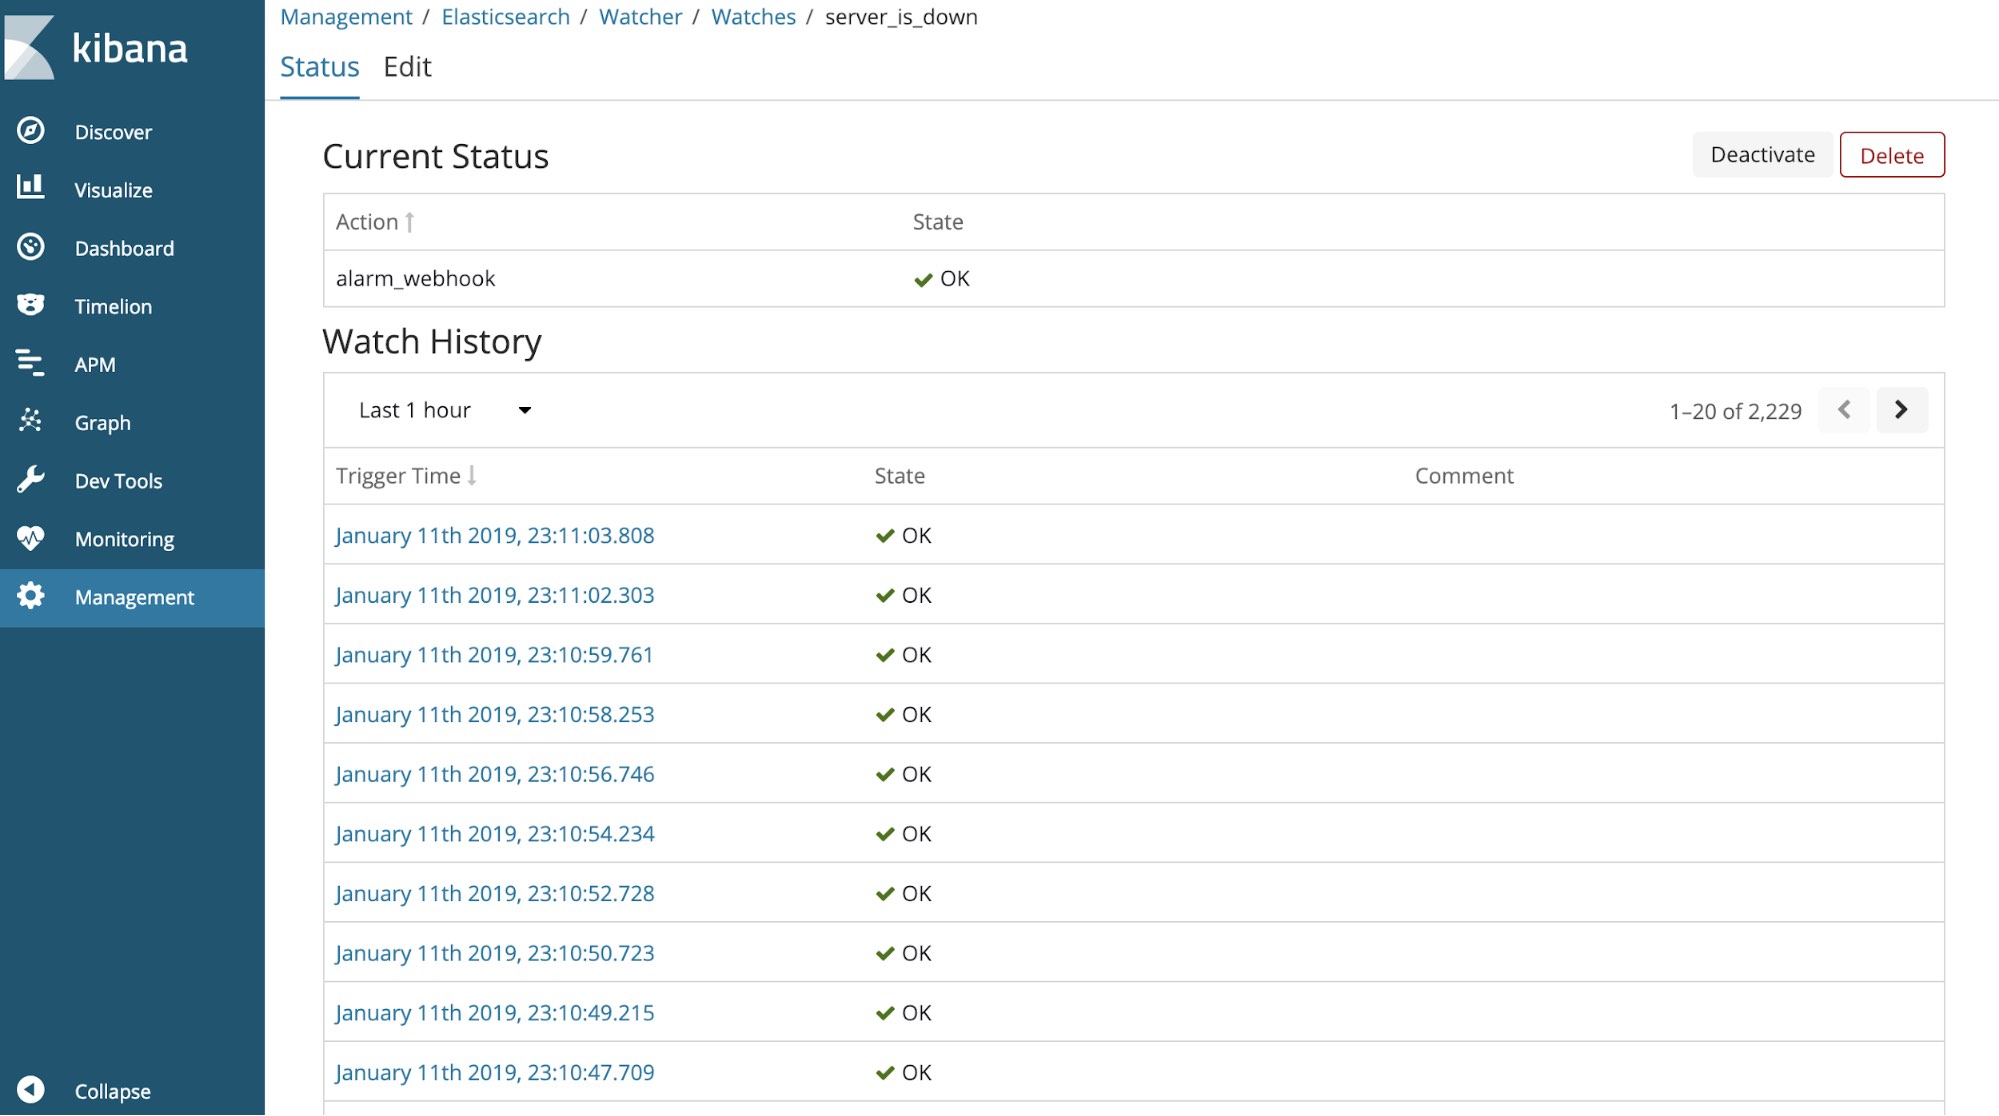
When the Watch is created, it will watch your cluster 24x7 without rest, and also you can view the execution history details from Watcher’s UI:

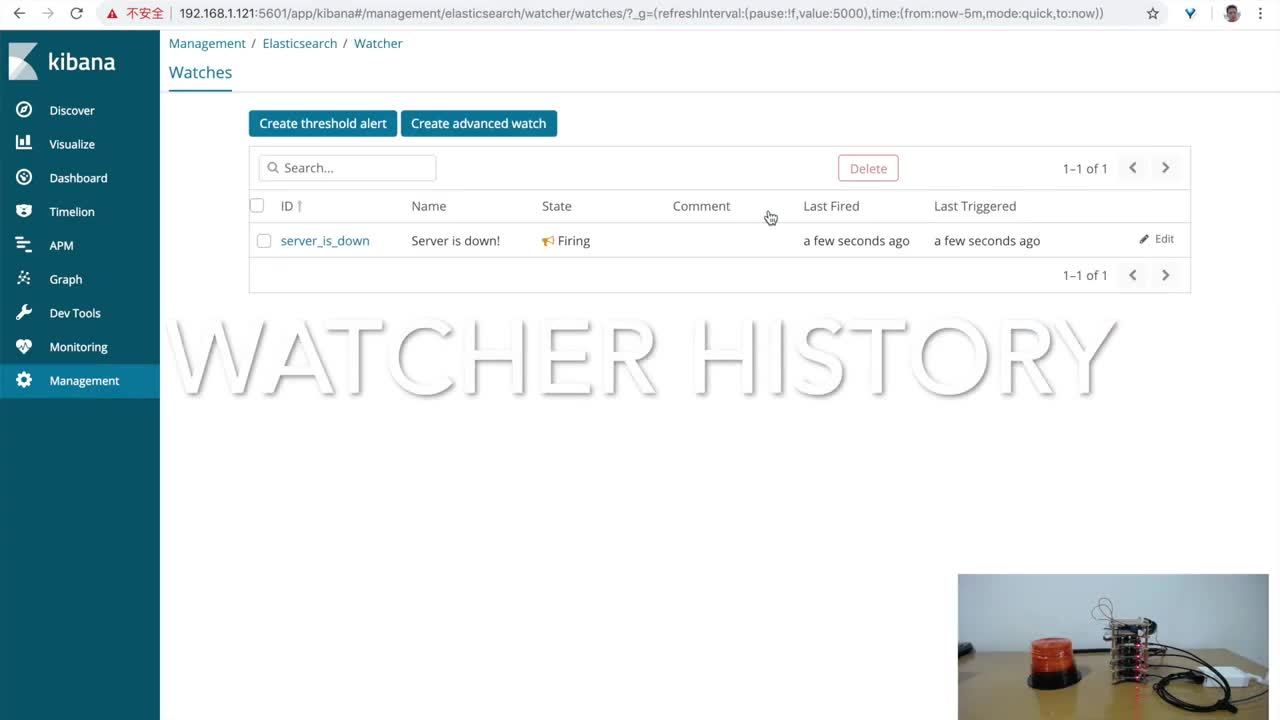
If you shutdown some service, you will get an alarm immediately.
Alerting with a webhook is really powerful. You may define your own webhook beyond just triggering a warning light, and you can also send the events to your own system, like Jira or GitHub, for further processing.
For more information about how to use Elasticsearch Alerting and how to define a Watch, please refer to this doc.
Show time
Finally, it’s time to show our work. Check out this video below:
Conclusion
In this blog post, we used Raspberry Pi to connect the real world, and we also used the power of Elasticsearch to achieve real-time service monitoring. The most important thing is that getting a warning from real lights and a sound buzzer seems very cool. But when you get that kind of warning in your production environment, you should fix the issue right away.
All related scripts can be found in this repo. Have fun!
