Securityedit
Securing Elasticsearch and Kibana is of paramount importance, to prevent unauthorized access by unknown users and unauthorized access by known users without the appropriate role required for authorization. In addition, securing the transport of data and communication between Elasticsearch, Kibana, the browser, or any other client by encrypting traffic is critical for data integrity.
The ARM template exposes a number of features for securing a deployment to Azure.
Authentication and Authorizationedit
The default template deployment applies a trial license to the cluster to enable Elastic Stack features, including Security, for a trial period of 30 days.
As part of the trial, Security features including Basic Authentication are enabled,
by configuring xpack.security.enabled: true
in Elasticsearch configuration. This prevents anonymous access to the
cluster.
After the trial license period expires, the trial platinum features operate in a degraded mode.
You should update your license as soon as possible. You are essentially flying blind when running with an expired license. The license can be updated at any point before or on expiration, using the Update License API or Kibana UI, if available in the version deployed.
With Elasticsearch 6.3+, you can revert to a free perpetual basic license included with deployment by using the Start Basic API.
With Elasticsearch 6.2 and prior, you can register for free basic license and apply it to the cluster.
Starting with Elastic Stack 6.8.0 and onwards in the 6.x major version lineage, and 7.1.0 onwards, Security features including Basic Authentication and Transport Layer Security are enabled for the free basic license level.
What this means is that if you deploy one of these versions of the Elastic Stack, Basic Authentication will be enabled and configured, and if certificates are supplied for Elasticsearch HTTP and Transport layers, and Kibana, Transport Layer Security will be configured.
Please read the Security for Elasticsearch is now free blog post for more details.
The following parameters are used to configure initial user accounts
-
securityBootstrapPassword -
Security password for :
bootstrap.passwordkey added to the Elasticsearch keystore. The bootstrap password is used to seed the built-in users and is necessary only for Elasticsearch 6.0 onwards.If no value is supplied, a 13 character password will be generated using the ARM template
uniqueString()function. -
securityAdminPassword -
Security password for the
elasticsuperuser built-in user account. Must be greater than six characters in length.Keep this password somewhere safe; You never know when you may need it!
-
securityKibanaPassword -
Security password for the
kibanabuilt-in user account. This is the account that Kibana uses to communicate with Elasticsearch. Must be greater than six characters in length. -
securityLogstashPassword -
Security password for the
logstash_systembuilt-in user account. This is the account that Logstash can use to communicate with Elasticsearch. Must be greater than six characters in length. -
securityBeatsPassword -
Security password for the
beats_systembuilt-in user account. This is the account that Beats can use to communicate with Elasticsearch. Must be greater than six characters in length. Valid only for Elasticsearch 6.3.0+ -
securityApmPassword -
Security password for the
apm_systembuilt-in user account. This is the account that the APM server can use to communicate with Elasticsearch. Must be greater than six characters in length. Valid only for Elasticsearch 6.5.0+ -
securityRemoteMonitoringPassword -
Security password for the
remote_monitoring_userbuilt-in user account. This is the account that Metricbeat uses when collecting and storing monitoring information in Elasticsearch. It has theremote_monitoring_agentandremote_monitoring_collectorbuilt-in roles. Valid only for Elasticsearch 6.5.0+
It is recommended after deployment to use the elastic superuser account to create
the individual user accounts that will be needed for the users and applications
that will interact with Elasticsearch and Kibana, then to use these accounts going
forward.
SAML single sign-on with Azure Active Directoryedit
Using SAML single sign-on (SSO) for Elasticsearch with Azure Active Directory (AAD) means that Elasticsearch does not need to be seeded with any user accounts from the directory. Instead, Elasticsearch is able to rely on the claims sent within a SAML token in response to successful authentication to determine identity and privileges.
To integrate SAML SSO, the following conditions must be satisfied:
-
esVersionmust be one that supports the SAML realm i.e. Elasticsearch 6.2.0 or later -
xpackPluginsmust beYesto install a trial license of Elastic Stack platinum features -
kibanamust beYesto deploy an instance of Kibana -
esHttpCertBloboresHttpCaCertBlobmust be provided to configure SSL/TLS for the HTTP layer of Elasticsearch.
SAML integration with AAD defines a SAML realm with the name saml_aad in the
elasticsearch.yml configuration file. The Basic Authentication realm is also
enabled, to provide access to the cluster through the built-in users configured
as part of the template. The built-in users can be used to perform additional steps
needed within Elasticsearch to complete the integration.
The following sections guide you through what is required to integrate SAML SSO with AAD for Elasticsearch and Kibana deployed through the ARM template.
Create Enterprise applicationedit
To integrate Elasticsearch with AAD for SAML SSO, it’s necessary to create an Enterprise Application within AAD before deploying Elasticsearch with the ARM template. An Enterprise application can be created in the Azure Portal by first navigating to Azure Active Directory
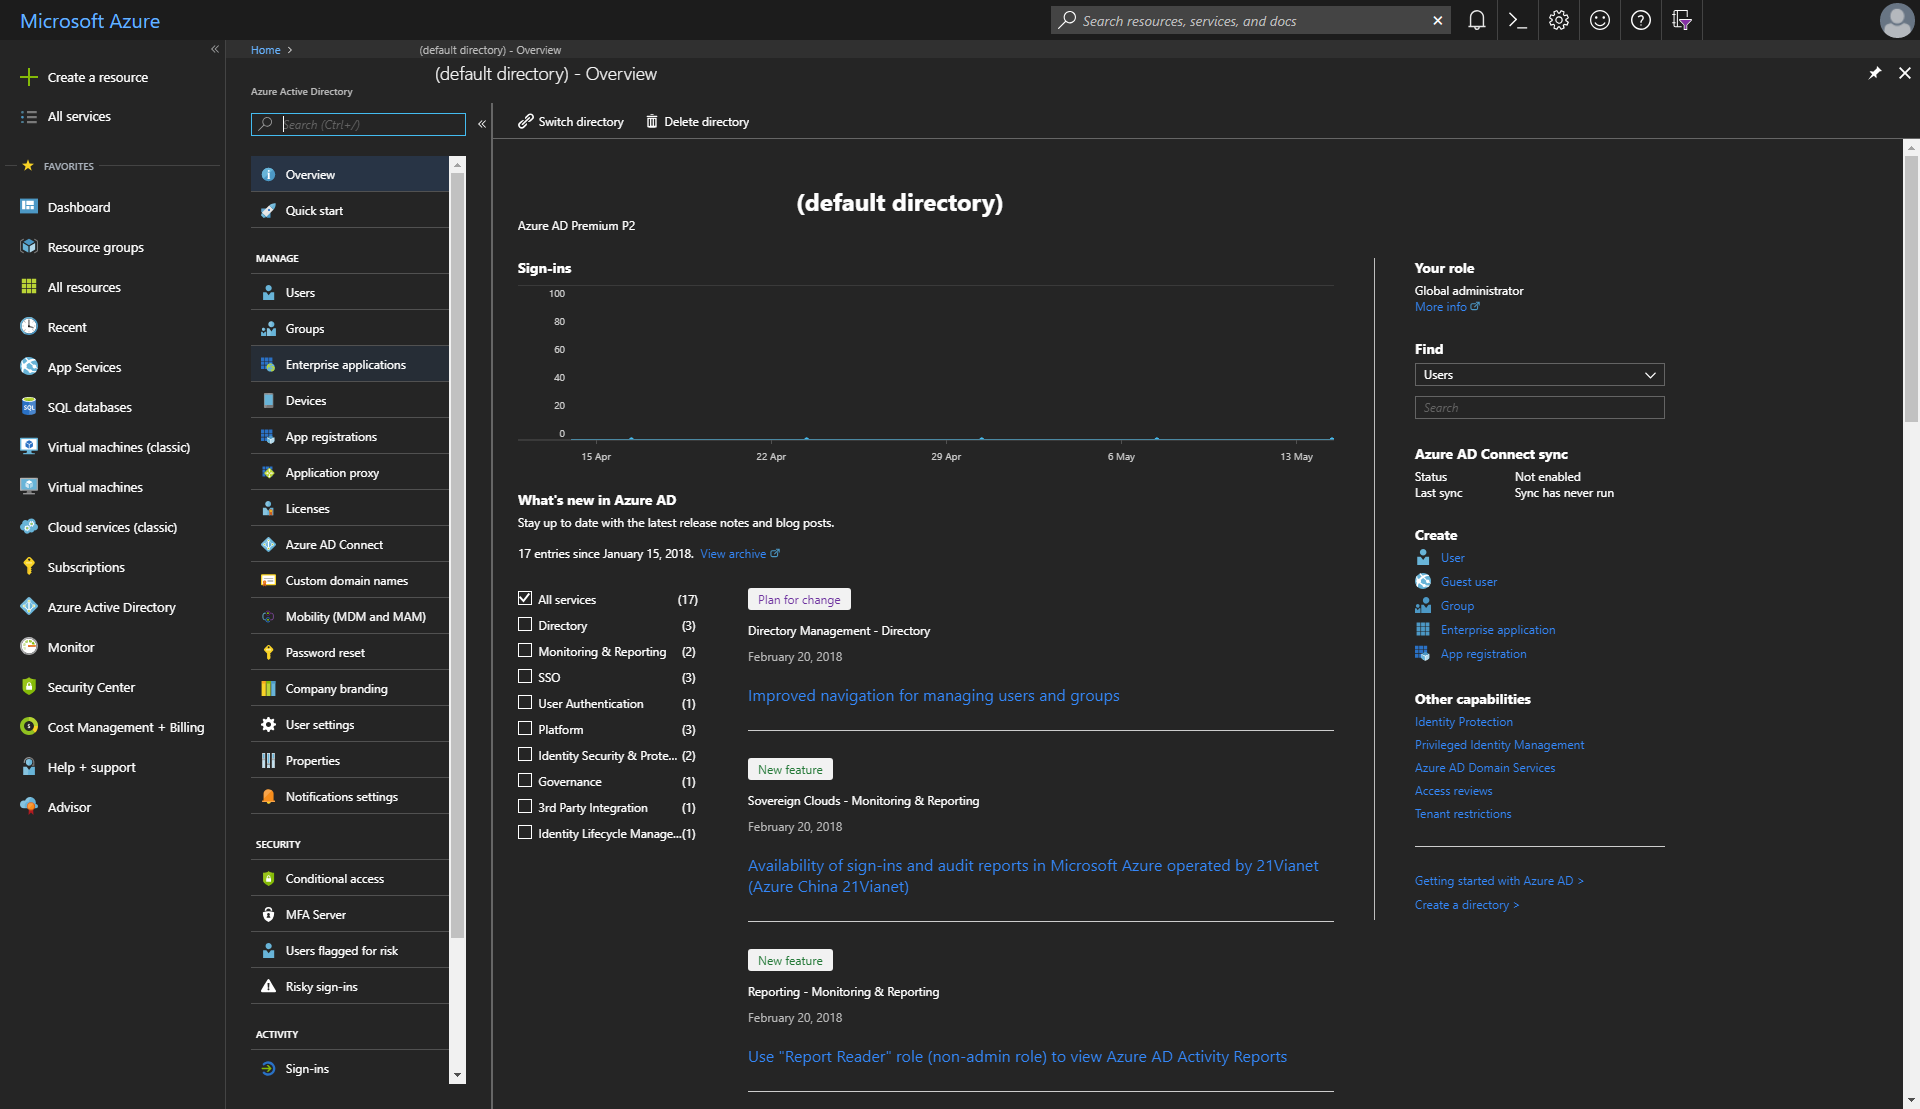
Choosing Enterprise applications from the AAD blade
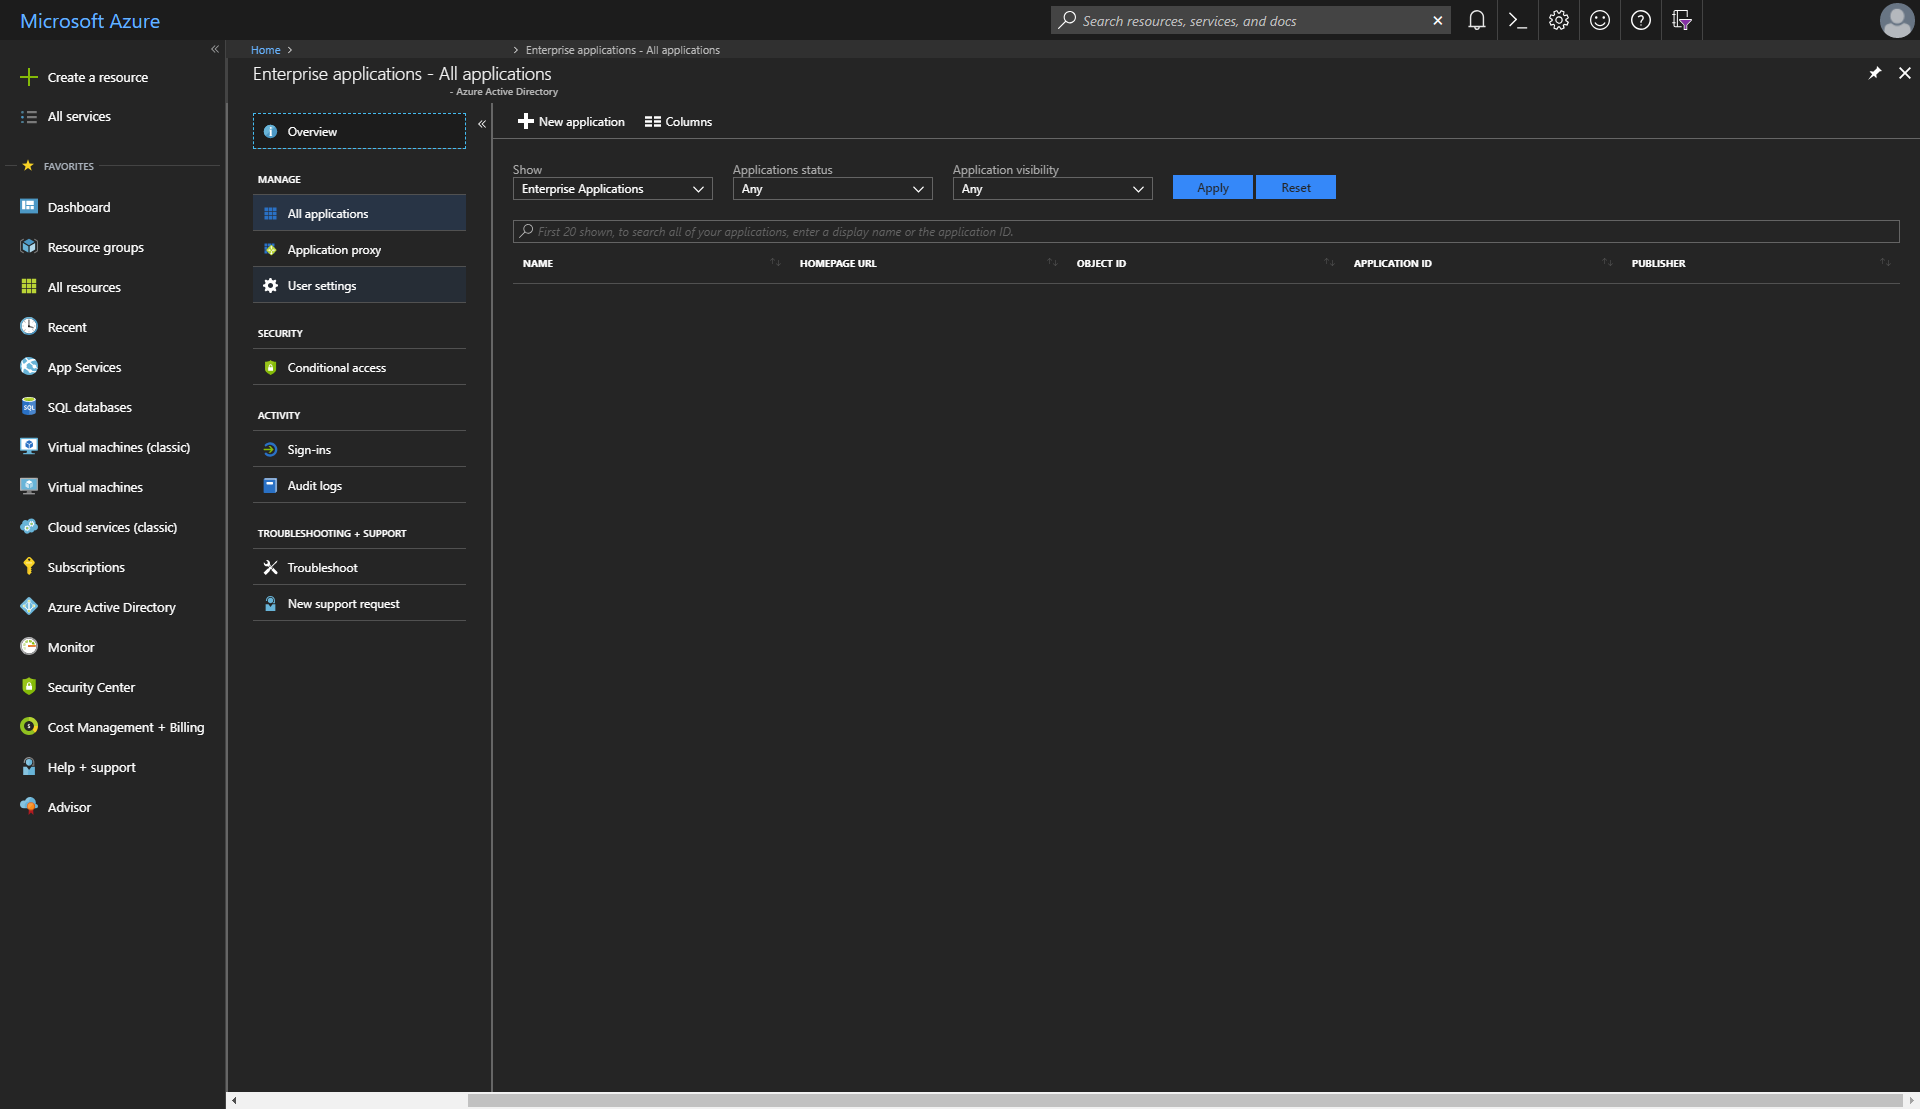
And then creating a new application using the + New application button. This will bring up a new blade where a new Enterprise application can be added
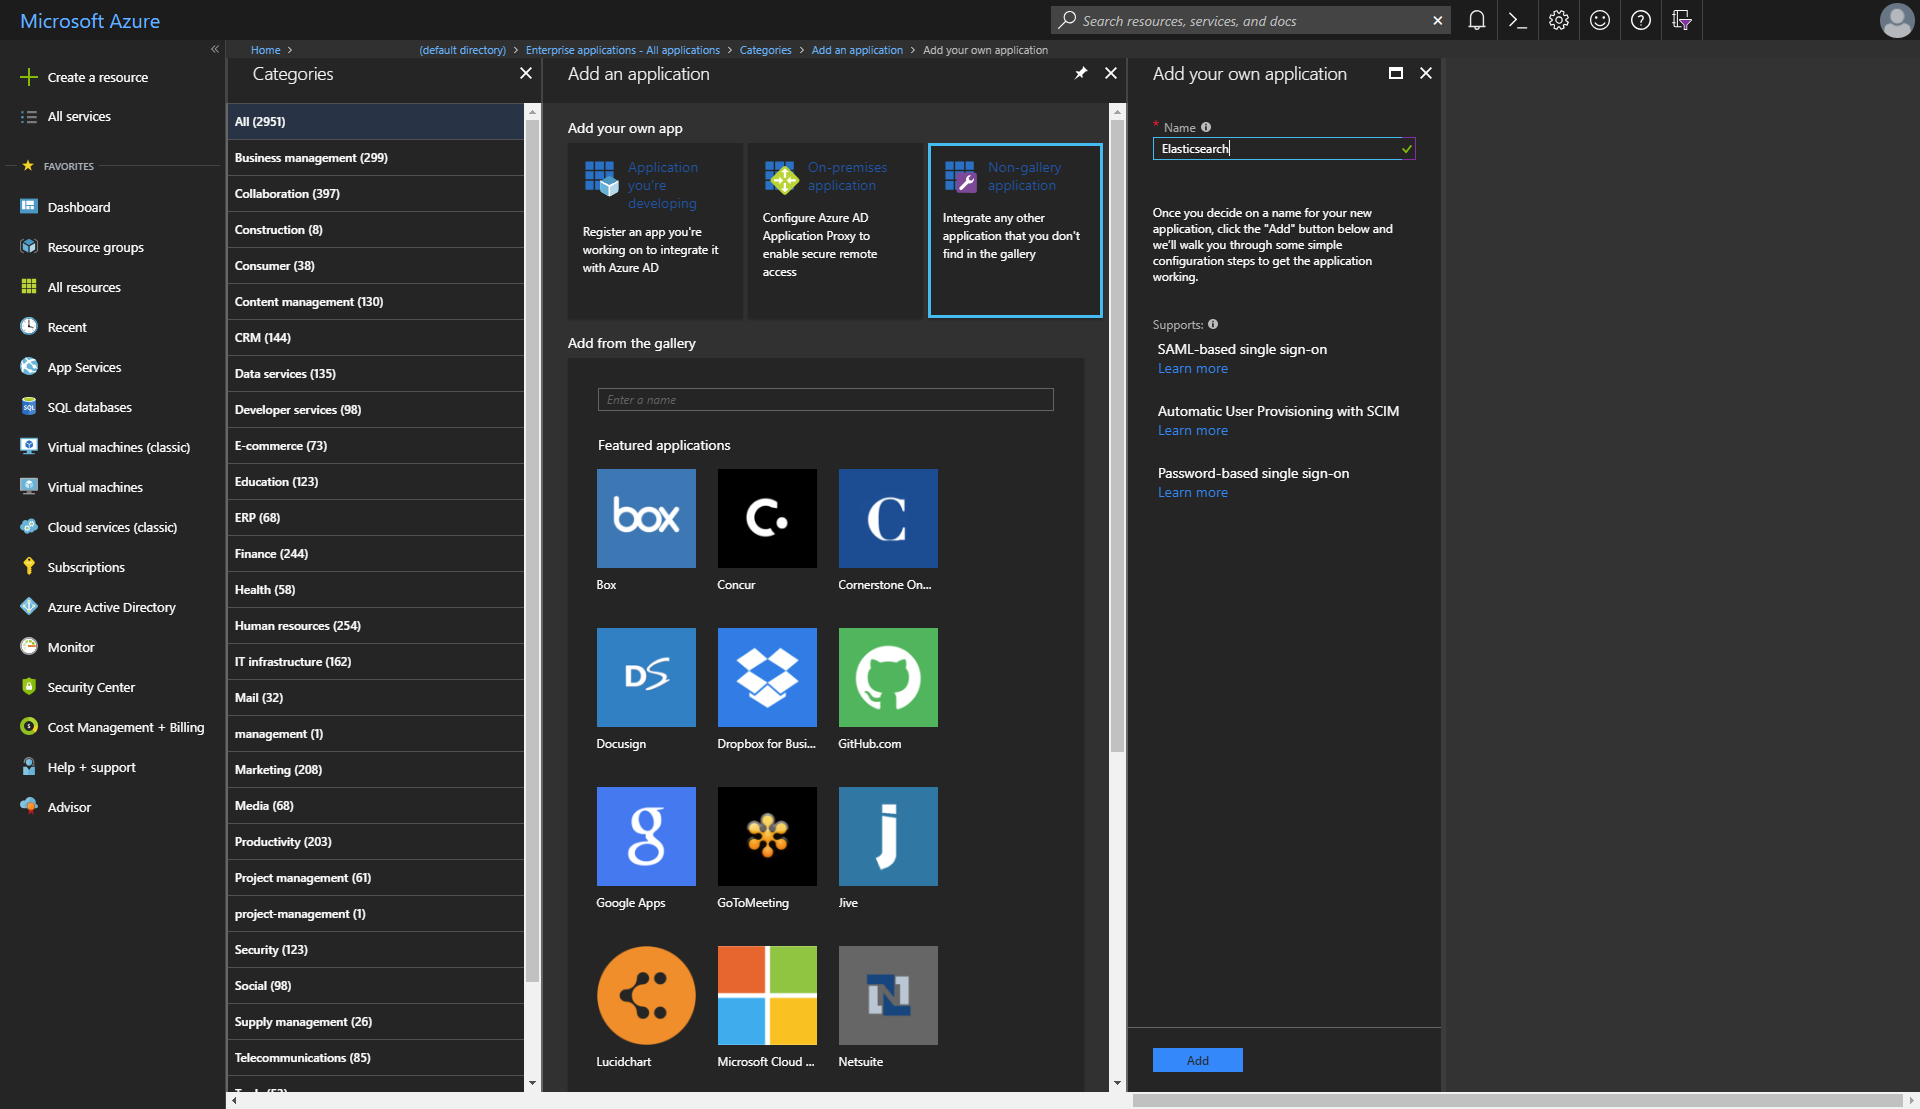
Configure a non-gallery application and give it a name, such as Elasticsearch.
Configure enterprise applicationedit
To configure the enterprise application for SAML SSO, navigate to it in the
AAD blade under Enterprise Applications, and select the Single sign-on navigation item
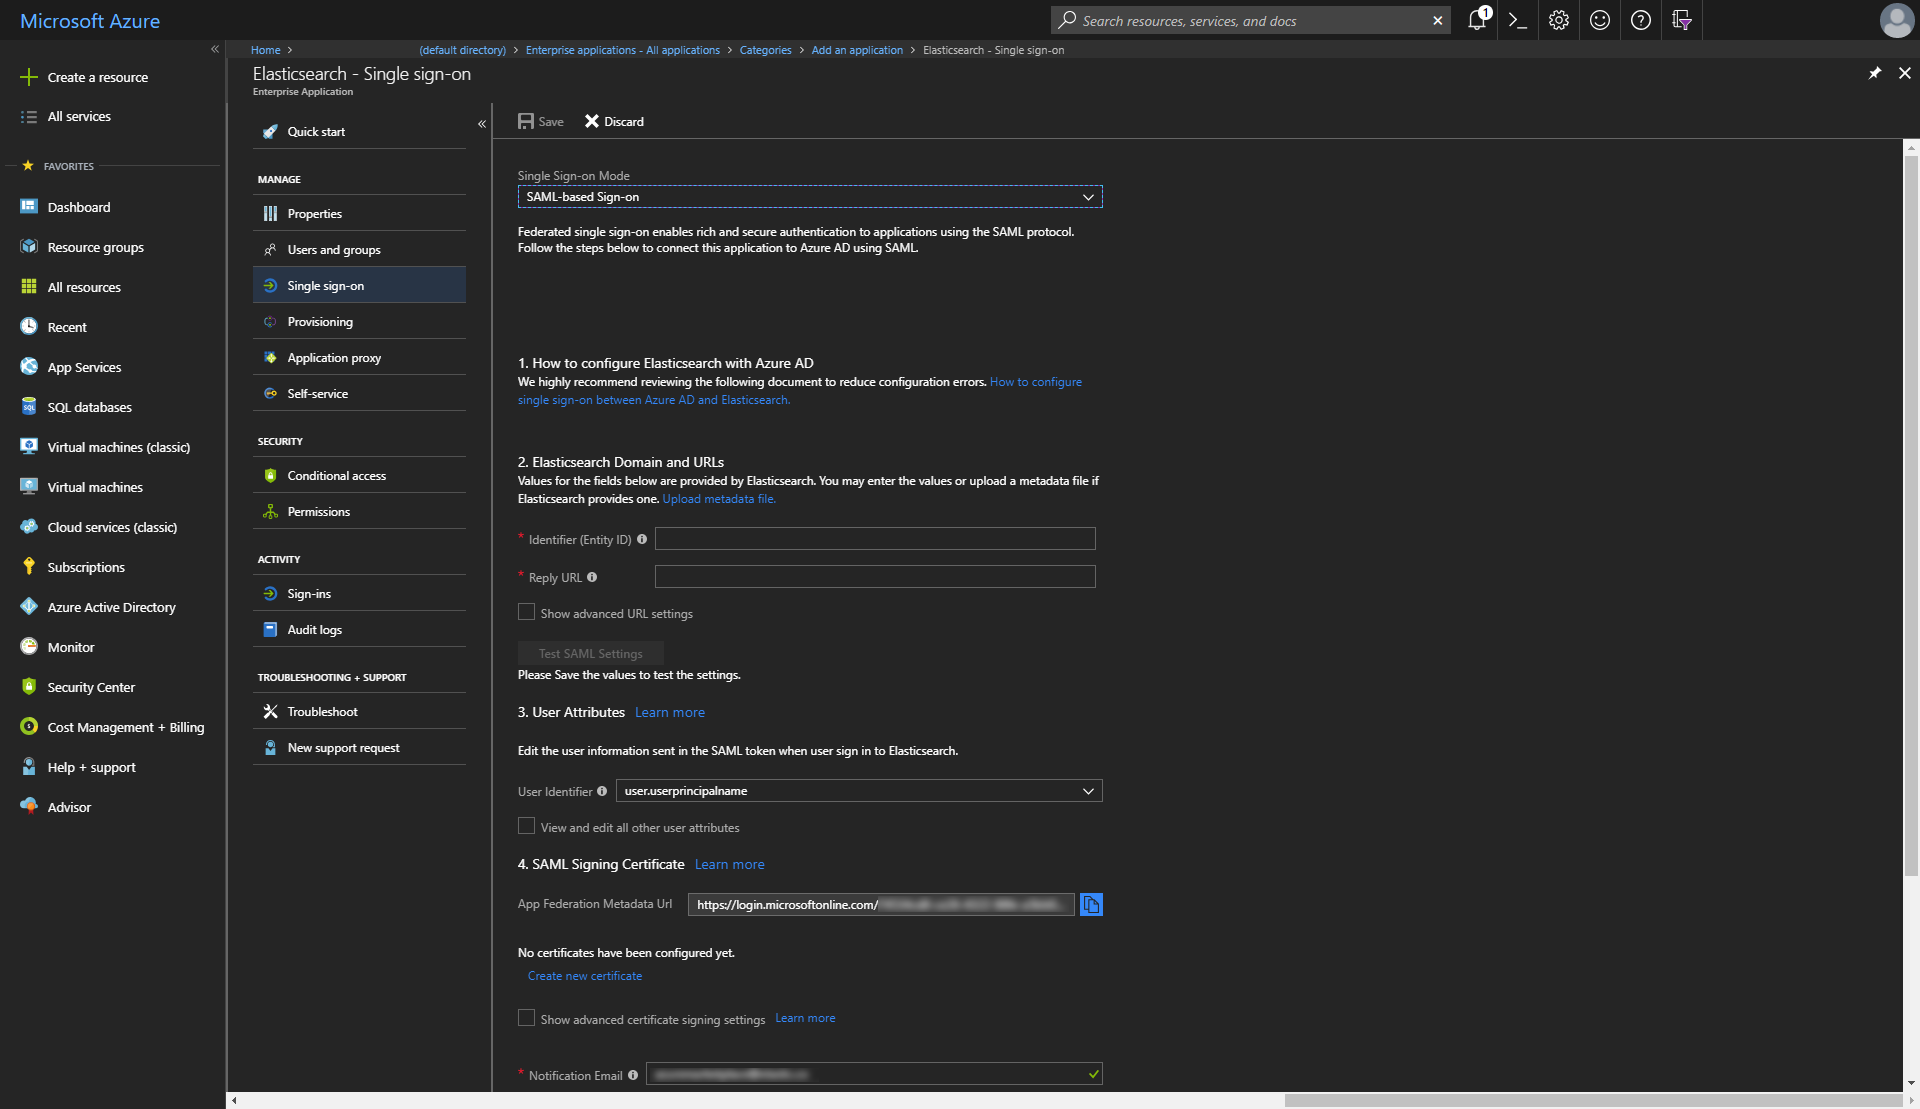
Make a note of the App Federation Metadata Url, as you will need this when deploying Elasticsearch on Azure.
If you will be configuring a CNAME DNS record entry for Kibana, configure the
Identifier (EntityID) input with the domain that you’ll be using. For example,
if setting up a CNAME of saml-aad on the elastic.co domain to point to Kibana, the value would be \https://saml-aad.elastic.co:5601 for Identifier (EntityID).
Additionally, the Reply URL input would be \https://saml-aad.elastic.co:5601/api/security/v1/saml. If you will not be configuring
a CNAME, simply leave these blank for now.
SAML token attributesedit
The User Attributes section lists the attributes that will be returned in a SAML token upon successful authentication
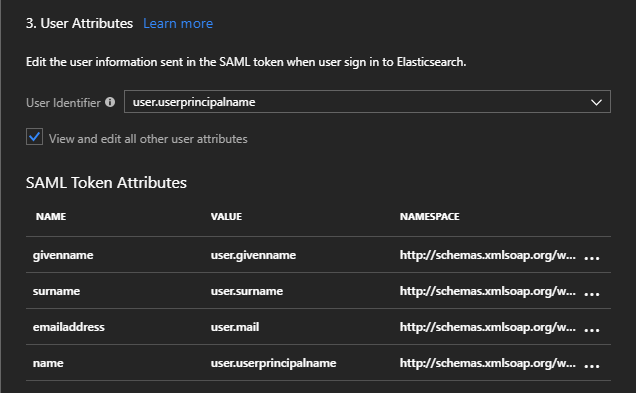
You can add here any additional attributes that you wish to be included as claims in the SAML token returned after successful authentication.
Application manifestedit
When an Enterprise application is first created, an Application Manifest
is also created that controls the application’s identity configuration with
respect to AAD. Amongst other things, the app manifest specifies which roles can
be declared for the Enterprise application, in the appRoles array.
To view the appRoles, navigate to the App registrations menu item within the
Azure Active Directory blade, select the Enterprise application in question, and click the Manifest button
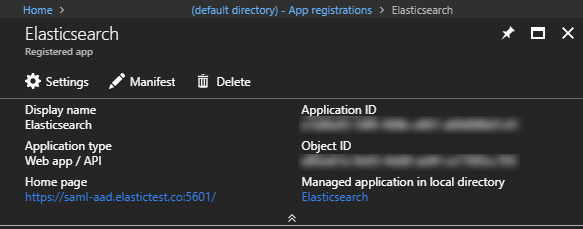
The manifest is a JSON object that will look similar to
{
  "appId": "<guid>",
  "appRoles": [
    {
      "allowedMemberTypes": [
        "User"
      ],
      "displayName": "User",
      "id": "<guid>",
      "isEnabled": true,
      "description": "User",
      "value": null
    },
    {
      "allowedMemberTypes": [
        "User"
      ],
      "displayName": "msiam_access",
      "id": "<guid>",
      "isEnabled": true,
      "description": "msiam_access",
      "value": null
    }
  ],
  ... etc.
}
Add role objects to the appRoles array for the roles that you wish to be able to assign
users within AAD to. A recommendation here is to add the built-in roles available within
Elasticsearch, for example, the superuser role, etc. Each role needs a unique identifer and can be given a description
{
  "appId": "<guid>",
  "appRoles": [
    {
      "allowedMemberTypes": [
        "User"
      ],
      "displayName": "Superuser",
      "id": "18d14569-c3bd-439b-9a66-3a2aee01d14d",
      "isEnabled": true,
      "description": "Superuser with administrator access",
      "value": "superuser"
    },
    ... other roles
  ],
  ... etc.
After adding the necessary roles, save the manifest.
Assign users and groups to Enterprise applicationedit
Now that the Enterprise application roles are configured, users and groups within AAD can be granted access to the Enterprise application and be assigned one of the application roles

Configuring Elasticsearch for SAML SSOedit
With Azure Active Directory configured, the following parameters can be used to configure Elasticsearch for SAML SSO
-
samlMetadataUri - the URI from which the metadata for the Identity Provider can be retrieved. Use the App Federation Metadata Url of the Enterprise application created in Azure.
-
samlServiceProviderUri -
An optional URI of the Service Provider. This will be the valuesupplied for the Identifier (EntityID) field, when using a
CNAMEDNS record entry to point to the instance of Kibana deployed.If not specified, the value used will be the fully qualified domain name of the public IP address assigned to the deployed Kibana instance.
For a production environment, it’s strongly recommended to also configure SSL/TLS for communication with Kibana using kibanaCertBlob and kibanaKeyBlob parameters. Consult the Transport Layer Security section for further details on configuring SSL/TLS for Elasticsearch and Kibana.
An example of a minimum deployment is
Azure CLI 2.0.
template_version=7.3.1
template_base_uri="https://raw.githubusercontent.com/elastic/azure-marketplace/$template_version/src/"

# certificates for SSL/TLS
http_cert=$(base64 /mnt/c/http.p12)
kibana_cert=$(base64 /mnt/c/kibana.crt)
kibana_key=$(base64 /mnt/c/kibana.key)

resource_group="<resource group>"
location="<location>"

# App Federation Metadata Url of the Enterprise application
metadata_uri="https://login.microsoftonline.com/<guid>/federationmetadata/2007-06/federationmetadata.xml?appid=<guid>"

az group create --name $resource_group --location $location

az group deployment create \
    --resource-group $resource_group \
    --template-uri $template_base_uri/mainTemplate.json \
    --parameters _artifactsLocation=$template_base_uri \
        esClusterName=elasticsearch \
        esHttpCertBlob=$http_cert \
        adminUsername=russ \
        authenticationType=password \
        adminPassword=Password1234 \
        securityBootstrapPassword=BootstrapPassword123 \
        securityAdminPassword=AdminPassword123 \
        securityKibanaPassword=KibanaPassword123 \
        securityLogstashPassword=LogstashPassword123 \
        securityBeatsPassword=BeatsPassword123 \
        securityApmPassword=ApmPassword123 \
        securityRemoteMonitoringPassword=RemoteMonitoringPassword123 \
        kibanaCertBlob=$kibana_cert \
        kibanaKeyBlob=$kibana_key \
        samlMetadataUri=$metadata_uri
Azure PowerShell.
$templateVersion = "7.3.1"
$templateBaseUri = "https://raw.githubusercontent.com/elastic/azure-marketplace/$templateVersion/src/"

# certificates for SSL/TLS
$httpCert = [Convert]::ToBase64String([IO.File]::ReadAllBytes("C:\http-cert.pfx"))
$kibanaCert = [Convert]::ToBase64String([IO.File]::ReadAllBytes("C:\kibana.crt"))
$kibanaKey = [Convert]::ToBase64String([IO.File]::ReadAllBytes("C:\kibana.key"))

$resourceGroup = "<resource group>"
$location = "<location>"

# App Federation Metadata Url of the Enterprise application
$metadataUri="https://login.microsoftonline.com/<guid>/federationmetadata/2007-06/federationmetadata.xml?appid=<guid>"

$parameters = @{
    "_artifactsLocation"= $templateBaseUri
    "esClusterName" = "elasticsearch"
    "esHttpCertBlob" = $httpCert
    "adminUsername" = "russ"
    "authenticationType" = "password"
    "adminPassword" = "Password1234"
    "securityBootstrapPassword" = "BootstrapPassword123"
    "securityAdminPassword" = "AdminPassword123"
    "securityKibanaPassword" = "KibanaPassword123"
    "securityLogstashPassword" = "LogstashPassword123"
    "securityBeatsPassword" = "BeatsPassword123"
    "securityApmPassword" = "ApmPassword123"
    "securityRemoteMonitoringPassword" = "RemoteMonitoringPassword123"
    "kibanaCertBlob" = $kibanaCert
    "kibanaKeyBlob" = $kibanaKey
    "samlMetadataUri" = $metadataUri
}

New-AzureRmResourceGroup -Name $resourceGroup -Location $location

New-AzureRmResourceGroupDeployment -ResourceGroupName $resourceGroup `
  -TemplateUri "$templateBaseUri/mainTemplate.json" `
  -TemplateParameterObject $parameters
After cluster deployment, if you didn’t provide a value for the samlServiceProviderUri,
copy the kibana output and paste this value into the
Identifier (EntityID) field for the Enterprise application within AAD. Also paste this value into the Reply URL field, followed by /api/security/v1/saml.
Role mappingsedit
With the cluster deployed, the Role Mapping APIs are used to configure rules to define how roles received in the SAML token map to roles within Elasticsearch. A SAML realm called saml_aad is configured when samlMetadataUri parameter is provided, and maps the SAML role claim to the groups attribute.
Since SAML SSO integration also configures Basic Authentication access, role mappings
can be added using the elastic superuser account. The role mappings that you define will vary depending on the roles that you defined in the appRoles array in the Enterprise Application Manifest, but as two examples to demonstrate
PUT /_xpack/security/role_mapping/saml-kibana-user
{
  "roles": [ "kibana_user" ],
  "enabled": true,
  "rules": {
    "field": { "realm.name": "saml_aad" }
  }
}
will give the kibana_user role to any user authenticated through the saml_aad SAML
realm, and
PUT /_xpack/security/role_mapping/saml-superuser
{
  "roles": [ "superuser" ],
  "enabled": true,
  "rules": {
    "all": [
      { "field": { "realm.name": "saml_aad" } },
      { "field": { "groups": "superuser" } }
    ]
  }
}
|
The SAML realm configured by the ARM template |
|
|
The |
Transport Layer Securityedit
It is strongly recommended that you secure communication when using the template in production. Elastic Stack Security can provide Authentication and Role Based Access control, and Transport Layer Security (TLS) can be configured for both Elasticsearch and Kibana.
HTTP layeredit
You can secure HTTP communication to the cluster with TLS on the HTTP layer of Elasticsearch. You would typically want to do this when also deploying an external loadbalancer or Application Gateway, but you can also do this when deploying only Kibana, to secure internal traffic between Kibana and Elasticsearch through the internal load balancer.
Configuring TLS for the HTTP layer requires xPackPlugins be set to Yes for 5.x versions,
6.x versions less than 6.8.0 and 7.x versions less than 7.1.0. With xPackPlugins set to Yes, a trial
license will be applied to the cluster, which allows TLS to be configured on these versions.
The following parameters can be used
-
esHttpCertBlob - A base 64 encoded string of the PKCS#12 archive containing the certificate and key with which to secure the HTTP layer. This certificate will be used by all nodes within the cluster.
-
esHttpCertPassword -
Optional passphrase for the PKCS#12 archive encoded in
esHttpCertBlob. Defaults to empty string as the archive may not be protected.
Typically, esHttpCertBlob parameter would be used with
a certificate associated with a domain configured with
a CNAME DNS record pointing to the public domain name
or IP address of the external load balancer or Application
Gateway.
As an alternative to esHttpCertBlob and esHttpCertPassword, the following parameters can be used
-
esHttpCaCertBlob - A base 64 encoded string of the PKCS#12 archive containing the Certificate Authority (CA) certificate and key with which to generate a certificate for each node within the cluster for securing the HTTP layer. Each generated certificate contains a Subject Alternative Name DNS entry with the hostname, an ipAddress entry with the private IP address, and an ipAddress entry with the private IP address of the internal load balancer. The latter allows Kibana to communicate with the cluster through the internal load balancer with full verification.
-
esHttpCaCertPassword -
Optional passphrase for the PKCS#12 archive encoded in
esHttpCaCertBlob. Defaults to empty string as the archive may not be protected.
When using Application Gateway for the loadBalancerType, you can only use esHttpCertBlob parameter (and optional esHttpCertPassword). SSL/TLS to Application Gateway is secured using appGatewayCertBlob parameter as described in Application Gateway section, with Application Gateway performing
SSL offload/termination.
End-to-end encryption when also configuring TLS on the HTTP layer requires passing the public certificate from the PKCS#12 archive passed in the esHttpCertBlob parameter as the value of the appGatewayEsHttpCertBlob parameter.
This allows Application Gateway to whitelist the certificate used by VMs in the backend pool.
The certificate can be extracted from the PKCS#12 archive using openssl, for example
openssl pkcs12 -in http_cert.p12 -out http_public_cert.cer -nokeys
The certificate to secure the HTTP layer must include a Subject Alternative Name with a DNS entry that matches the Subject CN, to work with Application Gateway’s whitelisting mechanism.
Transport layeredit
You can secure communication between nodes in the cluster with TLS on the Transport layer of Elasticsearch.
Configuring TLS for the Transport layer requires xPackPlugins be set to Yes for 5.x versions,
6.x versions less than 6.8.0 and 7.x versions less than 7.1.0. With xPackPlugins set to Yes, a trial
license will be applied to the cluster, which allows TLS to be configured on these versions.
The following parameters can be used
-
esTransportCaCertBlob - A base 64 encoded string of the PKCS#12 archive containing the Certificate Authority (CA) certificate and private key, used to generate a unique certificate for each node within the cluster. Each generated certificate contains a Subject Alternative Name DNS entry with the hostname and an ipAddress entry with the private IP address.
-
esTransportCaCertPassword -
Optional passphrase for the PKCS#12 archive encoded in
esTransportCaCertBlob. Defaults to empty string as the archive may not be protected. -
esTransportCertPassword -
Optional passphrase for each PKCS#12 archive generated by the CA certificate supplied in
esTransportCaCertBlob.
One way to generate a PKCS#12 archive containing a CA certificate and key is using Elastic’s certutil command utility.
Kibanaedit
You can secure communication between the browser and Kibana with TLS with the following parameters
-
kibanaCertBlob - A base 64 encoded string of the PEM certificate used to secure communication between the browser and Kibana.
-
kibanaKeyBlob - A base 64 encoded string of the private key for the certificate, used to secure communication between the browser and Kibana.
-
kibanaKeyPassphrase -
Optional passphrase for the private key encoded in
kibanaKeyBlob. Defaults to empty string as the private key may not be protected.
Passing certificates and archivesedit
All certificates and PKCS#12 archives must be passed as base 64 encoded string values. A base 64 encoded value can be obtained using
-
base64 on Linux, or openssl on Linux and MacOS
Using base64.
httpCert=$(base64 http-cert.p12)
Using openssl.
httpCert=$(openssl base64 -in http-cert.p12)
PEM certificates are already base 64 encoded. Irrespective, you should still base 64 encode PEM certificates; all certificates and PKCS#12 archives are expected to be base 64 encoded, to keep template usage simple i.e. if a parameter contains a certificate or archive, base 64 encode it.
-
using PowerShell on Windows
Using PowerShell.
$httpCert = [Convert]::ToBase64String([IO.File]::ReadAllBytes("c:\http-cert.p12"))