- Elastic Cloud Enterprise - Elastic Cloud on your Infrastructure: other versions:
- What Is Elastic Cloud Enterprise?
- Getting Started
- Configuring Your Installation
- Securing Your Installation
- Monitoring Your Installation
- Administering Your Installation
- Getting Started with Deployments
- Administering Deployments
- Change Your Deployment Configuration
- Stop Routing Requests or Pause Nodes
- Stop a Deployment
- Restart a Deployment
- Delete a Deployment
- Work with Snapshots
- Access the Elasticsearch API
- Upgrade Versions
- Editing Your User Settings
- Configure Beats and Logstash with Cloud ID
- Keep Your Clusters Healthy
- Secure Your Clusters
- Manage Your Kibana Instance
- Enable Monitoring (formerly Marvel)
- Enable Graph (Versions before 5.0)
- Connect to Your Cluster
- Troubleshooting
- RESTful API
- Using the API
- API examples
- A first API call: What deployments are there?
- Create a first deployment: Just an Elasticsearch cluster
- Applying a new plan: Resize and add high availability
- Applying a new plan: Checking on progress
- Applying a new deployment configuration: Upgrade
- Enable more stack features: Add Kibana to a deployment
- Dipping a toe into platform automation: Generate a roles token
- Customize your deployment
- Remove unwanted deployment templates and instance configurations
- API reference
- Authentication
- Clusters - Elasticsearch - CRUD
- Clusters - Elasticsearch - CRUD - Configuration
- Get cluster curation settings
- Update cluster curation settings
- Set settings overrides (all instances)
- Set settings overrides
- Set cluster name
- Get cluster metadata
- Set cluster metadata
- Get cluster metadata settings
- Update cluster metadata settings
- Cancel monitoring
- Set monitoring
- Get plan
- Update plan
- Get plan activity
- Cancel pending plan
- Get pending plan
- Set legacy security settings
- Get cluster snapshot settings
- Update cluster snapshot settings
- Clusters - Elasticsearch - Commands
- Search clusters
- Restart cluster
- Resynchronize cluster
- Shut down cluster
- Immediately create a new cluster snapshot
- Move instances (advanced)
- Start all instances
- Stop all instances
- Start maintenance mode all instances
- Stop maintenance mode all instances
- Move instances
- Start instances
- Stop instances
- Start maintenance mode
- Stop maintenance mode
- Clusters - Elasticsearch - Support
- Clusters - Kibana - CRUD
- Clusters - Kibana - CRUD - Configuration
- Clusters - Kibana - Commands
- Search clusters
- Restart cluster
- Resynchronize cluster
- Shut down cluster
- Upgrade cluster
- Move instances (advanced)
- Start all instances
- Stop all instances
- Start maintenance mode all instances
- Stop maintenance mode all instances
- Move instances
- Start instances
- Stop instances
- Start maintenance mode
- Stop maintenance mode
- Deployments - Notes
- Platform
- Platform - Allocators
- Get allocators
- Search allocators
- Delete allocator
- Get allocator
- Resynchronize allocator
- Move clusters
- Move clusters by type
- Start maintenance mode
- Stop maintenance mode
- Get allocator metadata
- Set allocator metadata
- Delete allocator metadata item
- Set allocator metadata item
- Get allocator settings
- Update allocator settings
- Set allocator settings
- Platform - Configuration - Instances - CRUD
- Platform - Configuration - Security
- Platform - Configuration - TLS
- Platform - Constructors
- Platform - License
- Platform - Repository - CRUD
- Platform - Runners
- Stack - Instance Types - CRUD
- Stack - Versions - CRUD
- Templates - Deployments
- Definitions
AllocatedInstanceStatusAllocatorCapacityAllocatorCapacityMemoryAllocatorHealthStatusAllocatorInfoAllocatorMoveRequestAllocatorOverviewAllocatorSettingsAllocatorZoneInfoApmPlanControlConfigurationBasicFailedReplyBasicFailedReplyElementBoolQueryCapacityConstraintsResourceChangeSourceInfoClusterCommandResponseClusterCredentialsClusterCrudResponseClusterCurationSettingsClusterCurationSpecClusterInstanceConfigurationInfoClusterInstanceDiskInfoClusterInstanceInfoClusterInstanceMemoryInfoClusterLicenseInfoClusterMetadataCpuResourcesSettingsClusterMetadataInfoClusterMetadataResourcesSettingsClusterMetadataSettingsClusterPlanStepInfoClusterPlanStepLogMessageInfoClusterSnapshotRepositoryDefaultClusterSnapshotRepositoryInfoClusterSnapshotRepositoryReferenceClusterSnapshotRepositoryStaticClusterSnapshotRequestClusterSnapshotResponseClusterSnapshotSettingsClusterSystemAlertClusterTopologyInfoClusterUpgradeInfoCompatibleNodeTypesResourceCompatibleVersionResourceConstructorHealthStatusConstructorInfoConstructorOverviewCreateElasticsearchClusterRequestCreateKibanaInCreateElasticsearchRequestCreateKibanaRequestDeploymentTemplateInfoDeploymentTemplateReferenceDiscreteSizesElasticsearchClusterBlockingIssueElementElasticsearchClusterBlockingIssuesElasticsearchClusterInfoElasticsearchClusterInstanceSettingsOverridesElasticsearchClusterPlanElasticsearchClusterPlanInfoElasticsearchClusterPlansInfoElasticsearchClusterRoleElasticsearchClusterSecurityInfoElasticsearchClusterSettingsElasticsearchClusterTopologyElementElasticsearchClusterUserElasticsearchClustersInfoElasticsearchConfigurationElasticsearchCurationElasticsearchInfoElasticsearchMasterElementElasticsearchMasterInfoElasticsearchMonitoringInfoElasticsearchNodeTypeElasticsearchPlanControlConfigurationElasticsearchReplicaElementElasticsearchScriptTypeSettingsElasticsearchScriptingUserSettingsElasticsearchShardElementElasticsearchShardsInfoElasticsearchSystemSettingsElasticsearchUserBundleElasticsearchUserPluginElevatePermissionsRequestEmptyResponseEnrollmentTokenRequestExistsQueryExternalHyperlinkGrowShrinkStrategyConfigHyperlinkIdResponseInstanceConfigurationInstanceMoveRequestInstanceTypeResourceKibanaClusterInfoKibanaClusterPlanKibanaClusterPlanInfoKibanaClusterPlansInfoKibanaClusterTopologyElementKibanaClustersInfoKibanaConfigurationKibanaPlanControlConfigurationKibanaSubClusterInfoKibanaSystemSettingsLegacySecuritySettingsLicenseInfoLicenseObjectListEnrollmentTokenElementListEnrollmentTokenReplyLoginRequestLoginStateManagedMonitoringSettingsMatchQueryMetadataItemMetadataItemValueMetadataItemsMoveApmClusterConfigurationMoveApmClusterDetailsMoveClustersCommandResponseMoveClustersDetailsMoveClustersRequestMoveElasticsearchClusterConfigurationMoveElasticsearchClusterDetailsMoveKibanaClusterConfigurationMoveKibanaClusterDetailsNestedQueryNodeTypeResourceNoteNotesPlanStrategyPlatformInfoPlatformServiceImageInfoPlatformServiceInfoPrefixQueryQueryContainerQueryStringQueryRangeQueryRepositoryConfigRepositoryConfigsRequestEnrollmentTokenReplyRestoreSnapshotApiConfigurationRestoreSnapshotConfigurationRestoreSnapshotRepoConfigurationRollingGrowShrinkStrategyConfigRollingStrategyConfigRunnerContainerInfoRunnerInfoRunnerOverviewRunnerRoleInfoRunnerRolesInfoSearchRequestSnapshotRepositoryConfigurationSnapshotStatusInfoStackVersionApmConfigStackVersionArchiveProcessingErrorStackVersionArchiveProcessingResultStackVersionConfigStackVersionConfigPostStackVersionConfigsStackVersionElasticsearchConfigStackVersionInstanceCapacityConstraintStackVersionKibanaConfigStackVersionMetadataStackVersionNodeTypeStackVersionTemplateFileHashStackVersionTemplateInfoTargetElasticsearchClusterTermQueryTiebreakerTopologyElementTlsPublicCertChainTokenResponseTopologySizeTransientApmPlanConfigurationTransientElasticsearchPlanConfigurationTransientKibanaPlanConfiguration
- Script Reference
- Release notes
- Elastic Cloud Enterprise 2.0.1
- Elastic Cloud Enterprise 2.0.0
- Elastic Cloud Enterprise 1.1.5
- Elastic Cloud Enterprise 1.1.4
- Elastic Cloud Enterprise 1.1.3
- Elastic Cloud Enterprise 1.1.2
- Elastic Cloud Enterprise 1.1.1
- Elastic Cloud Enterprise 1.1.0
- Elastic Cloud Enterprise 1.0.2
- Elastic Cloud Enterprise 1.0.1
- Elastic Cloud Enterprise 1.0.0
- About This Product
It is time to say goodbye: This version of Elastic Cloud Enterprise has reached end-of-life (EOL) and is no longer supported.
The documentation for this version is no longer being maintained. If you are running this version, we strongly advise you to upgrade. For the latest information, see the current release documentation.
Tag Your Allocators
editTag Your Allocators
editYou tag allocators to indicate what kind of hardware you have available. These tags matter, because they enable instance configurations to filter on allocators where components of the Elastic Stack should get deployed. Without tags, instance configurations will allow Elastic Stack components to get deployed wherever there is space on allocators. With tags, instance configurations can filter out those allocators that are best suited to deploy specific components of the Elastic Stack and make sure they get deployed there.
Allocator tags are a simple way of characterizing the hardware resources that you have in your ECE installation, such as:
- CPU (compute)
- Memory
- Storage
- I/O
You should tag your allocators under the following circumstances:
- After you upgrade to or install Elastic Cloud Enterprise 2.0 or later, to characterize what kind of hardware you have available in your installation.
- Before you create your own instance configurations and your own deployment templates, to indicate what hardware resources you can work with.
- After you add new allocators to your installation, to indicate what kind of hardware resources they provide.
You can also delete tags, if you have no more use for them. Keep in mind that removing tags from allocators can in turn affect what allocators get matched. Removing a tag might prompt ECE to move instances of the Elastic Stack to other allocators.
Before You Begin
editYour tags should characterize what kind of hardware you have available. As you start developing your own tags, keep in mind that simpler is often better and that the tags you use will likely evolve over time. The main purpose of tagging is to go from this is an allocator, which doesn’t tell you anything about the allocator’s hardware resources, to this is an allocator with better CPU resources or this allocator provides a large amount of spindle-based storage.
Tags are simple key-value pairs. A small sampling of tags that you could use include:
-
SSD: true,SSD: false,highstorage: true -
Indicates if you have fast SSD storage for incoming data (
SSD: true) or spindle-based storage that can store larger volumes of less frequently queried data (SSD: falseorhighstorage: true). -
highCPU: true - Indicates allocators that can run CPU-intensive workloads faster than others.
-
instanceFamily: i3,instanceFamily: m5 - Indicates the host type, used extensively on our hosted Elasticsearch Service to identify hosts with specific hardware characteristics. If you run your own hardware on-premise and have standardized on several specific host configurations, you could use similar tags. If you are deploying ECE on another cloud platform, you could use the instance type or machine type names from your provider.
Avoid tags that describe a particular use case or an Elastic Stack component you plan to run on these allocators. Examples of tags to avoid include elasticsearch: false or kibana: true. You should define the intended use at the level of instance configurations instead and tag your allocators only to describe hardware characteristics.
If you have an allocator that meets several criteria, such as an allocator with multi-purpose hardware, consider assigning it a single tag that identifies its multipurpose view, such as the instanceFamily: i3 example mentioned earlier. While it is not wrong to assign multiple tags to an allocator, filtering on the allocator when you create or edit instance configurations will be simpler with a single tag.
Steps
editTo tag allocators in the Cloud UI:
- Log into the Cloud UI.
- From the Platform menu, select Allocators.
- Select one of the allocators and locate the Tags section.
-
Enter values into the Key and Value fields, and then click Add tag. For example: You could add
SSD: trueandhighCPU: truetags from our example tags if your allocator meets these criteria.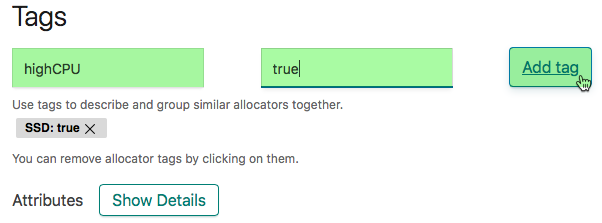
- Repeat the previous step until you have added all of the tags that you want to use to characterize the hardware of this allocator.
- Repeat the previous steps for your other allocators until you have tagged all of them.
To tag an allocator through the RESTful API:
-
Get a list of the allocators in your ECE installation:
curl -k -X GET -u USER:PASSWORD https://COORDINATOR_HOST:12443/api/v1/platform/infrastructure/allocators/
The user must have sufficient privileges, such as the
adminuser. -
Check what tags have already been assigned to your allocators. In a new or newly upgraded ECE installation, this command returns
[], which means that you have not assigned any tags, yet.curl -k -X GET -u USER:PASSWORD https://COORDINATOR_HOST:12443/api/v1/platform/infrastructure/allocators/ALLOCATOR_ID/metadata
-
ALLOCATOR_ID -
The value of the
allocator_idfield for one of your allocators as returned by the/api/v1/platform/infrastructure/allocators/API endpoint.The examples in this section all use HTTPS over port 12443 and run against a host that holds the coordinator role. Using HTTPS requires that you have a TLS certificate already installed. For testing purposes only, you can specify the
-koption to turn off certificate verification, as shown in our examples, or use HTTP over port 12400 until you get your TLS certificate sorted out.
-
-
Tag an allocator by assigning it the tags that you might need.
-
Example: To assign a single
highCPU: truetag to an allocator:curl -k -X PUT -u USER:PASSWORD https://COORDINATOR_HOST:12443/api/v1/platform/infrastructure/allocators/ALLOCATOR_ID/metadata/highCPU -H 'content-type: application/json' -d '{ "value": "true" }' [{ "key": "highCPU", "value": "true" }]
After the API call completes successfully, ECE returns JSON output to show that the operation was successful.
-
Example: To assign multiple tags to an allocator with a single command:
curl -k -X PUT -u USER:PASSWORD https://COORDINATOR_HOST:12443/api/v1/platform/infrastructure/allocators/ALLOCATOR_ID/metadata -H 'content-type: application/json' -d '
{
  "items": [
    {
      "key": "highCPU",
      "value": "true"
    },
    {
      "key": "SSD",
      "value": "true"
    }
  ]
}'
When you assign multiple tags to an allocator as shown, any tags you assigned previously get replaced. That is, existing tags are not preserved and they do not get merged with new tags. If in doubt, <<[check-allocator-tag,check which tags have already been assigned>> and make sure you include those tags that you want to keep along with new tags.
-
- Repeat the previous step for your other allocators until you have tagged all of them.
On this page