From vector search to powerful REST APIs, Elasticsearch offers developers the most extensive search toolkit. Dive into our sample notebooks in the Elasticsearch Labs repo to try something new. You can also start your free trial or run Elasticsearch locally today.
In this article we'll take a look at the Elasticsearch-DSL client for Python, with a focus on how it simplifies the task of building a vector search solution.
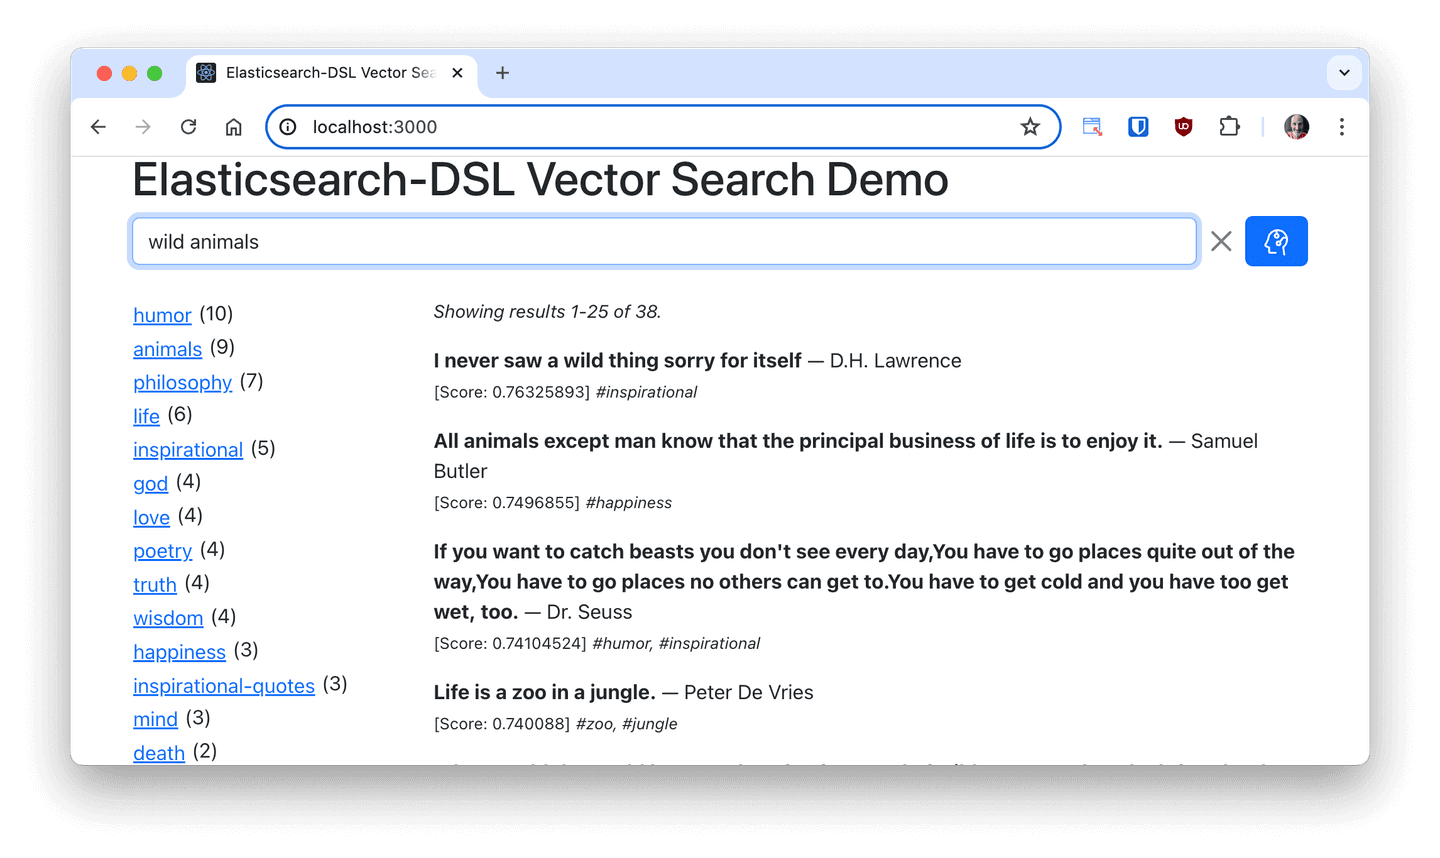
The code that accompanies this article implements a database of famous quotes. It includes a back end written in Python with the FastAPI web framework, and a front end written in TypeScript and React. Regarding vector search, this application demonstrates how to:
- run a local Elasticsearch service using Docker,
- bulk-ingest a large number of documents efficiently,
- generate vector embeddings for documents as they are ingested,
- leverage the power of a GPU to accelerate the generation of vector embeddings through parallelization,
- run vector search queries using the approximate kNN algorithm,
- aggregate results from vector search,
- compare vector search results against those resulting from a standard match (BM25) query.
Below you can see a screenshot of the application. In this article you will find a detailed explanation of how the ingest and search features work. You then have the option to install and run the code on your own computer to experiment and learn!
What is the Elasticsearch-DSL client for Python?
Sometimes called the "high-level" Python client, Elasticsearch-DSL offers idiomatic (or "Pythonic") access to your Elasticsearch database, in contrast with the official (or "low-level") Python client, which provides direct access to the complete range of Elasticsearch features and endpoints.
When using Elasticsearch-DSL, the structure (or "mappings") of Elasticsearch indices are defined as classes, with a syntax that is similar to that of Python dataclasses. The documents stored in these indices are represented by instances of these classes. All the transformations that are necessary to map between Python objects and Elasticsearch documents are automatically and transparently carried out, resulting in application code that is simple and idiomatic.
To add Elasticsearch-DSL to your Python project, you can install it with pip:
If your project is asynchronous, then there are additional dependencies that need to be installed, so in that case use the following command instead:
Index definition
As stated above, with Elasticsearch-DSL the structure of an Elasticsearch index is defined as a Python class. The example application featured in this article uses a dataset of famous quotes that have the following fields:
quote: the text of the quote, as a stringauthor: the name of the author, as a stringtags: a list of tag names that apply to the quote, each a string
As part of this application we are going to add one additional field, the vector embedding that we will use to search for quotes:
embedding: a list of floating point numbers representing a vector embedding for the quote
Let's write an initial document class to describe our famous quotes index:
The AsyncDocument class that is used as a base class for our QuoteDoc class implements all the functionality to connect the class to an Elasticsearch index. The choice of an asynchronous document base class was made because this examples uses the FastAPI web framework, which is also asynchronous. For projects that do not use asynchronous Python, the Document base class must be used when declaring document classes.
The name attribute given in the Index inner class defines the name of the Elasticsearch index that will be used with documents of this class.
If you have used Python dataclasses before, you likely find the way fields are defined very familiar, with each field being given a Python type hint. These Python types are mapped to the closest Elasticsearch type, so for example, in the case of str, the corresponding field in the Elasticsearch index will be given the type text, the standard type that is used for text that needs to be indexed for full-text search, while float is mapped to the equally named float on the Elasticsearch side.
While it can be useful to leave the quote field as is so that we can use it for both vector and full-text searches, the author and tags fields do not really need all the extra work associated with full-text search. The best Elasticsearch type for these fields is keyword, which just stores the text, without doing any indexing. Likewise, the embedding field is not just a simple list of floating point numbers, we are going to use it for vector search, which is a behavior associated with the dense_vector type in Elasticsearch.
To assign a type override to a field, we add an assignment with the mapped_field() function, as shown in the improved version of the QuoteDoc class that follows:
As you can see in this updated version, the elasticsearch_dsl package includes classes such as Keyword and DenseVector to represent all the native Elasticsearch field types.
Did you notice the init=False argument given in this new definition of the embedding field? If you are familiar with Python dataclasses you may recognize init as one of the options available in the dataclasses field() function, used to indicate that the given attribute should be omitted from the constructor for instances of the class. The behavior is the same here, which means that when creating an instance of QuoteDoc, this argument should not be given.
How will the vector embeddings be generated if they will not be passed down to the document constructor? Elasticsearch-DSL always calls the clean() method in all documents before serializing them and sending them to Elasticsearch. This method is a convenience entry point where the application can add any custom field processing logic. For example, fields that are optional or auto-generated can be added in this method. Here is the final version of the QuoteDoc document class, including the logic that generates the embeddings:
For this example we are going to use embeddings from a SentenceTransformers model. These embeddings are easy to generate locally and being open source and free they are convenient to use when experimenting. The all-MiniLM-L6-v2 model is a great general purpose embedding model for English text. There are many other models that are also compatible with the SentenceTransformers framework, so feel free to use a different one if you prefer.
The clean() method can be used for more advanced use cases as well. For example, it is common when working with large bodies of text to split the text into smaller chunks, and then generate embeddings for each chunk. Elasticsearch accommodates this use case through nested objects. If you want to see an advanced example that implements this type of solution, check out the vectors example in the Elasticsearch-DSL repository.
Document ingestion
With the structure of the index in place, we can now create the index. This is done with the init() class method:
In many cases it is useful to delete a previously existing index to make sure an ingest process begins from a clean starting point. This can be done using the _index class attribute, which provides access to the Elasticsearch index, along with its exists() and delete() methods:
The example dataset used by the example application is a collection of almost 37,000 famous quotes. It comes as a CSV file with the quote, author and tags columns. The tags are given as a comma-separated string. The dataset is available for download from the example GitHub repository.
To ingest the data contained in this dataset, Python's csv module can be used:
The csv.DictReader class creates a CSV file importer that returns a dictionary for each row in the data file. For each row, we create a QuoteDoc instance and pass the quote, author and tags in the constructor. For the tags, the string that is read from the CSV file has to be split into a list, which is how it will be stored in the Elasticsearch index.
To write a document to the index, the save() method is invoked. This method will call the document's clean() method, which in turn will generate the vector embedding for the quote.
Starting an Elasticsearch instance
Before the above ingest script can be executed, you need to have access to a running instance of Elasticsearch. By far the easiest (and also 100% free) way to do this is with a Docker container.
To start a single-node Elasticsearch service on your computer first make sure you have Docker running, and then execute the following command:
To make sure you are running the latest and greatest version, open the release notes page to find out what is the current version, then replace the version number in the last line of the above command.
The -v option in the command above sets up a mapping between a directory named data in your local system and the data directory in the Elasticsearch container. All the data files used by Elasticsearch will be saved in this directory, so that in case you need to restart your container you do not lose any data. If you prefer to not store the data files in your computer, then you can remove the -v line and the data will be stored ephemerally in the container.
Note that deploying Elasticsearch using this method is only adequate for local experimentation. If you intend to deploy Elasticsearch on a production server, consider using our Elasticsearch on Docker Compose or Elasticsearch on Kubernetes guides.
Connecting to Elasticsearch
The ingestion script needs to know how to connect to Elasticsearch. If you are running a Docker container as demonstrated in the previous section, add the following line between the imports and the definition of the QuoteDoc class:
To complete the script, the ingest_quotes() function should be called. Add the following snippet at the bottom of your source file:
The asyncio.run() function will launch the asynchronous application. If your application is not asynchronous, then you would just call the ingest function directly.
For your convenience, below you can find the complete code for the script up to this point. You can save this file as search.py. You can find an example of this file here.
Create a virtual environment for your project using the tool of your choice, and then install the dependencies on it:
Make sure you have the quotes.csv file in the current directory, and then start the ingest by running the script:
The script does not print anything, so it will run for a while adding the quotes from the CSV file into your Elasticsearch index. The file has about 37,000 quotes, so expect the process to run for several minutes.
Luckily you do not need to wait that long. If you start the script and no error appears, that is confirmation that everything is working. You can press Ctrl-C to stop it and continue reading to learn about ingest performance.
Performance tuning part 1: bulk processing
If your dataset is small, then the above ingest solution will work just fine, and it has the benefit that it is simple to code and easy to understand.
For larger ingest jobs, however, it is necessary to sacrifice code clarity and pay attention to performance, so let's see what optimizations can be done in this application.
First of all, to evaluate performance we need to be able to measure the performance of the existing solution. Below is the updated ingest_quotes() function, which now calls ingest_progress() every 100 ingested documents to show how many documents have been ingested, along with an average document per second.
This version of the ingest is nicer than the previous one because it prints regular status updates. If you let the script run for a while you may see an output similar to the one below:
The data file has close to 37,000 quotes, so now you can have a good idea of how long the ingest will take. Assuming the average of 97 ingested documents per second holds throughout the entire ingest job, it should take less than 7 minutes to ingest the entire dataset. You can press Ctrl-C to stop this ingest process, there is no need to let it run to completion yet.
Elasticsearch offers a very flexible bulk ingest feature, which is made available in the Elasticsearch-DSL package's bulk() method. Instead of saving each document, the entire import loop can be moved into a generator function which is given to the bulk() method as an argument:
Here the get_next_quote() inner generator function yields QuoteDoc instances. The QuoteDoc.bulk() method will run the generator and issue batch updates to Elasticsearch. With this change, you can expect to see a small speed improvement:
For another small improvement, the JSON serializer used by the Elasticsearch client can be changed to the orjson library, which performs better than Python's own:
This should lead to another small performance improvement:
Performance tuning part 2: GPU accelerated embeddings
You have seen in the previous section that we have obtained some modest performance improvements by processing ingest requests in bulk. But while ingestion requests are now being grouped, the embeddings continue to be generated one by one in the clean() method of the QuoteDoc class.
Is there a way to optimize embedding generation? The SentenceTransformers model uses PyTorch, which in turn uses a GPU if one is available. But the embeddings are generated individually, which does not lead to an optimal utilization of the GPU hardware. GPUs are very good at parallelization, so we can reorganize the ingest function to generate embeddings in batches. And once again the price we pay for this comes in increased code complexity.
So we are going to stop using the clean() method to generate document embeddings, and instead we are going to accumulate the QuoteDoc instances in a list, and once we reach a good number we'll generate embeddings for all of them in a single operation.
Let's start by writing a helper function that generates embeddings for a list of QuoteDoc instances:
Note how now the model.encode() method is given a list of quotes to embed instead of a single one. When the input argument is a list, the model generates an embedding for each list element. The method accepts an optional batch_size argument (not used in the example above) that defaults to 32 that can be used to control the size of each batch of samples that are sent to the model for computation. Depending on the GPU hardware you may find that different values of this argument help tune performance to the best possible. Once the embeddings are generated, they are assigned to each quote using a for-loop.
Now the ingest function can be refactored to accumulate quotes and use the helper function to generate embeddings:
In this version of ingest_quotes(), each QuoteDoc instance is added to the quotes list, and when 512 elements have accumulated the embed_quotes() function added above is used to generate the embeddings more efficiently. Once the objects have their embeddings, they are yielded, so that the bulk() method from Elasticsearch-DSL can add them to the index as before.
What is the significance of the 512 number? There isn't any. We know that the model uses a batch size of 32, so it makes sense to accumulate at least that many documents. Starting from 32, you can try if larger powers of 2 provide better performance. With the hardware available to me, I've found 512 to give the best performance.
Here is an example run using batched embeddings:
And now the ingestion process runs much faster, with the entire dataset ingested in about 1 minutes and 16 seconds.
If you decide to try to optimize your ingest, you are encouraged to try different options and see what works best with your hardware.
Querying the index
If you are following along, by now you have an Elasticsearch index called quotes that is populated with about 37K famous quotes, each with a searchable vector embedding. Now it is time to learn how to query this index.
When using Elasticsearch-DSL, the document classes return a search object from their search() method:
The search object has a large number of methods that map to the query options in the Elasticsearch query DSL.
The simplest query that can be issued is the match all query, which returns all the elements. With the class-based approach used by Elasticsearch-DSL, this is how to run the query:
This would obviously print a listing of the entire list of quotes stored in the index, up to 10,000, which is the maximum number of results Elasticsearch returns by default.
In many cases it is useful to request a subset of the results. The search object uses Python style slicing for this. Here is how to request the first 25 results only:
Here is how to request the second page of results, at 25 results per page:
Elasticsearch offers approximate and exact vector search queries, also called k-nearest neighbor (kNN) queries. To run a vector search query with the approximate k-nearest neighbor algorithm, the Knn query should be used:
The Knn query class accepts the field that stores the embeddings and a search vector as arguments. In the above snippet the variable q has the search text entered by the user.
If instead you prefer to run a regular full-text search, the Match query class is used:
Filters
One of the most important benefits of using Elasticsearch as a vector database is that it is a robust database system, and all the options you can expect to have from a database nicely integrates with your vector search queries.
A great example of this is filters. The famous quotes database stores a list of tags for each quote, so it is only natural to have the option to restrict a query to quotes that have a specific tag.
Given a list of tag filters stored in a tags variable, the following snippet configures a search object to only return results that include the given tags using a "terms" filter:
Aggregations
Another example of a useful database function that is fully integrated with vector search is aggregations. Given a query, Elasticsearch can aggregate the tags and provide the counts of quotes per tag.
The next snippet shows how to add a Terms aggregation to an existing query, which will return the 100 most referenced tags in the results:
Recall that the tags field was declared with the Keyword() type, which means that the tags will be stored as is on the index, without any processing. This is required by the Terms aggregation, which will count the occurrences of each tag in the results.
A complete query example
You have seen a few isolated query examples. In this section you can see how they can all be integrated into a function that performs a query in the example application.
The search_quotes() function shown below accepts a query string q, a list of filters tags and a use_knn flag to choose between kNN or full-text search query. It also accepts start and size pagination arguments.
The function decides which of the three queries you've seen above to issue depending on the input arguments. If q is empty, then it selects a "match all" query, and in any other case it selects a kNN or match query depending on the use_knn flag, which the user can control from a checkbox in the application's user interface.
The function returns three results as a tuple:
- a list of
QuoteDocinstances that are the search results, - the tag aggregations as a list of tuples, each with tag name and document count,
- the total number of results, which is useful to show in paginated queries
Here is the complete code of this function:
To be able to access both the search results and the aggregation results, we now issue the request explicitly through the execute() method and store the response is stored in r. The hits attribute of the response object contains the actual search results, and the aggs attribute provides access to the aggregations. The format in which the aggregation results is provided is described in the terms aggregation documentation.
Conclusion
The complete quotes example is available in a GitHub repository that you can install and run on your computer. Follow the instructions on the README.md file to set it up.
You are welcome to use this example to experiment with vector embeddings and Elasticsearch!
Frequently Asked Questions
What is the Elasticsearch-DSL client for Python?
Sometimes called the "high-level" Python client, Elasticsearch-DSL offers idiomatic (or "Pythonic") access to your Elasticsearch database, in contrast with the official (or "low-level") Python client, which provides direct access to the complete range of Elasticsearch features and endpoints.
Related Content

February 18, 2026
Better text analysis for complex languages with Elasticsearch and neural models
Using neural models and the Elasticsearch inference API to improve search in Hebrew, German, Arabic, and other morphologically complex languages.
February 16, 2026
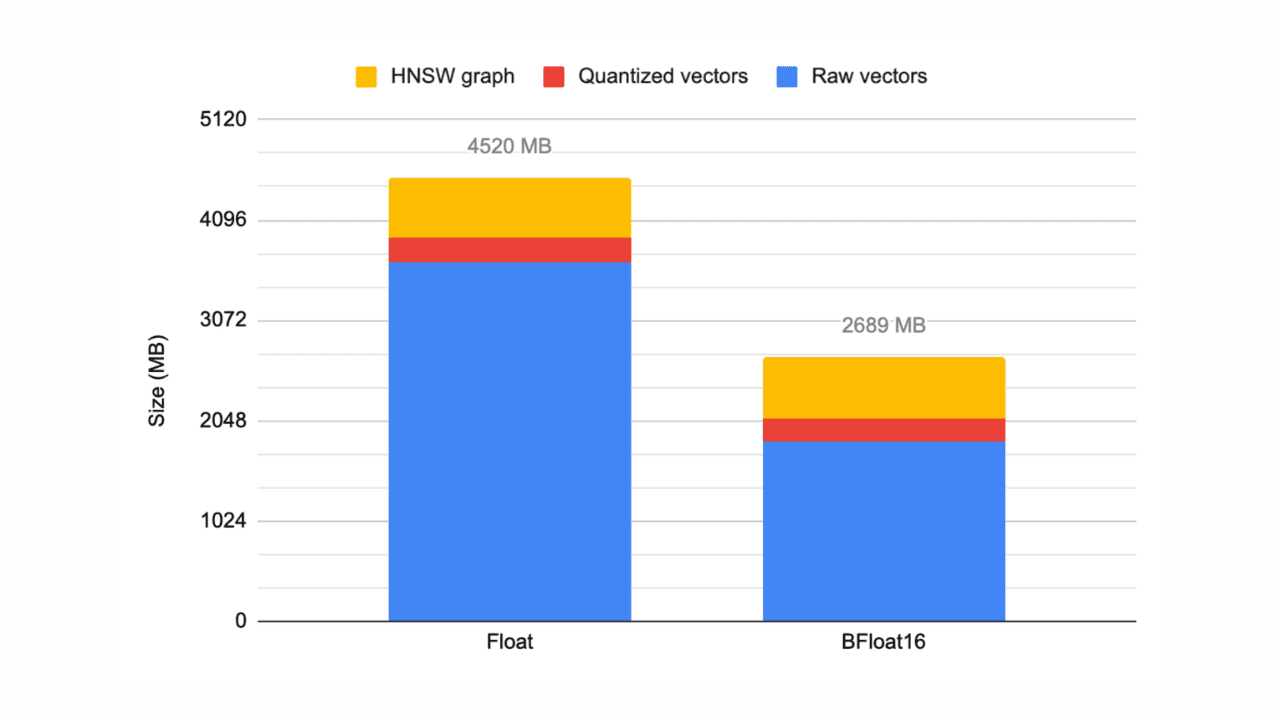
Elasticsearch 9.3 adds bfloat16 vector support
Exploring the new Elasticsearch element_type: bfloat16, which can halve your vector data storage.

February 10, 2026
How to defend your RAG system from context poisoning
How context engineering techniques prevent context poisoning in LLM responses.

February 12, 2026
Entity resolution with Elasticsearch & LLMs, Part 1: Preparing for intelligent entity matching
Learn what entity resolution is and how to prepare both sides of the entity resolution equation: your watch list and the articles you want to search.
February 4, 2026
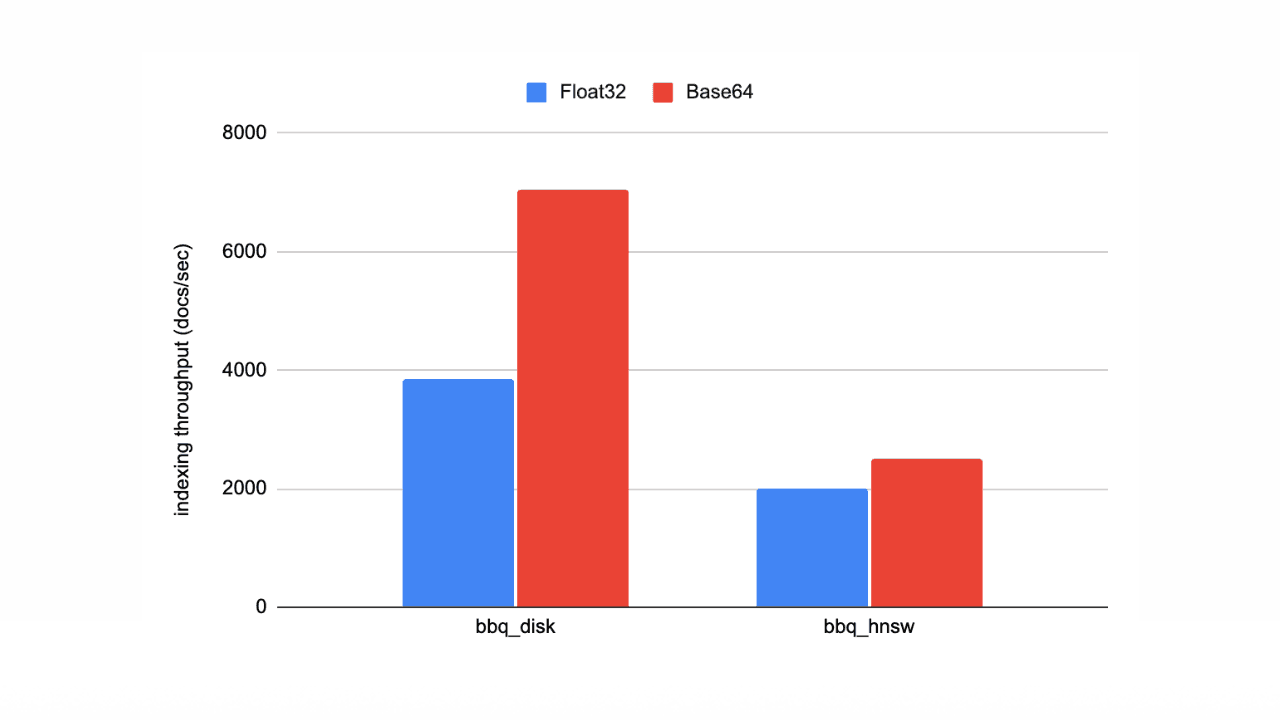
Speed up vector ingestion using Base64-encoded strings
Introducing Base64-encoded strings to speed up vector ingestion in Elasticsearch.