Elasticsearch has native integrations with the industry-leading Gen AI tools and providers. Check out our webinars on going Beyond RAG Basics, or building prod-ready apps with the Elastic vector database.
To build the best search solutions for your use case, start a free cloud trial or try Elastic on your local machine now.
In this blog, we explore how to enhance your customer success application by implementing a conversational search leveraging technologies such as Large Language Models (LLMs) and Retrieval-Augmented Generation (RAG).
You will learn about the benefits of a conversational search in the context of a customer success application and how to implement it efficiently with Elasticsearch.
Introduction
What is a customer success application
A customer success application is a tool that allows customers to self-serve to find support information, so they get answers when they need them, and can maximize the value of products or services they use and help them maximize the value of their products or services. Imagine you’re planning a trip on a booking website, and there’s a dedicated section to assist you with any questions or issues regarding your planned trip, as well as options to contact support for further assistance. This is what a customer success application does – it keeps customers satisfied and ensures they have a successful experience with your services.
What is AI conversational search
AI conversational search allows users to interact with your application using natural language, much like having a conversation with a human. This technology understands user queries, retrieves relevant information, and provides accurate, context-aware responses in real-time, making search experiences more intuitive and efficient.
From a technical perspective, AI conversational search combines the power of Large Language Models (LLMs) and Retrieval-Augmented Generation (RAG). LLMs are capable of understanding and generating human-like text based on vast amounts of training data. RAG enhances this by integrating a retrieval system that pulls relevant information from a predefined, real-time and domain-specific dataset, ensuring the responses are both accurate and contextually relevant.
Benefits of AI conversational search for a customer success application
AI conversational search makes customer success applications much more user-friendly and helpful compared to a traditional search bar experience. It allows customers to ask questions naturally and get a quick, possibly personalized, answer, saving them time and frustration. Furthermore, they can ask follow-up questions if the first answer is unsatisfactory or if they need more explanation.
Overall, AI conversational search creates a better experience for customers, making them feel valued and providing them with prescriptive guidance based on their needs.
Implementation of AI conversational search
In the following part, we will take a look at the different steps to build an AI Conversational search app from scratch.
High-level architecture
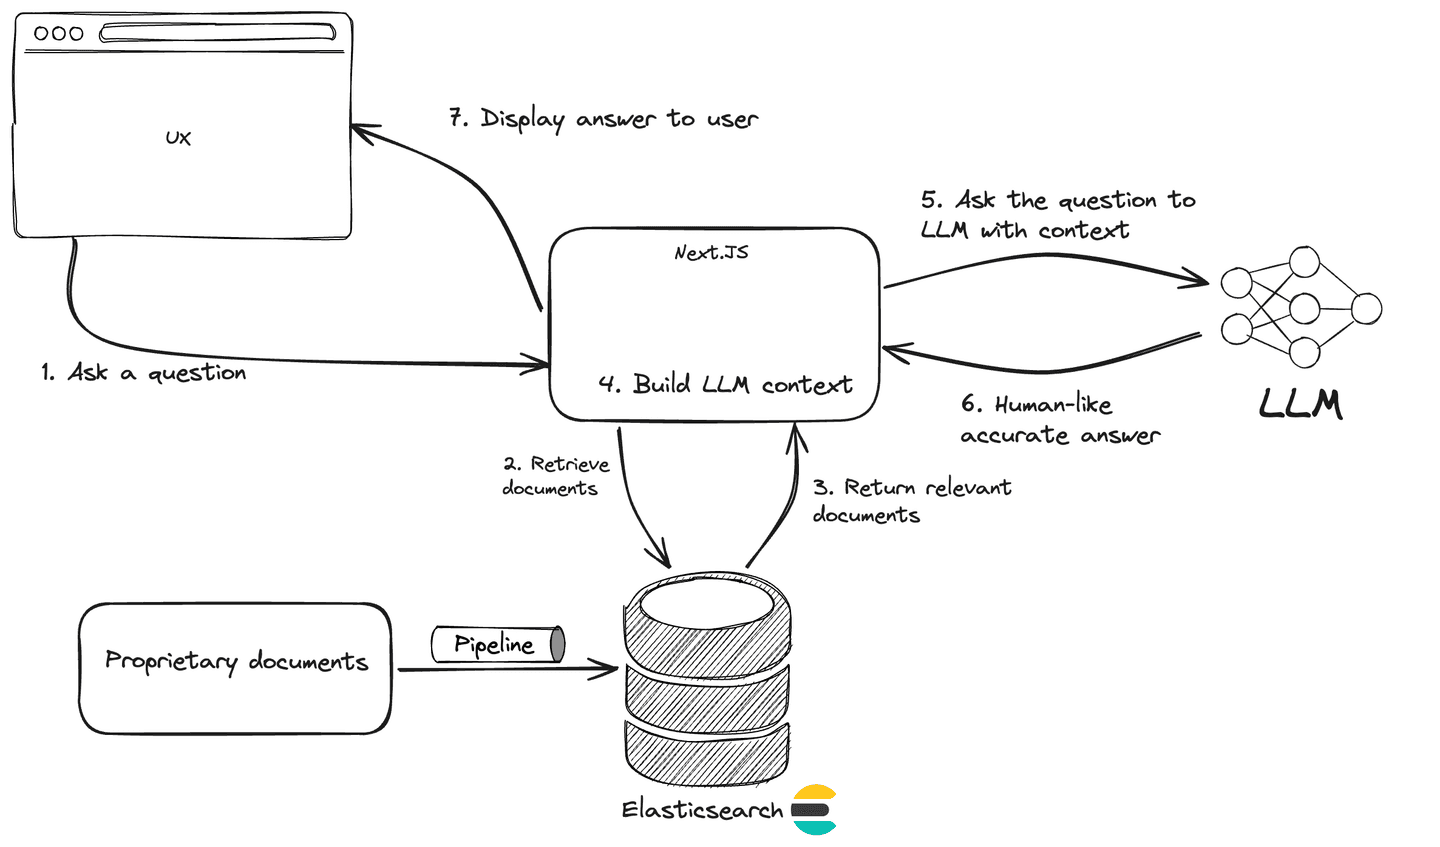
From a high-level architecture standpoint, an AI conversational search experience is a RAG application at its core with an advanced retrieval system, in our case Elasticsearch, and a conversational interface.
Data collection and preprocessing
By definition, an AI Conversational search experience in the context of a customer success application requires access to proprietary data. The data that represents the knowledge specific to the service you provide.
First, you need to determine where the data is sourced from, such as internal knowledge bases, FAQs, and documentation. Next, you need to build a data pipeline to bring this data into the retrieval system and also prepare it to be used in a RAG application.
Using Elasticsearch, you can ingest any type of data, unstructured or not, from anywhere. Check out this blog that explains what ingest method to use depending on your use case with Elasticsearch.
Also the data needs to be transformed to be used efficiently in our AI conversational search app. We expect users to ask questions using natural language, therefore the retrieval system needs to support advanced search techniques such as semantic and hybrid search to retrieve most relevant information. This requires chunking long text in passages and generating dense or sparse vector embeddings before indexing them into Elasticsearch. This can be all done in Elasticsearch as part of your data pipeline. Check out this blog that explains how to leverage index mapping in Elasticsearch to transform your data automatically.
Set up Elasticsearch
The easiest way to get started with Elasticsearch is to create a serverless project. Follow the steps described here to get an Elasticsearch deployment in a few seconds.
In the next steps, you will need your Elasticsearch API Key and Elasticsearch URL endpoint. So make sure to retrieve them.
Set up the data pipeline
In this blog, we’ll use a sample dataset to implement our AI conversational search example and ingest it into an index search-faq using Python code.
We also want to prepare the data to support semantic search. For this we will leverage the E5 multilingual model distributed out of the box with Elasticsearch serverless to generate vector embeddings.
The first step is preparing the index mapping to store the data we will ingest. Note that the field named semantic of type semantic_text is the field that will automatically generate embeddings from the content of the content field (note the copy_to option).
Let’s see the Python code for this.
Next, we need to create an inference service to operate the E5 multilingual ML model.
Now the data pipeline is ready. It will automatically generate vector embeddings for each document at ingest time.
Create an application with Next.Js
Now that our retrieval system is ready, we’re going to build a simple chat interface for our users to interact with.
This application is inspired by the Vercel RAG example documented here.
First, initialize the Next.JS application.
Then navigate to the application folder chat-example.
Let’s add an API route to implement the logic of our RAG application. This API will be called by the chat frontend with the user question. Next, relevant documents are retrieved from Elasticsearch using semantic search. A context window is generated from the returned documents, which is used by OpenAI to provide a meaningful answer back to the user.
Create a new file app/api/chat/route.ts and start editing it.
First let's add the import and initialize the Elasticsearch client connection
Then we declare a function that query Elasticsearch using semantic search.
Finally, we declare the main function that handle the route POST call. This function retrieves the user question, uses the function findRelevantContent to retrieve documents from Elasticsearch, then build the context window, pass it to LLM then stream back the answer to the client.
Let’s now edit the frontend to display a simple chat interface. Open the file app/page.tsx and replace the existing content with the following one:
By default, the project is created with a dark theme. Let’s simplify it for our example, open the file app/globals.css and keep only this:
Let’s test our application. Export the following environment variables before running the application:
Install the project dependencies:
Finally, run the application locally:
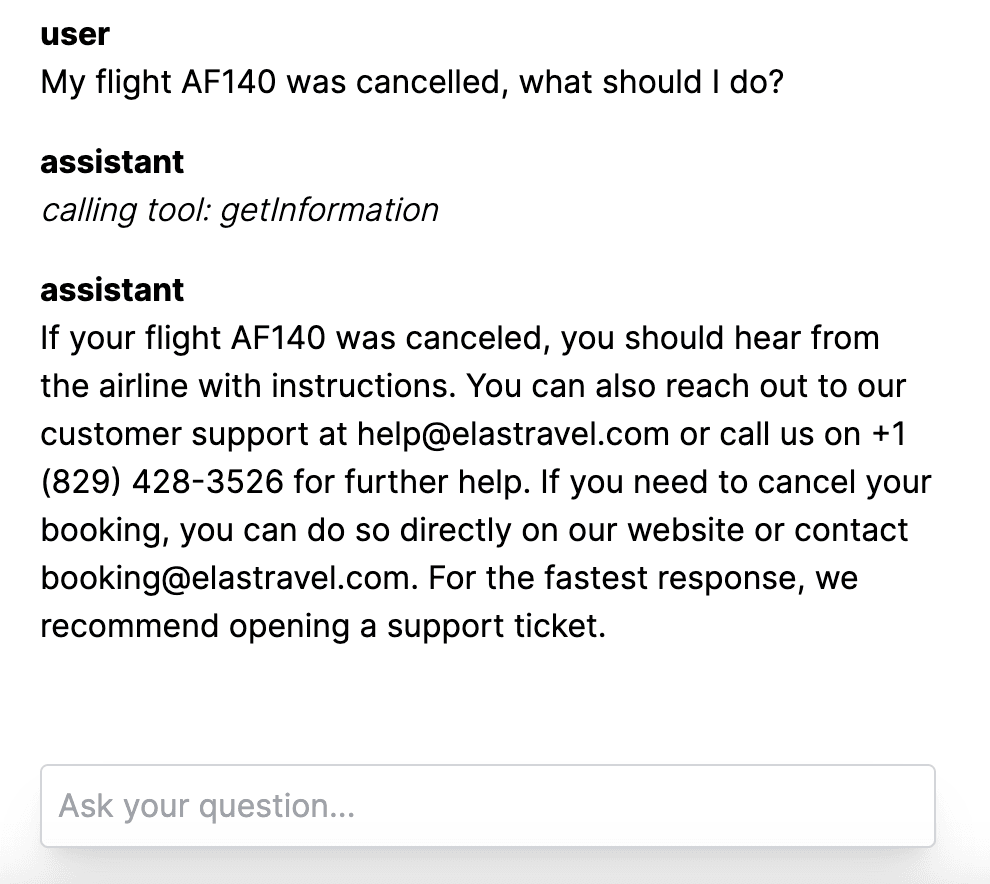
And that’s it, you built your first AI conversational search!
The working code of that example can be found in Github.
Conclusion
In this article, you learned the benefits of using AI conversational search over a traditional search experience when building a customer success application. You then saw an end-to-end guide on how to build an AI conversational search using Elasticsearch, OpenAI and Next.JS. Use this tutorial to get started enhancing your customer’s experience with generative AI and Elasticsearch. You can also check out the Playground in Kibana to get started with conversational search quickly.
Related Content

March 13, 2026
Entity resolution with Elasticsearch, part 4: The ultimate challenge
Solving and evaluating entity resolution challenges in a highly diverse “ultimate challenge” dataset designed to prevent shortcuts.

March 4, 2026
Entity resolution with Elasticsearch, part 3: Optimizing LLM integration with function calling
Learn how function calling enhances LLM integration, enabling a reliable and cost-efficient entity resolution pipeline in Elasticsearch.

February 26, 2026
Entity resolution with Elasticsearch & LLMs, Part 2: Matching entities with LLM judgment and semantic search
Using semantic search and transparent LLM judgment for entity resolution in Elasticsearch.

February 18, 2026
Better text analysis for complex languages with Elasticsearch and neural models
Using neural models and the Elasticsearch inference API to improve search in Hebrew, German, Arabic, and other morphologically complex languages.

February 12, 2026
Entity resolution with Elasticsearch & LLMs, Part 1: Preparing for intelligent entity matching
Learn what entity resolution is and how to prepare both sides of the entity resolution equation: your watch list and the articles you want to search.