- Kibana Guide: other versions:
- What is Kibana?
- What’s new in 8.18
- Kibana concepts
- Quick start
- Set up
- Install Kibana
- Configure Kibana
- AI Assistant settings
- Alerting and action settings
- APM settings
- Banners settings
- Cases settings
- Enterprise Search settings
- Fleet settings
- i18n settings
- Logging settings
- Logs settings
- Metrics settings
- Monitoring settings
- Reporting settings
- Search sessions settings
- Secure settings
- Security settings
- Spaces settings
- Task Manager settings
- Telemetry settings
- URL drilldown settings
- Start and stop Kibana
- Access Kibana
- Securing access to Kibana
- Add data
- Upgrade Kibana
- Configure security
- Configure reporting
- Configure logging
- Configure monitoring
- Command line tools
- Production considerations
- Discover
- Dashboards
- Canvas
- Maps
- Build a map to compare metrics by country or region
- Track, visualize, and alert on assets in real time
- Map custom regions with reverse geocoding
- Heat map layer
- Tile layer
- Vector layer
- Plot big data
- Search geographic data
- Configure map settings
- Connect to Elastic Maps Service
- Import geospatial data
- Troubleshoot
- Reporting and sharing
- Machine learning
- Graph
- Alerting
- Observability
- Search
- Security
- Dev Tools
- Fleet
- Osquery
- Stack Monitoring
- Stack Management
- Cases
- Connectors
- Amazon Bedrock
- Cases
- CrowdStrike
- D3 Security
- Google Gemini
- IBM Resilient
- Index
- Jira
- Microsoft Teams
- Observability AI Assistant
- OpenAI
- Opsgenie
- PagerDuty
- SentinelOne
- Server log
- ServiceNow ITSM
- ServiceNow SecOps
- ServiceNow ITOM
- Swimlane
- Slack
- TheHive
- Tines
- Torq
- Webhook
- Webhook - Case Management
- xMatters
- Preconfigured connectors
- License Management
- Maintenance windows
- Manage data views
- Numeral Formatting
- Rollup Jobs
- Manage saved objects
- Security
- Spaces
- Advanced Settings
- Tags
- Upgrade Assistant
- Watcher
- REST API
- Get features API
- Kibana spaces APIs
- Kibana role management APIs
- User session management APIs
- Saved objects APIs
- Data views API
- Index patterns APIs
- Alerting APIs
- Action and connector APIs
- Cases APIs
- Import and export dashboard APIs
- Logstash configuration management APIs
- Machine learning APIs
- Osquery manager API
- Short URLs APIs
- Get Task Manager health
- Upgrade assistant APIs
- Synthetics APIs
- Uptime APIs
- Kibana plugins
- Troubleshooting
- Use dark mode in Kibana
- Accessibility
- Release notes
- Upgrade notes
- Kibana 8.18.0
- Kibana 8.17.4
- Kibana 8.17.3
- Kibana 8.17.1
- Kibana 8.17.0
- Kibana 8.16.6
- Kibana 8.16.5
- Kibana 8.16.4
- Kibana 8.16.3
- Kibana 8.16.2
- Kibana 8.16.1
- Kibana 8.16.0
- Kibana 8.15.5
- Kibana 8.15.4
- Kibana 8.15.3
- Kibana 8.15.2
- Kibana 8.15.1
- Kibana 8.15.0
- Kibana 8.14.3
- Kibana 8.14.2
- Kibana 8.14.1
- Kibana 8.14.0
- Kibana 8.13.4
- Kibana 8.13.3
- Kibana 8.13.2
- Kibana 8.13.1
- Kibana 8.13.0
- Kibana 8.12.2
- Kibana 8.12.1
- Kibana 8.12.0
- Kibana 8.11.4
- Kibana 8.11.3
- Kibana 8.11.2
- Kibana 8.11.1
- Kibana 8.11.0
- Kibana 8.10.4
- Kibana 8.10.3
- Kibana 8.10.2
- Kibana 8.10.1
- Kibana 8.10.0
- Kibana 8.9.2
- Kibana 8.9.1
- Kibana 8.9.0
- Kibana 8.8.2
- Kibana 8.8.1
- Kibana 8.8.0
- Kibana 8.7.1
- Kibana 8.7.0
- Kibana 8.6.1
- Kibana 8.6.0
- Kibana 8.5.2
- Kibana 8.5.1
- Kibana 8.5.0
- Kibana 8.4.3
- Kibana 8.4.2
- Kibana 8.4.1
- Kibana 8.4.0
- Kibana 8.3.3
- Kibana 8.3.2
- Kibana 8.3.1
- Kibana 8.3.0
- Kibana 8.2.3
- Kibana 8.2.2
- Kibana 8.2.1
- Kibana 8.2.0
- Kibana 8.1.3
- Kibana 8.1.2
- Kibana 8.1.1
- Kibana 8.1.0
- Kibana 8.0.0
- Kibana 8.0.0-rc2
- Kibana 8.0.0-rc1
- Kibana 8.0.0-beta1
- Kibana 8.0.0-alpha2
- Kibana 8.0.0-alpha1
- Developer guide
Spaces
editSpaces
editYou can define multiple spaces in a single Kibana instance from the Spaces menu. Each space has its own navigation and saved objects, and users can only access the spaces that they have been granted access to. This access is based on user roles, and a given role can have different permissions per space.
Kibana creates a default space for you. When you create more spaces, users are asked to choose a space when they log in to Kibana, and can change their current space at any time from the top menu.
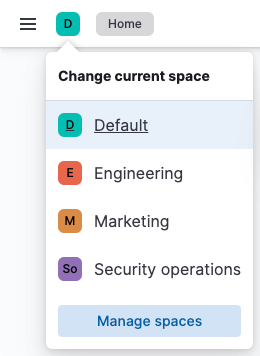
To go to Spaces, find Stack Management in the navigation menu or use the global search bar.
Required privileges
editThe kibana_admin role or equivalent is required to manage Spaces.
Create a space
editYou can have up to 1,000 spaces by default. The maximum number of spaces can be configured by the xpack.spaces.maxSpaces setting (refer to Spaces settings in Kibana).
-
Select Create space and provide a name, description, and URL identifier.
The URL identifier is a short text string that becomes part of the Kibana URL when you are inside that space. Kibana suggests a URL identifier based on the name of your space, but you can customize the identifier to your liking. You cannot change the space identifier once you create the space.
-
Select a Solution view. This setting controls the navigation that all users of the space will get:
- Search: A light navigation menu focused on analytics and Search use cases. Features specific to Observability and Security are hidden.
- Observability: A light navigation menu focused on analytics and Observability use cases. Features specific to Search and Security are hidden.
- Security: A light navigation menu focused on analytics and Security use cases. Features specific to Observability and Search are hidden.
- Classic: All features from all solutions are visible by default using the classic, multilayered navigation menus. You can customize which features are visible individually.
-
If you selected the Classic solution view, you can customize the Feature visibility as you need it to be for that space.
Even when disabled in this menu, some Management features can remain visible to some users depending on their privileges. Additionally, controlling feature visibility is not a security feature. To secure access to specific features on a per-user basis, you must configure Kibana Security.
- Customize the avatar of the space to your liking.
- Save your new space by selecting Create space.
You can edit all of the space settings you just defined at any time, except for the URL identifier.
Kibana also has an API if you prefer to create spaces programmatically.
Define access to a space
editUsers can access spaces based on the roles that they have.
- Certain reserved roles can view and access all spaces by default. You can’t prevent those roles from accessing a space. Instead, you can grant different roles to your users.
- When creating or editing a role, you can define which existing spaces that role can access, and with which permissions.
-
When editing a space, you can assign roles to the space and define the permissions within the space for these roles. To do that, go to the Permissions tab of the space you’re editing.
When a role is assigned to All Spaces, you can’t remove its access from the space settings. You must instead edit the role to give it more granular access to individual spaces.
Delete a space
editDeleting a space permanently removes the space and all of its contents. Find the space on the Spaces overview page and click the trash icon in the Actions column. You can’t delete the default space, but you can customize it to your liking.
Move saved objects between spaces
editTo move saved objects between spaces, you can copy objects, or export and import objects.
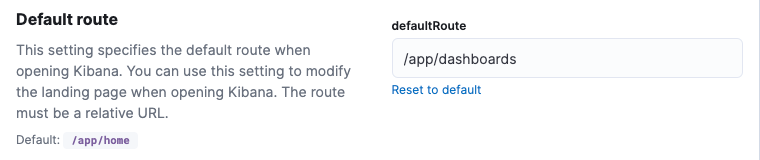
Configure a space-level landing page
editYou can create a custom experience for users by configuring the Kibana landing page on a per-space basis. The landing page can route users to a specific dashboard, application, or saved object as they enter each space.
To configure the landing page, use the default route setting in
Stack Management > Kibana > Advanced settings.
For example, you might set the default route to /app/dashboards.
Disable spaces
editSince Kibana 8.0, the Spaces feature cannot be disabled.
On this page