Elasticsearch allows you to index data quickly and in a flexible manner. Try it free in the cloud or run it locally to see how easy indexing can be.
How to ingest data from AWS S3 to Elastic Cloud using Elastic Serverless Forwarder (ESF)
- Create S3 bucket for VPC flow logs: In the AWS Console, create an S3 bucket (e.g.,
s3-vpc-flow-logs-elastic) to store VPC flow logs. Note the bucket ARN. - Enable VPC flow logs to S3: In the AWS Console, configure VPC flow logs to send data to the S3 bucket created in the previous step. Select the appropriate filters and aggregation interval.
- Create SQS queue: Create an SQS queue (e.g.,
sqs-vpc-flow-logs-elastic-serverless-forwarder) in the same region as the S3 bucket. Set the Visibility Timeout to 910 seconds. Update the SQS Access Policy to allow the S3 bucket to send messages to the queue. Note the SQS ARN. - Configure S3 event notification: In the S3 bucket properties, create an event notification that triggers when objects are created. Set the destination to the SQS queue created earlier.
- Deploy Elastic Serverless Forwarder:
- Create another S3 bucket to store the ESF configuration file.
- Create a
config.yamlfile with the necessary input and output configurations, including the SQS ARN, Elasticsearch endpoint, and API key. Upload theconfig.yamlfile to the configuration S3 bucket. - In the AWS Console, deploy the Elastic Serverless Forwarder from the Serverless Application Repository, providing the S3 bucket names and SQS ARN in the application settings.
- Install the Elastic AWS integration assets in Kibana.
Background
This is the first installment in a multi-part blog series exploring different options for ingesting data from AWS S3 into Elastic Cloud.
Elasticsearch offers several options for ingesting data from AWS S3 buckets, allowing customers to select the most suitable method based on their specific needs and architectural strategy.
These are the key options for ingesting data from AWS S3:
- Elastic Serverless Forwarder (ESF) - our focus in this blog
- Elastic Agent - part 2
- Elastic S3 Native Connector - part 3
Data ingestion options comparison
| Features | ESF | Elastic Agent | S3 Connector |
|---|---|---|---|
| Logs | ✅ | ✅ | ✅[[^1]] |
| Metrics | ❌ | ✅ | ✅[[^2]] |
| Cost | Medium-Lambda,SQS | Low-EC2,SQS | Low-Elastic Enterprise Search |
| Scaling | Auto - Unlimited | EC2 instance size | Enterprise Search Node size |
| Operation | Low - Monitor Lambda function | High - Manage Agents | Low |
| PrivateLink | ✅ | ✅ | NA (Pull from S3) |
| Primary Use Case | Logs | Logs & Metrics | Content & Search |
Note1: ESF doesn't support metrics collection due to AWS limitation on services that can trigger Lambda function and you can't invoke Lambda using subscription filter on CloudWatch metrics. However, taking cost consideration into account it is possible to store metrics in S3 and via SQS trigger ingest into Elastic.
Note2: [[^1]][[^2]]Although S3 connector can pull logs and metrics from S3 bucket, it is most suited for ingesting content, files, images and other data types
In this blog we will focus on how to ingest data from AWS S3 using Elastic Serverless Forwarder(ESF). In the next parts, we will explore Elastic Agent and Elastic S3 Native Connector methods.
Let's begin.
Follow these steps to launch the Elastic Cloud deployment:
Elastic Cloud
- Create an account if not created already and create an Elastic deployment in AWS.
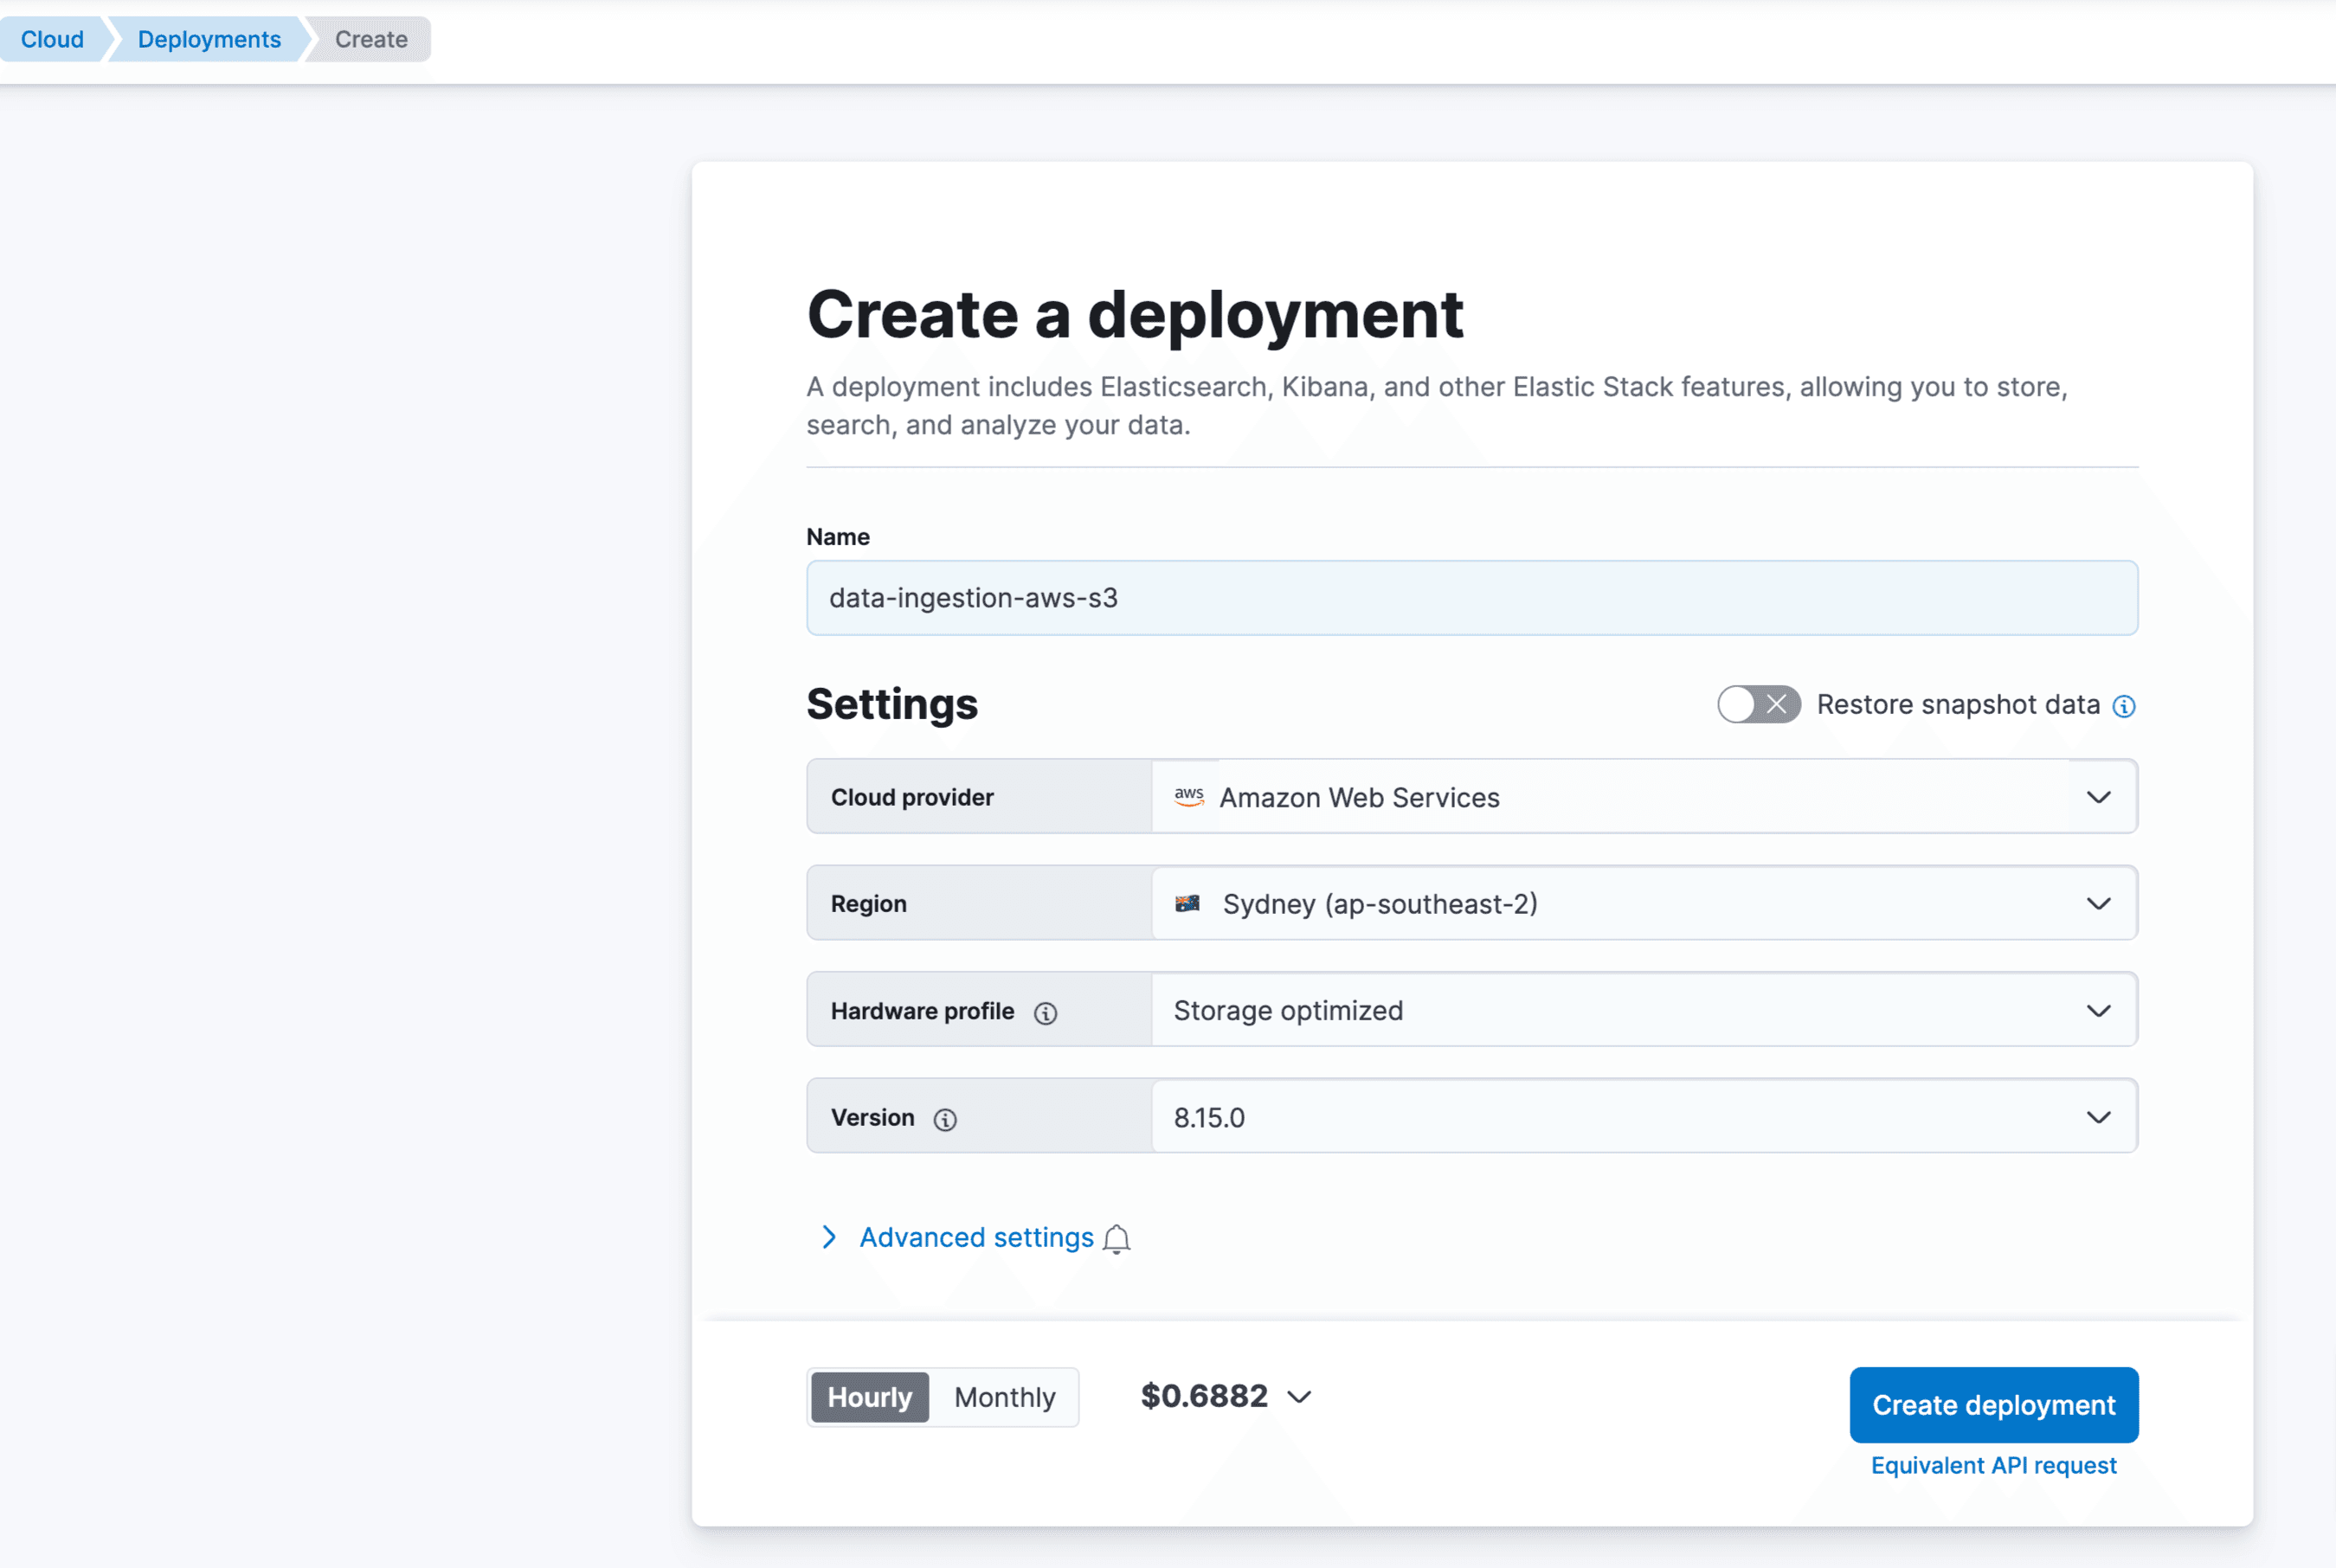
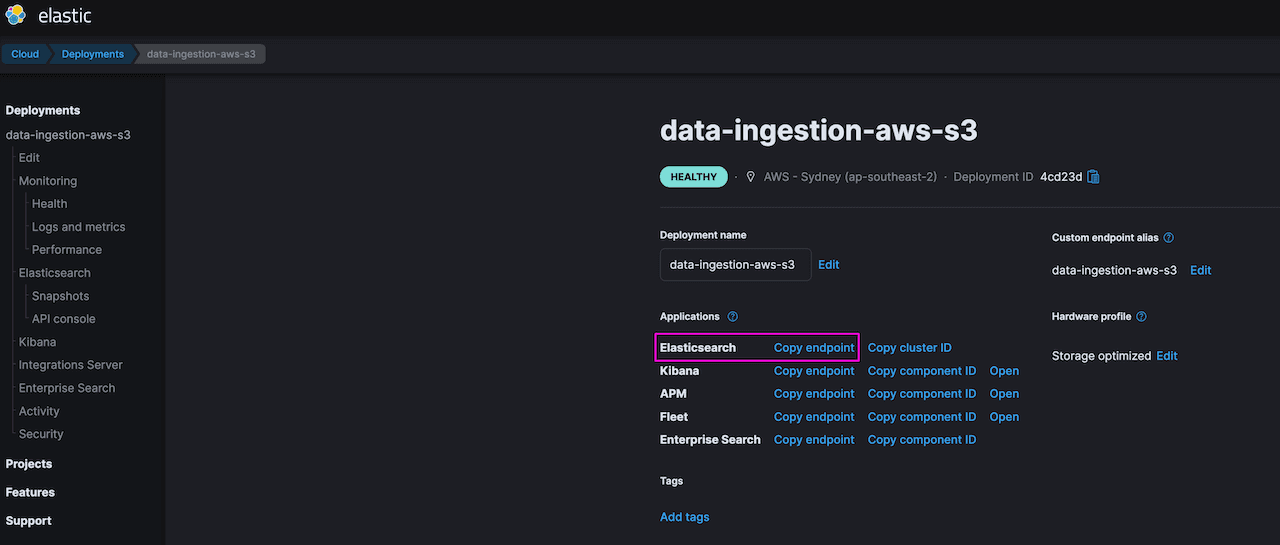
- Once the deployment is created, note the Elasticsearch endpoint. This can be found in the Elastic Cloud console under -> Manage -> Deployments.
Elastic Serverless Forwarder
The Elastic Serverless Forwarder is an AWS Lambda function that forward logs such as VPC Flow logs, WAF, Cloud Trail etc. from AWS environment to Elastic. It can be used to send data to Elastic Cloud as well as self-managed deployment.
Features of Elastic Serverless Forwarder
- Support multiple inputs
- S3 (via SQS event notification)
- Kinesis Data Streams
- CloudWatch Logs subscription filters
- SQS message payload
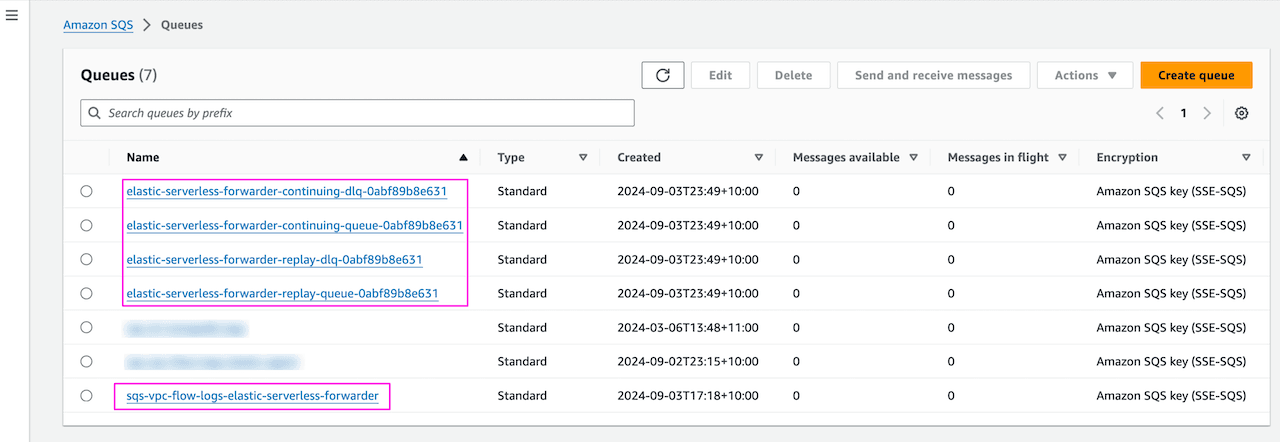
- At least once delivery using "continuing queue" and "replay queue" (created automatically by serverless forwarder)
- Support data transfer over PrivateLink which allows data transfer within the AWS Virtual Private Cloud (or VPC) and not on public network.
- Lambda function is an AWS Serverless compute managed service with automatic scaling in response to code execution request
- Function execution time is optimised with optimal memory size allocated as required
- Pay as you go pricing, only pay for compute time during Lambda function execution and for SQS event notification
Data flow:
We will use S3 input with SQS notification to send VPC flow logs to Elastic Cloud:
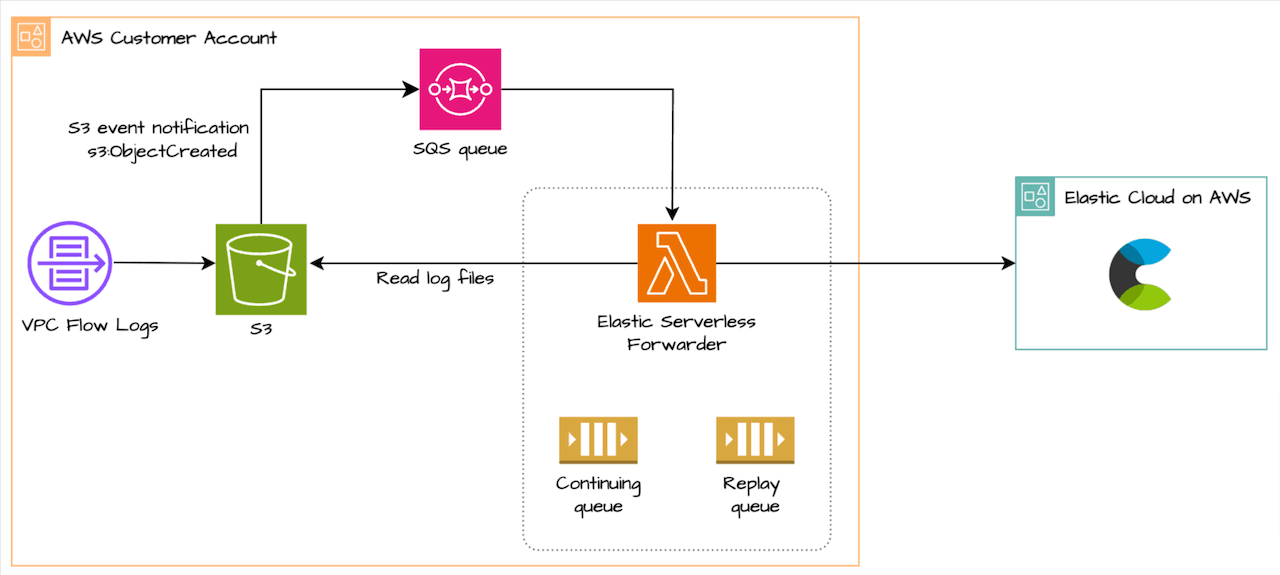
- VPC flow log is configured to write to S3 bucket
- Once log is written to S3 bucket, S3 event notification (S3:ObjectCreated) is sent to SQS
- SQS event notification containing event metadata triggers the Lambda function which read the logs from the bucket
- Continuing queue is created when forwarder is deployed and ensures at least once delivery. Forwarder keeps track of last event sent and helps in processing pending events when forwarder function exceed runtime of 15 min (Lambda max default)
- Replay queue is also created when forwarder is deployed and handles log ingestion exceptions. Forwarder keeps track of failed events and writes them to the replay queue for later ingestion. For e.g. in my testing, I put the wrong Elastic API key, causing authentication failure, which filled up the replay queue. You can enable the replay queue as a trigger for the ESF lambda function to consume the messages from the S3 bucket again. It is important to address the delivery failure first; otherwise message will accumulate in the replay queue. You can set this trigger permanently but may need to remove/re-enable depending on the message failure issue. To enable the trigger go to SQS ->
elastic-serverless-forwarder-replay-queue--> under Lambda triggers -> Configure Lambda function trigger -> Select the ESF lamnda function
Setting up Elastic Serverless Forwarder for AWS S3 data ingestion
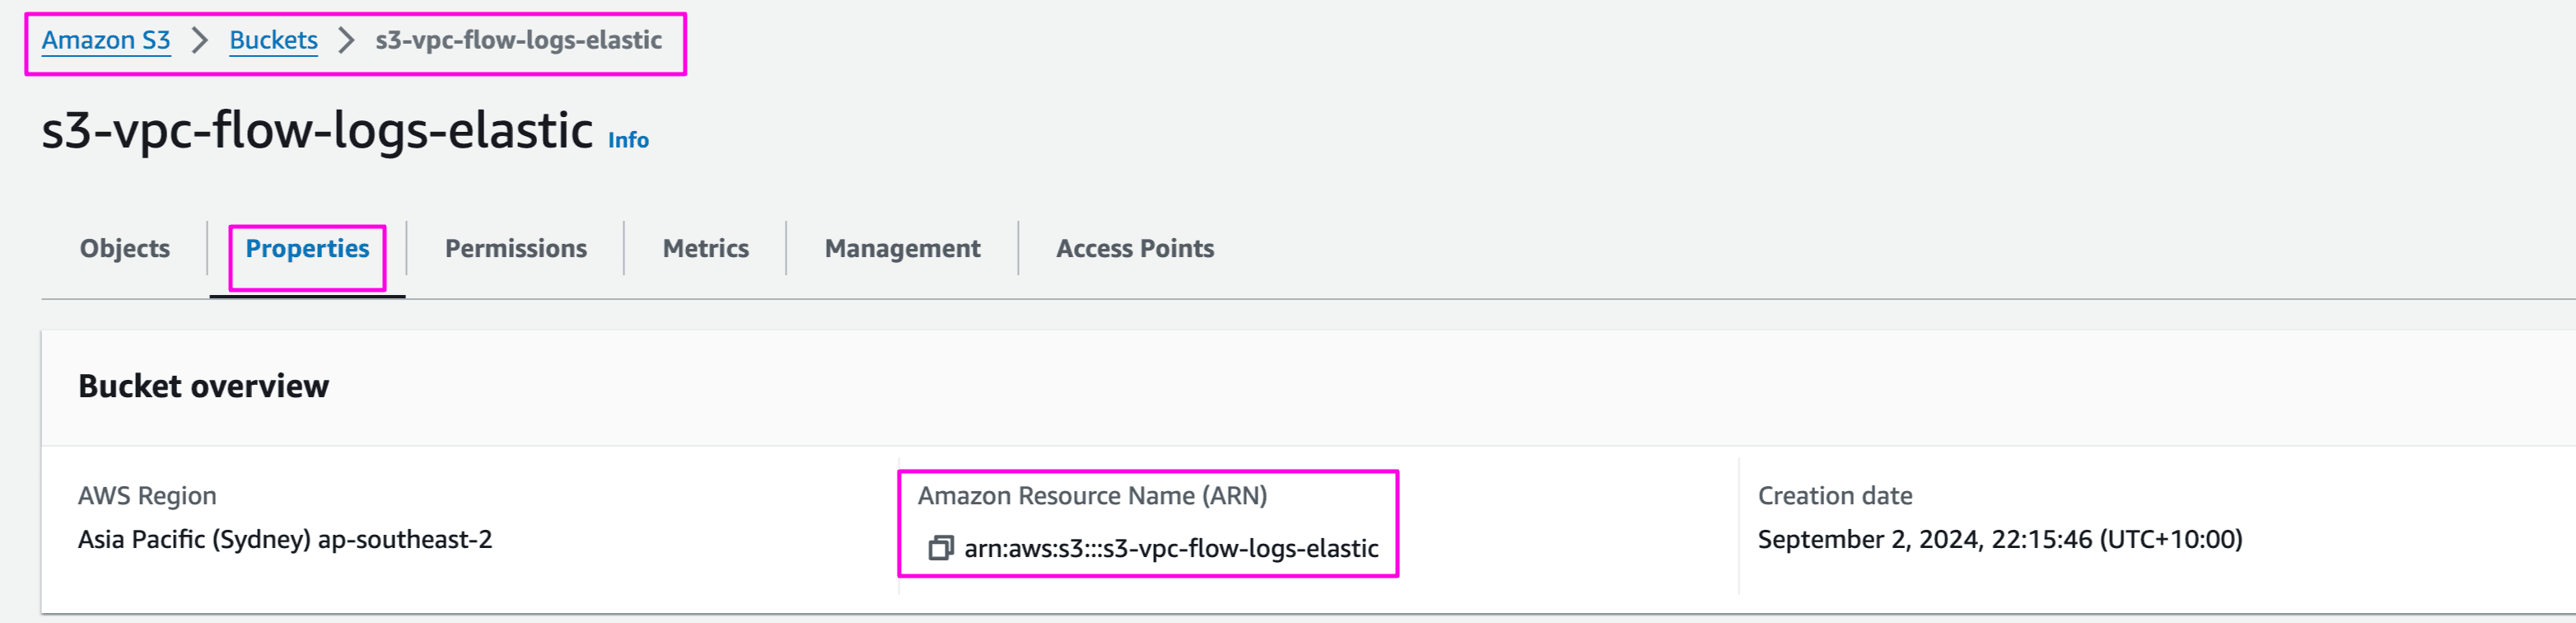
- Create S3 Bucket
s3-vpc-flow-logs-elasticto store VPC flow logs
AWS Console -> S3 -> Create bucket. You may leave other settings as default or change as per the requirements:
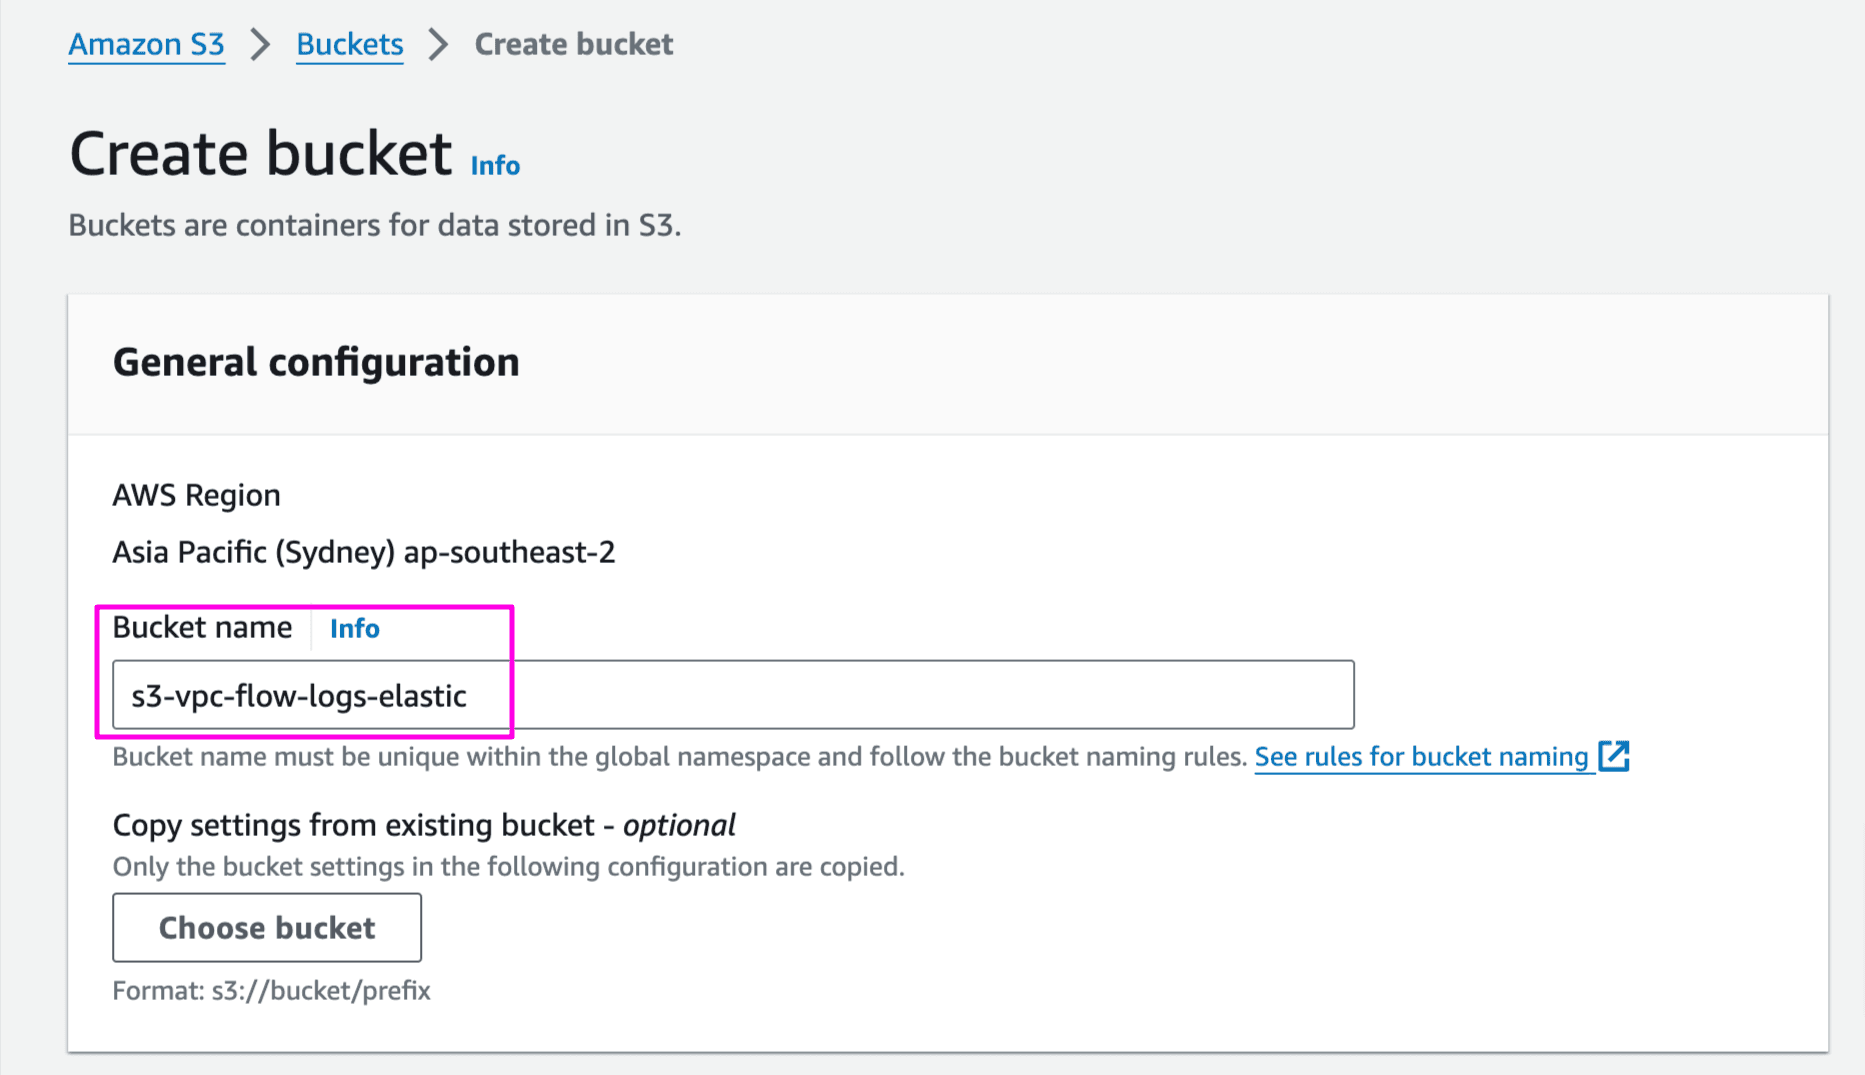
Copy the bucket ARN, required to configure flow logs in next step:
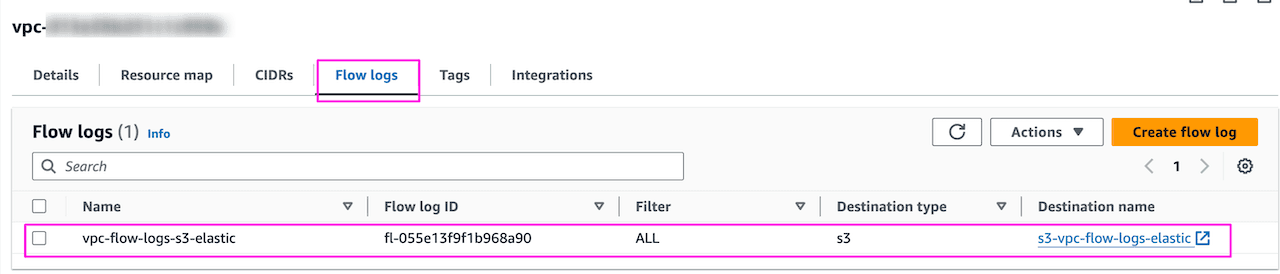
- Enable VPC Flow logs and send to S3 bucket
s3-vpc-flow-logs-elastic
AWS Console -> VPC -> Select VPC -> Flow logs. Leave other settings as is or change as per the requirements:

Provide name of the flow logs, select what filters to apply, aggregation interval and destination for the flow log storage:

Once done, it will look like below with S3 as the destination. Going forward all the flow traffic through this VPC will be stored in the bucket s3-vpc-flow-logs-elastic :
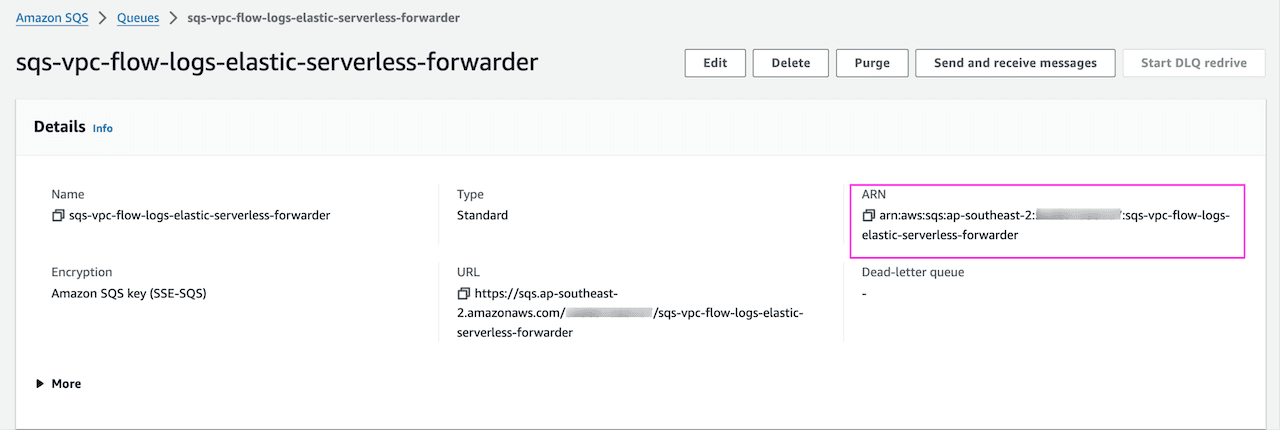
- Create SQS queue
Note 1: Create SQS queue in same region as S3 bucket
Note 2: Set the visiblity timeout of 910 second which is 10 sec more than AWS Lambda function max runtime of 900 sec.
AWS Console -> Amazon SQS -> Create queue
Provide queue name and update visiblity timeout to 910 sec. Lambda function runs for max 900 sec (15min) and setting a higher value for visibility timeout allows consumer Elastic Serverless Forwarder(ESF) to process and delete the message from the queue:

Update the SQS Access Policy (Advance) to allow S3 bucket to send notification to SQS queue. Replace account-id with your AWS account ID. Keep other options as default.
Here, we are specifying S3 to send message to SQS queue (ARN) from the S3 bucket:
More details on permission requirement (IAM user) for AWS integration is available here.
Copy the SQS ARN, in queue setting under Details:
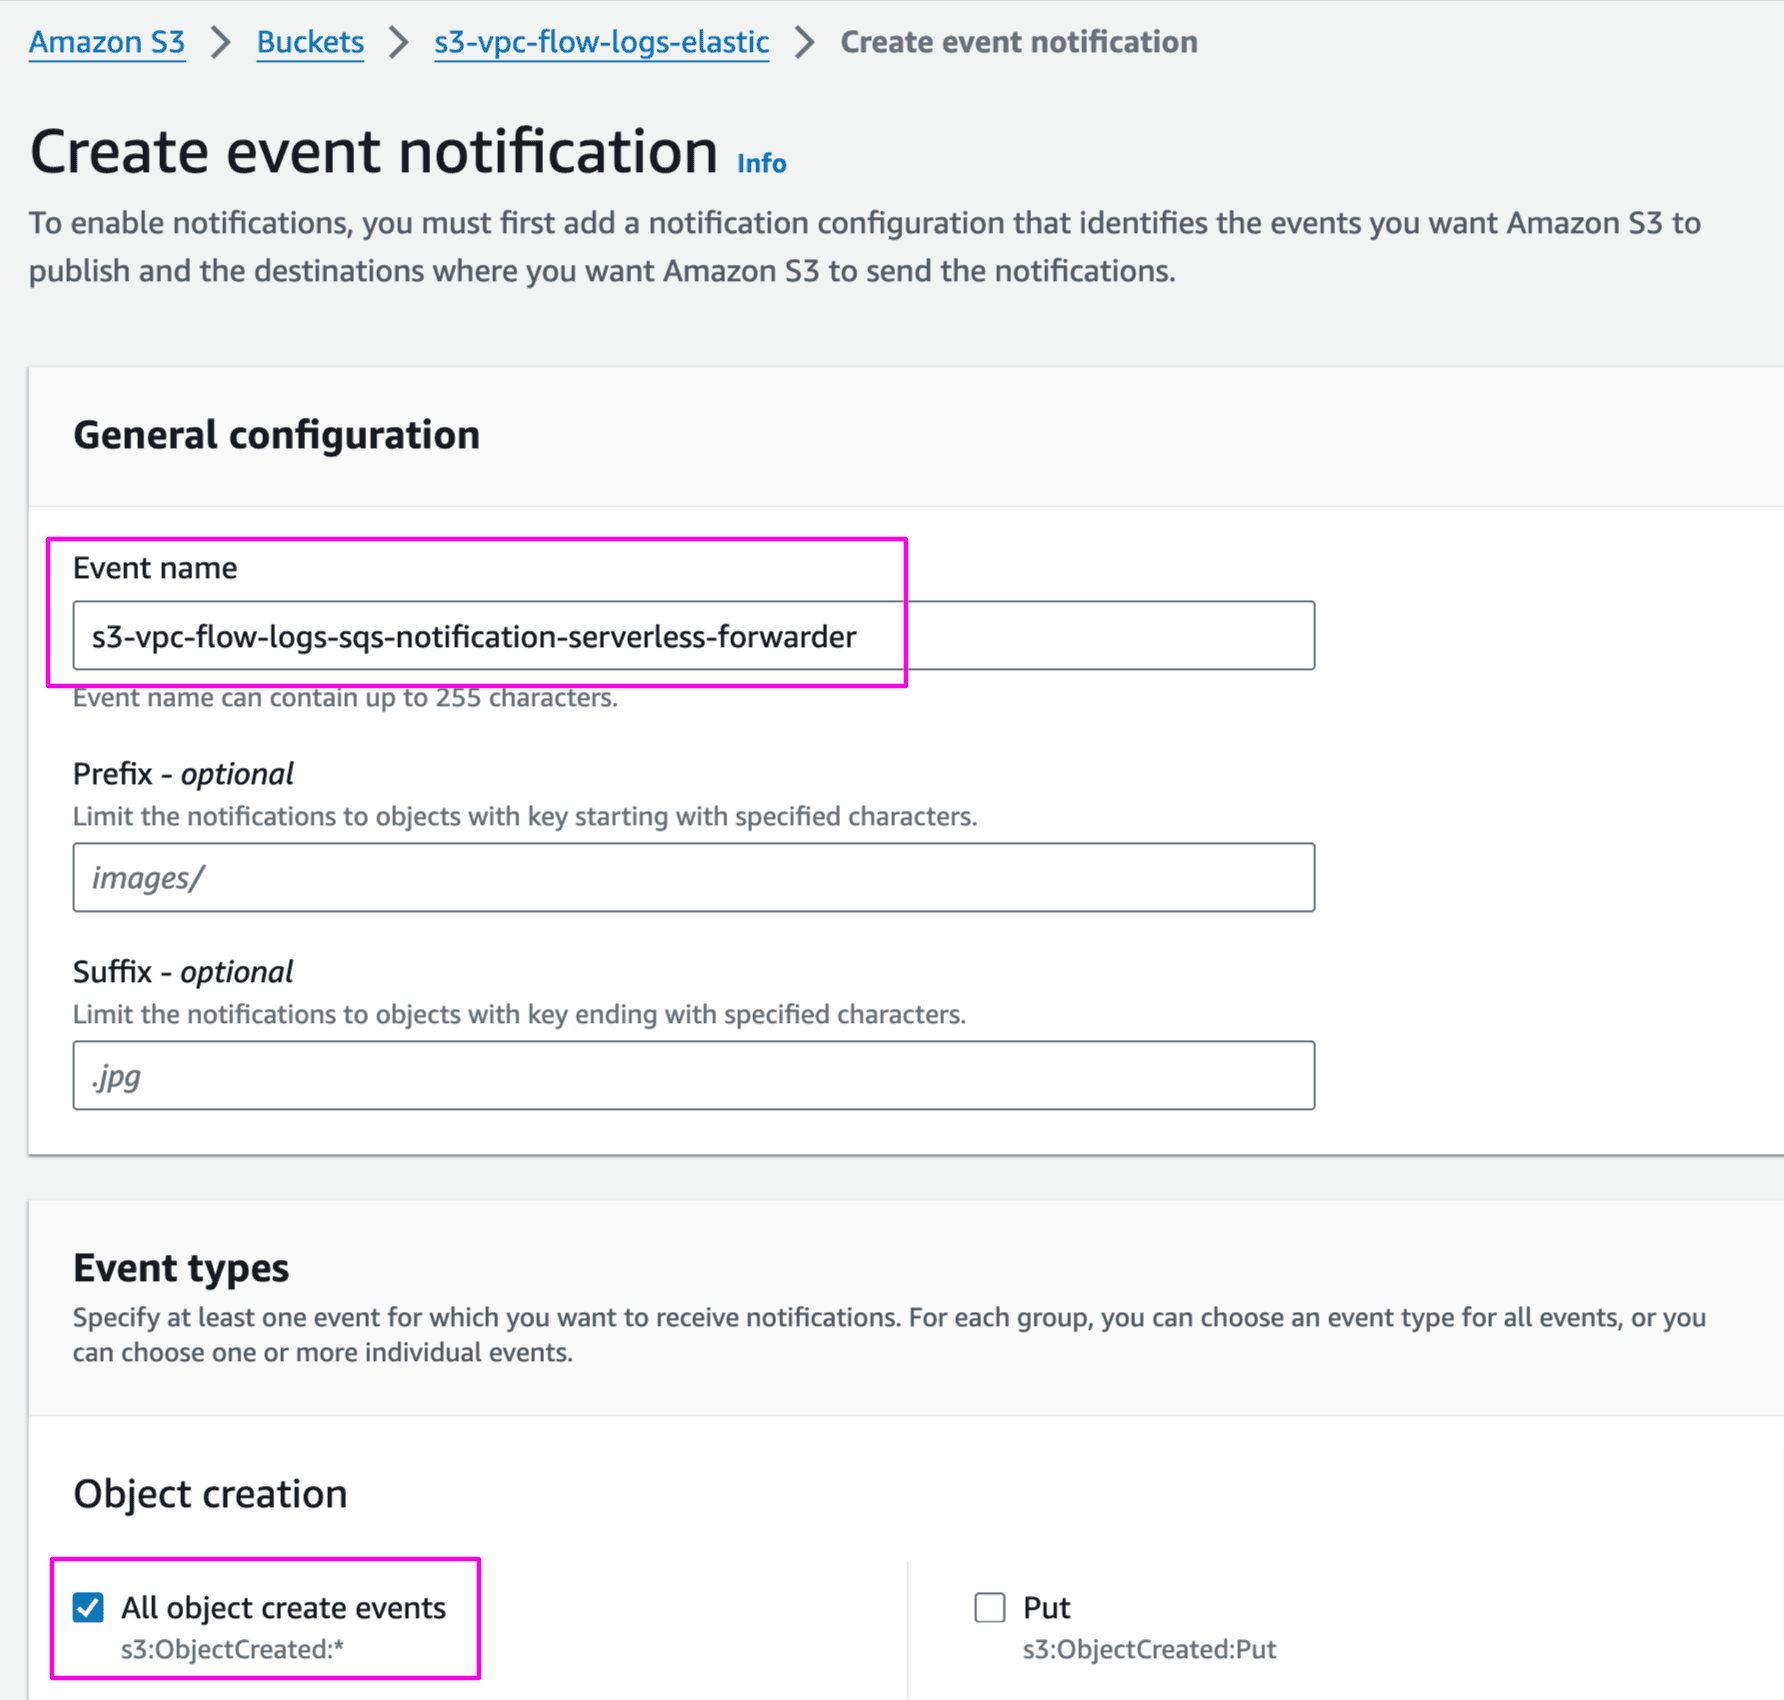
- Enable VPC flow log event notification in S3 bucket
AWS Console > S3. Select bucket s3-vpc-flow-logs-elastic -> Properties and Create event notification
Provide name and on what event type you want to trigger SQS. We have selected object create when any object is added to the bucket:
Select destination as SQS queue and choose sqs-vpc-flow-logs-elastic-serverless-forwarder:
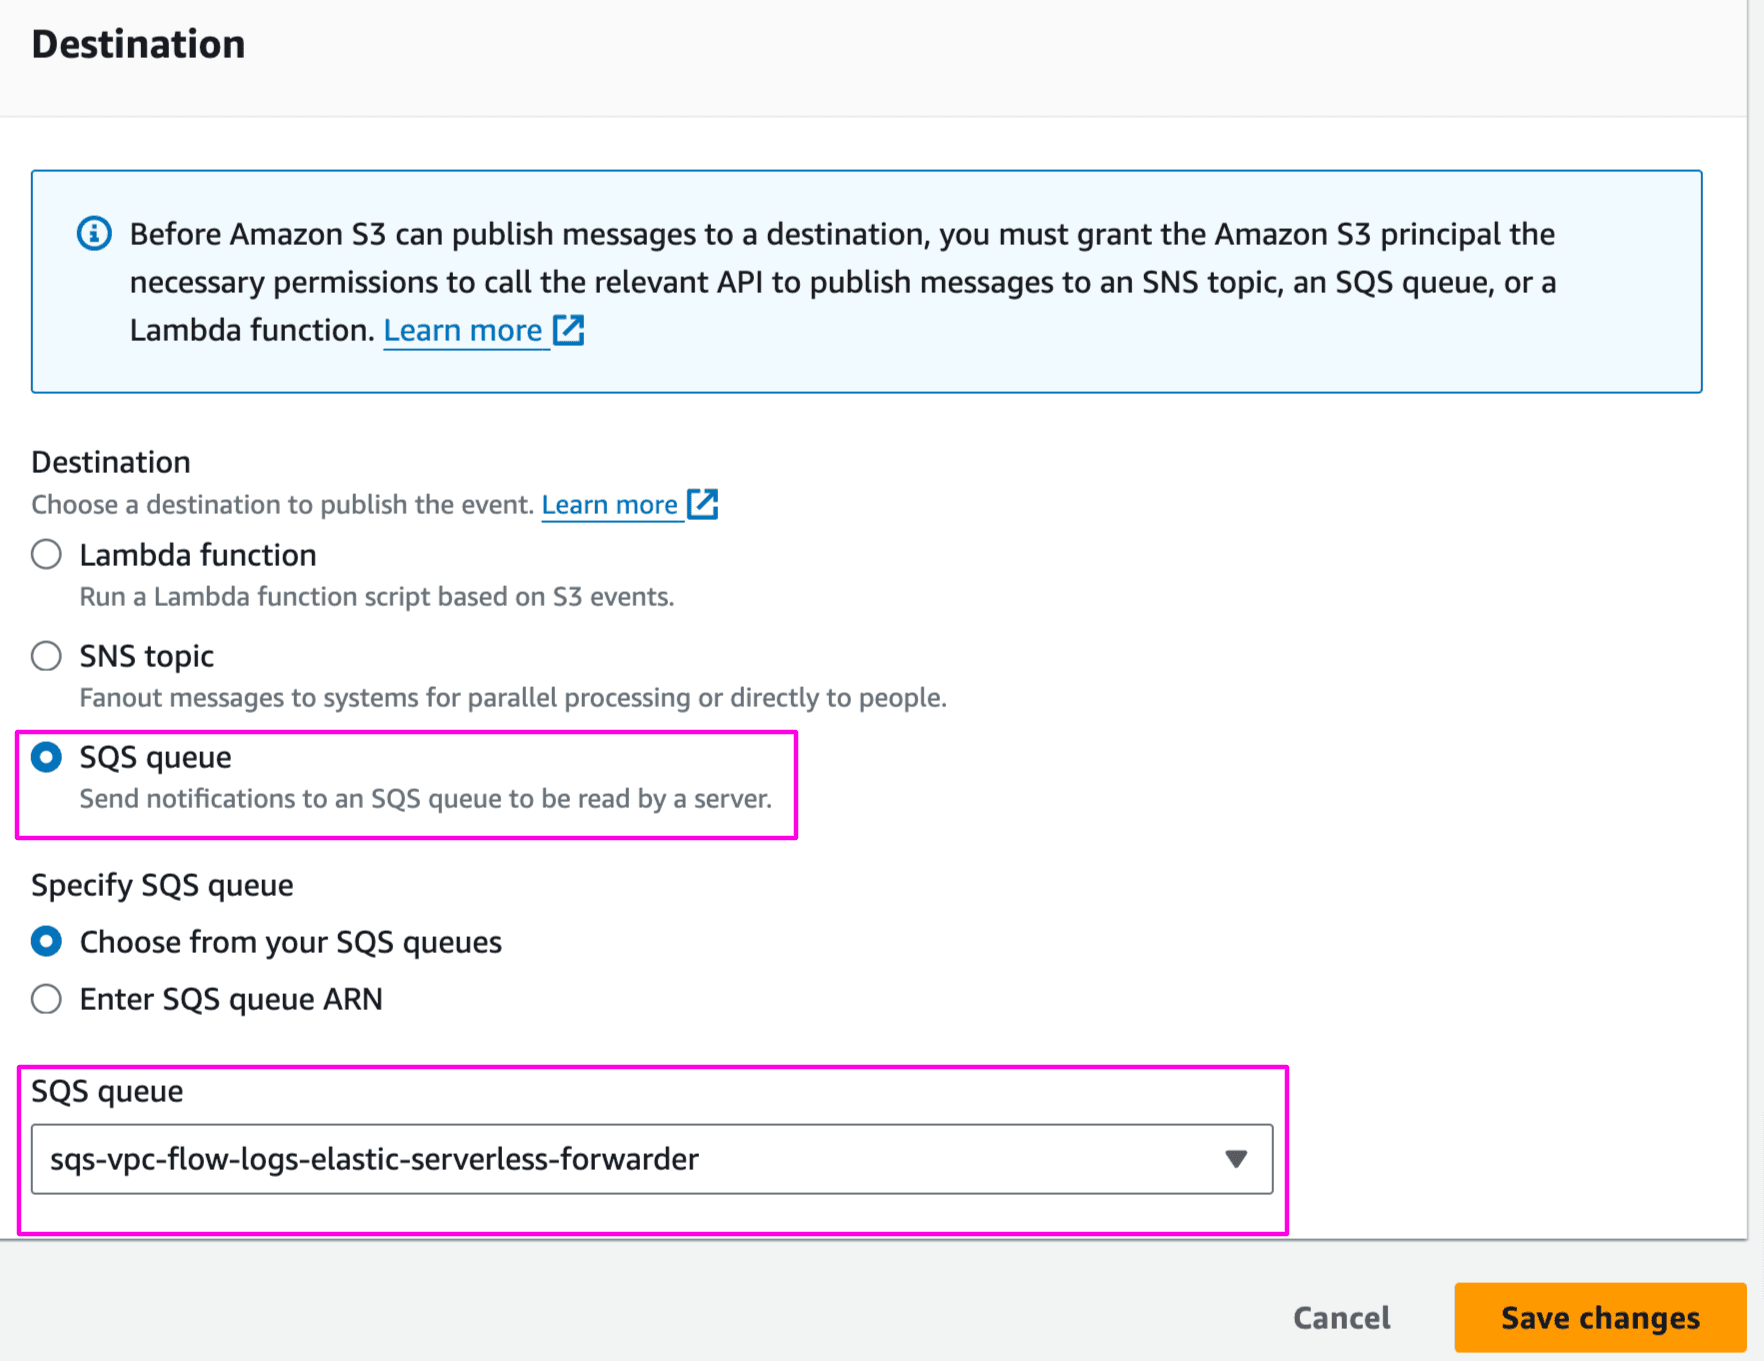
Once saved, configuration will look like below:

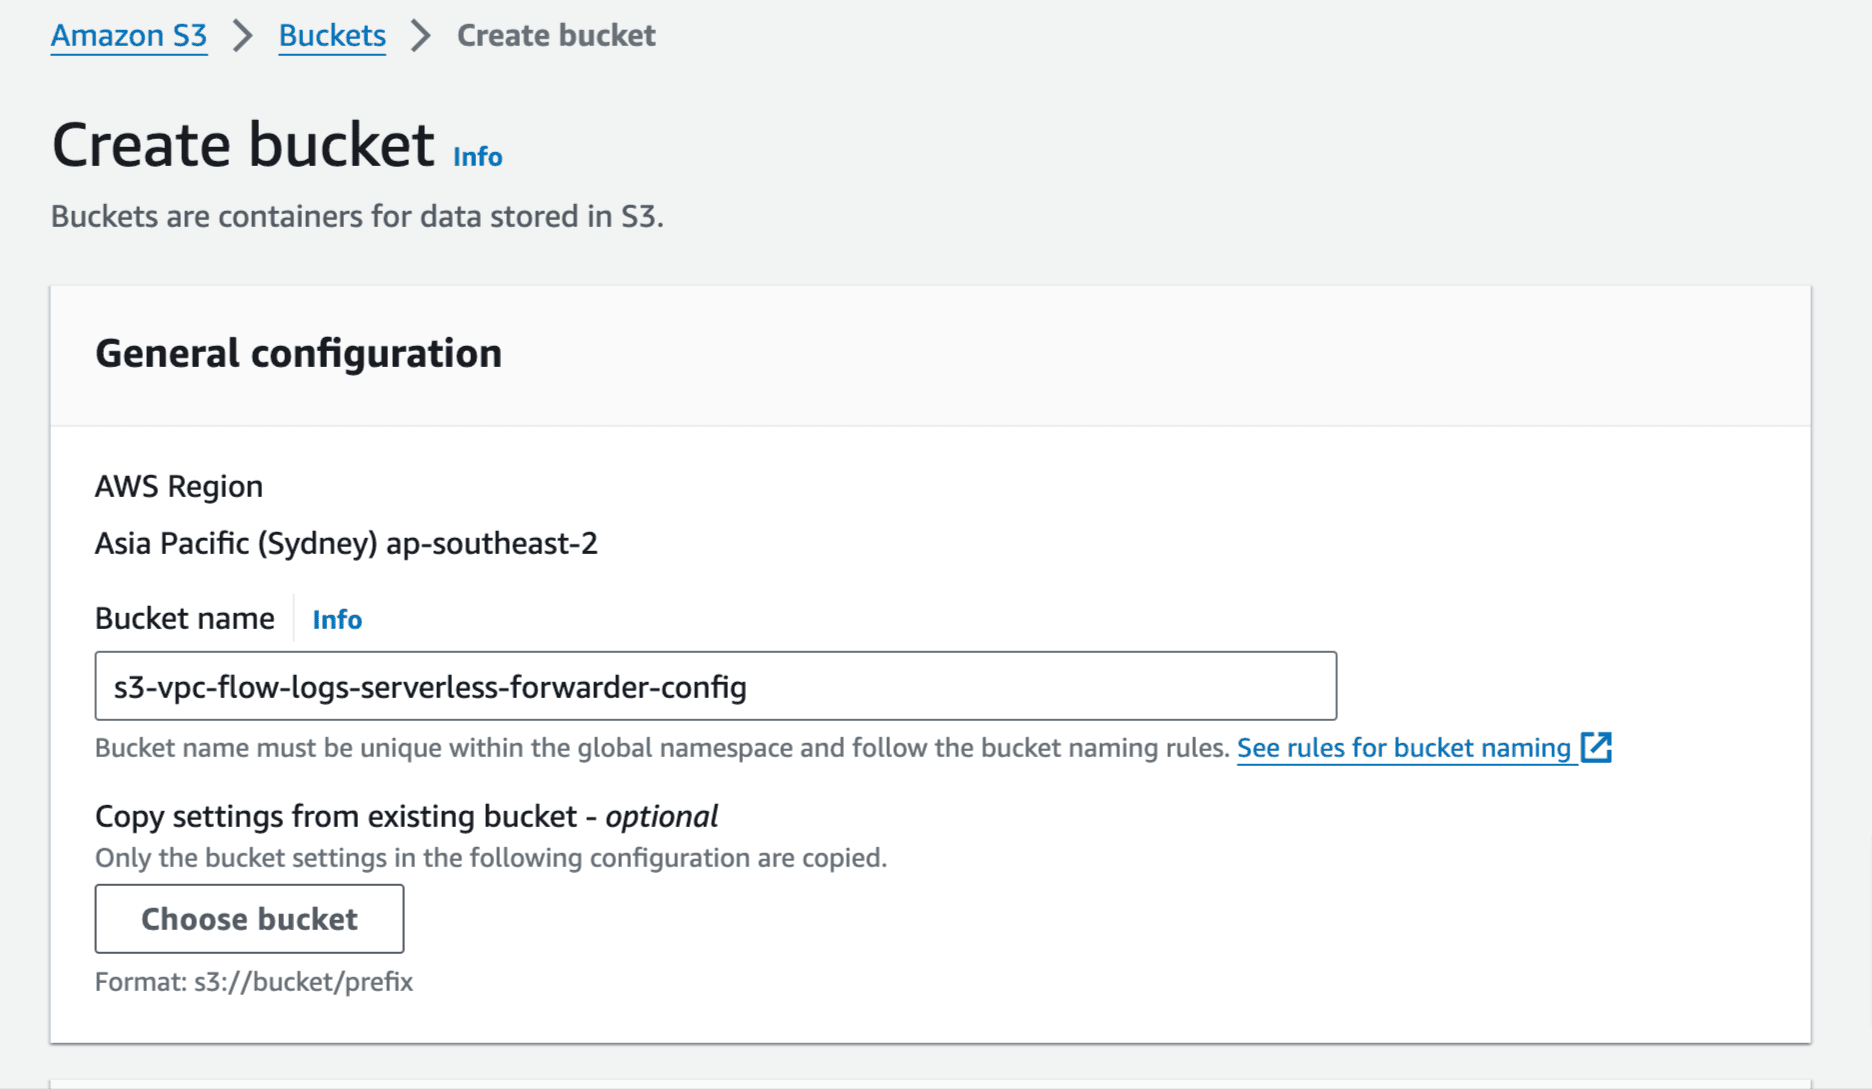
- Create another S3 bucket to store configuration file for Elastic Serverless Forwarder:
Create a file named config.yaml and update with below configuration. Full set of options here:
input type : s3-sqs . We are using S3 with SQS notification option
output :
elasticsearch_url : elasticsearch endpoint from Elastic Cloud deployment Create section above
api_key : Create Elasticsearch API key (User API key) using instruction here
es_datastream_name : forwarder supports automatic routing of aws.cloudtrail, aws.cloudwatch_logs, aws.elb_logs, aws.firewall_logs, aws.vpcflow, and aws.waf logs . For other log types you can set it to the naming convention required.
Leave other options as default.
Upload the config.yaml in s3 bucket s3-vpc-flow-logs-serverless-forwarder-config:

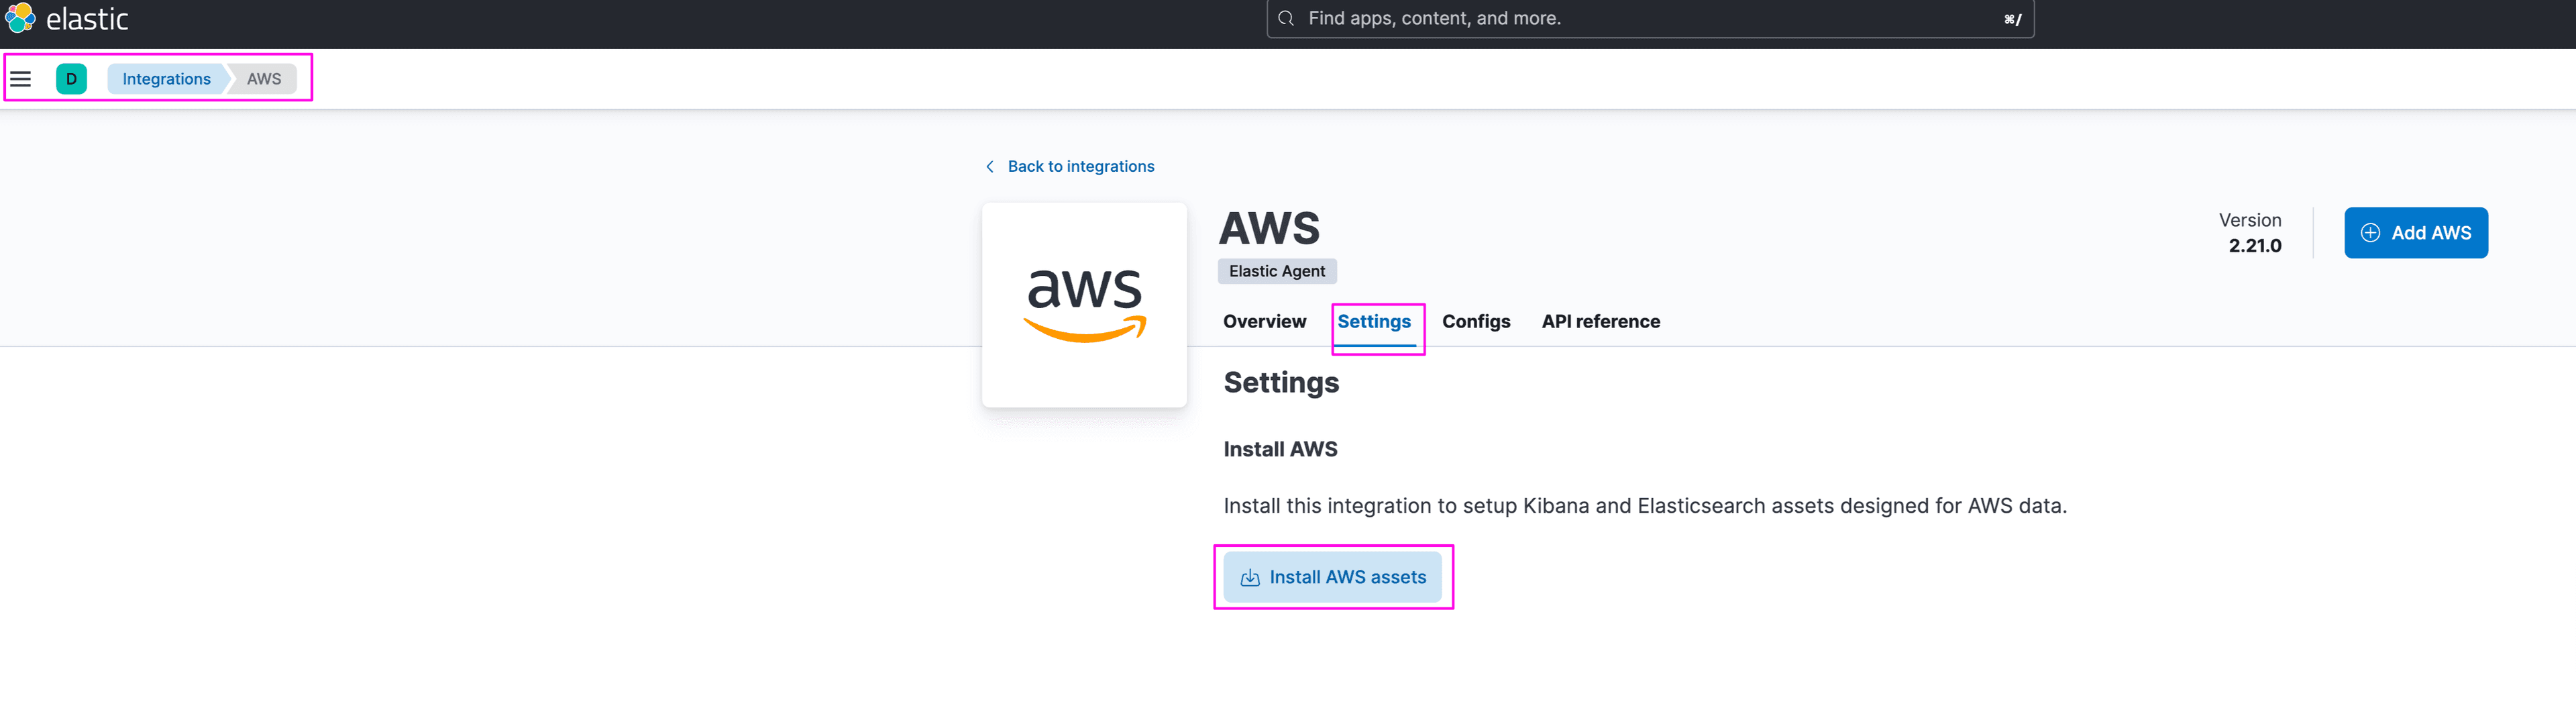
- Install AWS integration assets
Elastic integrations comes pre-packaged with assets that simplify collection, parsing , indexing and visualisation. The integrations uses data stream with specific naming convention for indices which is helpful in getting started. Forwarder can write to any other stream name too.
Follow the steps to install Elastic AWS integration.
Kibana -> Management -> Integrations, Search for AWS:
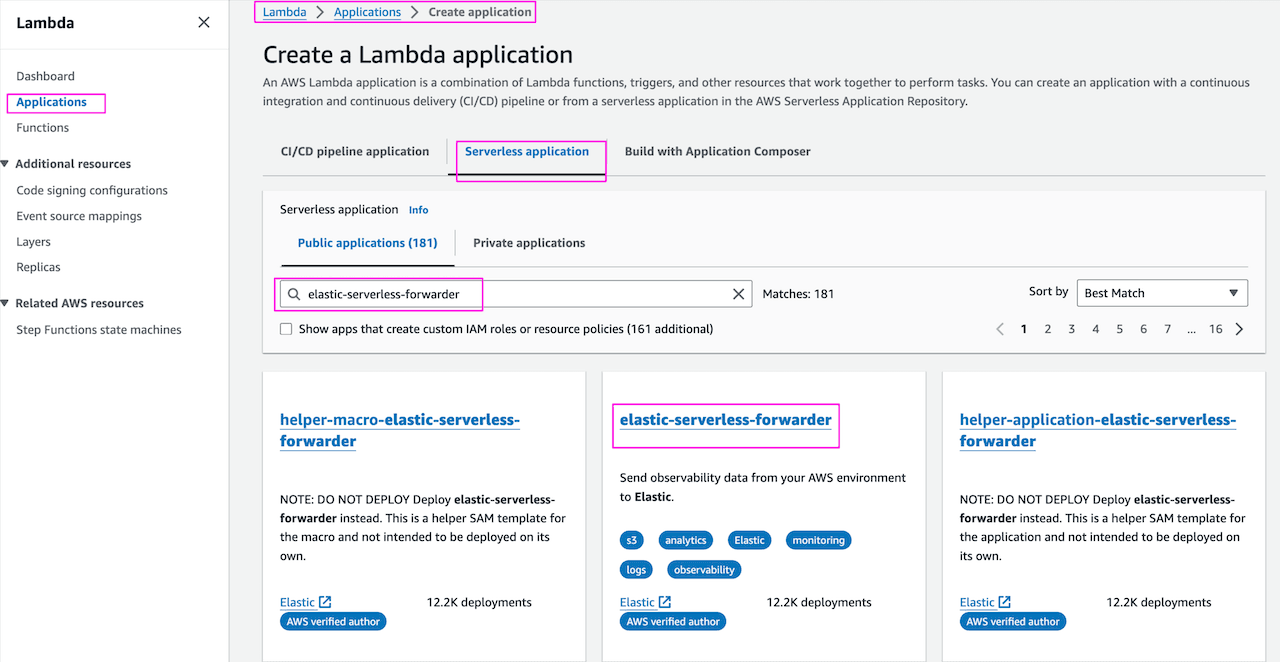
- Deploy the Elastic Serverless Forwarder
There are several options available to deploy Elastic Serverless Forwarder from SAR (Serverless Application Repository):
- Using AWS Console
- Using AWS Cloudformation
- Using Terraform
- Deploy directly which provides more customisation options
We will use AWS Console option to deploy ESF.
Note : Only one deployment per region is allowed when using the AWS console directly.
AWS Console -> Lambda -> Application -> Create Application , search for elastic-serverless-forwarder:
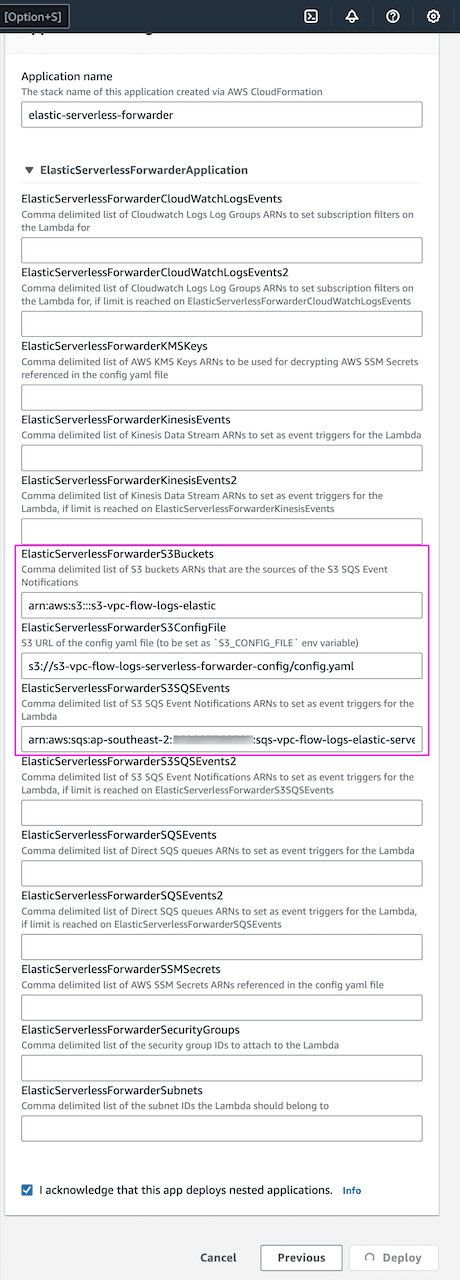
Under Application settings provide the following details:
- Application name -
elastic-serverless-forwarder - ElasticServerlessForwarderS3Buckets -
s3-vpc-flow-logs-elastic - ElasticServerlessForwarderS3ConfigFile -
s3://s3-vpc-flow-logs-serverless-forwarder-config/config.yaml - ElasticServerlessForwarderS3SQSEvent -
arn:aws:sqs:ap-southeast-2:xxxxxxxxxxx:sqs-vpc-flow-logs-elastic-serverless-forwarder
On successful deployment, status of Lambda deployment should be Create Complete:

Below are the SQS queues automatically created upon successful deployment of ESF:
Once everything is set up correctly, published flow logs in S3 bucket s3-vpc-flow-logs-elastic will send notification to SQS and you will see the messages available in the queue sqs-vpc-flow-logs-elastic-serverless-forwarder to be consumed by ESF.
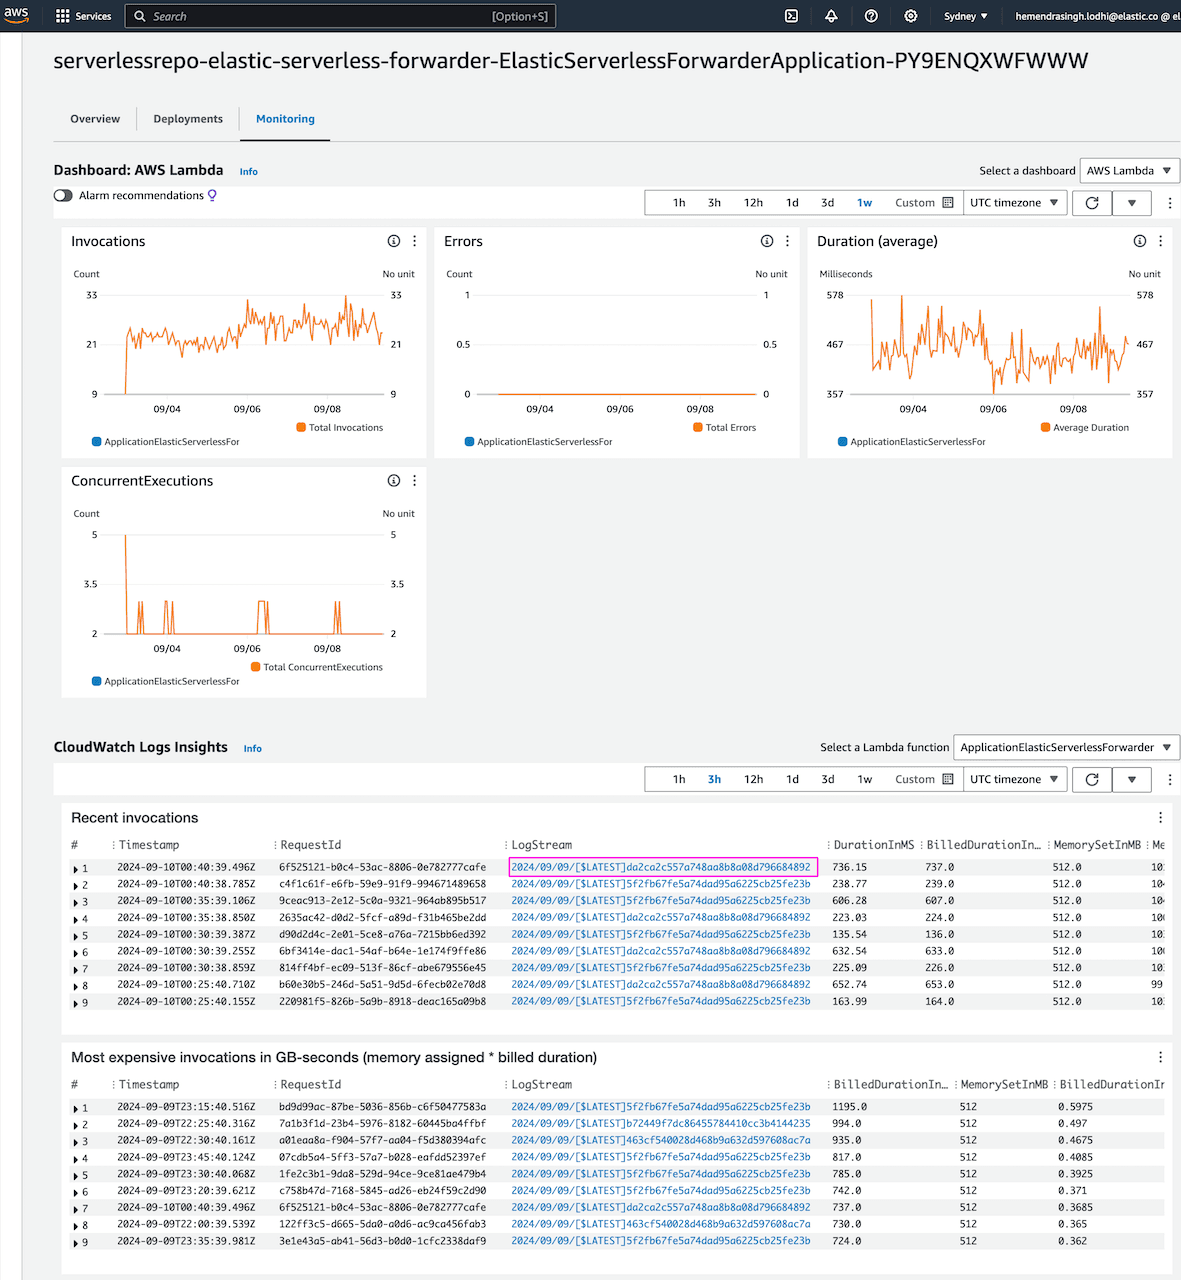
In case of issues such as SQS message count keep on increasing then check the Lambda execution logs Lambda -> Application -> serverlessrepo-elastic-serverless-forwarder-ElasticServerlessForwarderApplication* -> Monitoring -> Cloudwatch Log Insights. Click on LogStream for detailed information:
More on troubleshooting here.
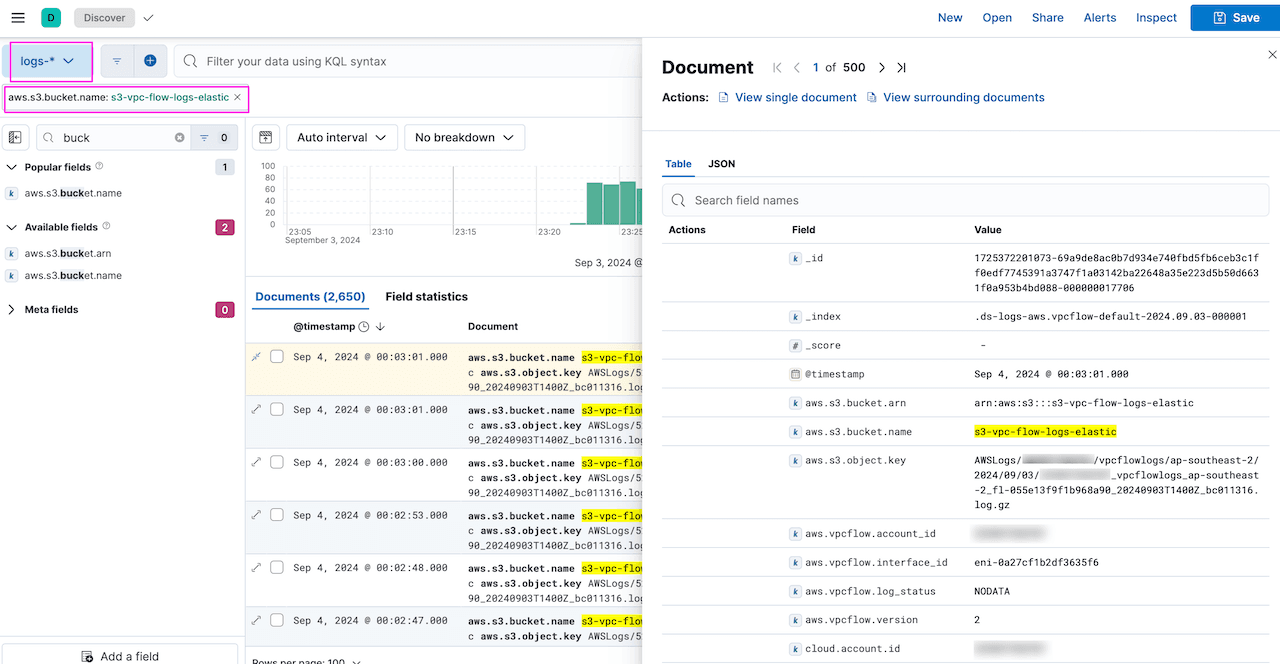
- Validate VPC flow logs in Kibana Discover and Dashboard
Kibana -> Discover . This will show VPC flow logs:
Kibana -> Dashboards . Look for VPC Flow log Overview dashboard:
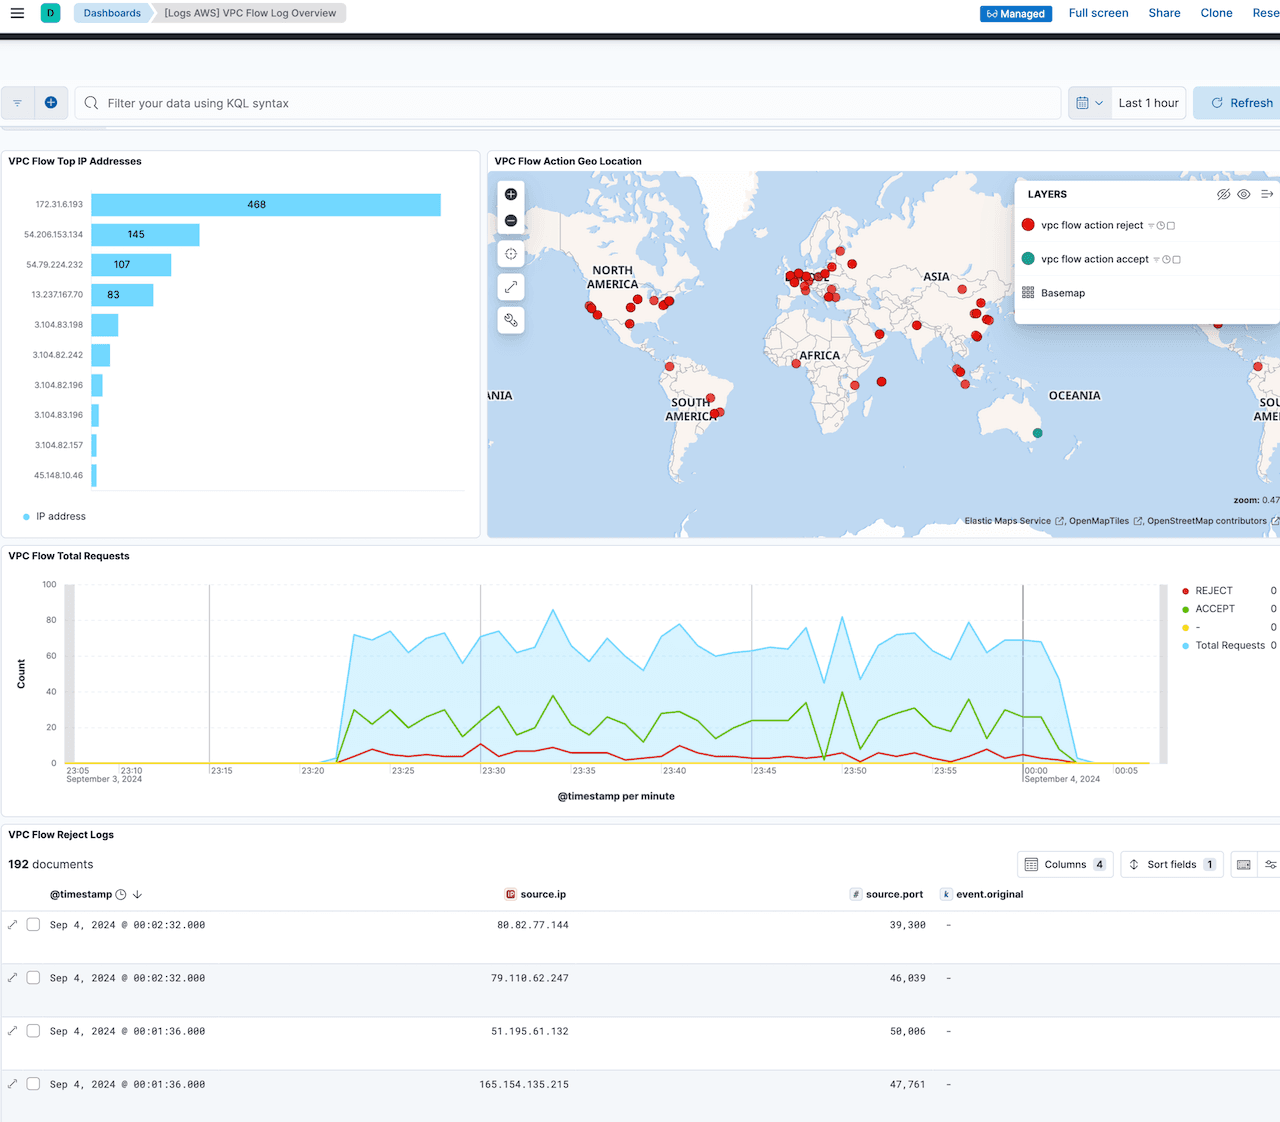
More dashboards!
As mentioned earlier, AWS integration provides pre-built dashboards in addition to other assets. We can monitor involved AWS services in our setup using the Elastic agent ingestion method which we will cover in Part 2 of this series. This will help in tracking usage and help in optimisation.
Conclusion
Elasticsearch provides multiple options to sync data from AWS S3 into Elasticsearch deployments. In this walkthrough, we have demonstrated that it is relatively easy to implement Elastic Serverless Forwarder(ESF) ingestion options to ingest data from AWS S3 and leverage Elastic's industry-leading search & analytics capabilities.
In Part 2 of this series, we'll dive into using Elastic Agent as another option for ingesting AWS S3 data. And in part 3, we'll explain how to ingest data from AWS S3 using the Elastic S3 Native connector.
Frequently Asked Questions
What is Elastic Serverless Forwarder?
The Elastic Serverless Forwarder is an AWS Lambda function that forward logs such as VPC Flow logs, WAF, Cloud Trail etc. from AWS environment to Elastic.
Related Content
December 16, 2025
Reducing Elasticsearch frozen tier costs with Deepfreeze S3 Glacier archival
Learn how to leverage Deepfreeze in Elasticsearch to automate searchable snapshot repository rotation, retaining historical data and aging it into lower cost S3 Glacier tiers after index deletion.

September 22, 2025
Elastic Open Web Crawler as a code
Learn how to use GitHub Actions to manage Elastic Open Crawler configurations, so every time we push changes to the repository, the changes are automatically applied to the deployed instance of the crawler.

August 6, 2025
How to display fields of an Elasticsearch index
Learn how to display fields of an Elasticsearch index using the _mapping and _search APIs, sub-fields, synthetic _source, and runtime fields.

July 14, 2025
Run Elastic Open Crawler in Windows with Docker
Learn how to use Docker to get Open Crawler working in a Windows environment.

June 24, 2025
Ruby scripting in Logstash
Learn about the Logstash Ruby filter plugin for advanced data transformation in your Logstash pipeline.