Test Elastic's leading-edge, out-of-the-box capabilities. Dive into our sample notebooks in the Elasticsearch Labs repo, start a free cloud trial, or try Elastic on your local machine now.
This blog series reveals how our Field Engineering team used the Elastic stack with generative AI to develop a lovable and effective customer support chatbot. If you missed other installments in the series, be sure to check out part one, part two, part four, the launch blog, and part five.
The idea of chatting via a web app has been around for a very long time. So you might think that means a GenAI chatbot would be a standard, boring interface to build. But it turns out an AI chatbot presents a few interesting and novel challenges. I’ll mention a few of them here, and hopefully, if you’re looking to build your own chat interface, you can use some of these tips and tricks to help you out.
In my role as a UI designer, I like to make big deals about tiny things. Is the hex color for an avatar a shade too dark? I’m definitely complaining. Is the animation on this tooltip not eased properly? Let’s spend the time to track down the right bezier curves. No no, trust me, it’s definitely worth it. Is the font rendering slightly different on the new page? Oh yeah, you’re definitely going to be hearing about it from Ian.
So when my team began work on a new automated Support Assistant, we had to decide: Do we pull a library off the shelf to handle the chat interface? Do we develop our own from scratch? For me, I hardly wanted to consider the former. Getting the small things right for our chatbot is a designer’s dream. Let’s do this.
1. Choosing the library
So when I said “develop our own from scratch” earlier, I didn’t mean from scratch scratch. Sorry folks, this is 2024 AD, most people don’t develop UI components from scratch anymore. Many developers rely on component libraries to build new things, and at Elastic we’re no exception. Although we are pretty exceptional in one respect: We have our very own Elastic UI component library, and it’s free for anyone to use.
EUI currently has no “ChatBot” component, but it does provide the avatars, “panels”, text areas, etc, one might need to create a nice little chat window.
If you want to follow along with the rest of this post, feel free to open this sample EUI chat interface I made in another tab and you can give it a spin yourself. Have fun!
2. Animations... With some unlikely help
After designing & assembling the major building blocks of the chat interface (which you can check out in the sandbox link above), one of our next challenges was how to keep users engaged during the sometimes-lengthy period of time the chatbot took to respond. To make matters worse, the first LLM endpoint we were using (for internal alpha-testing) wasn’t streaming its responses; it simply generated and sent the entire answer back to us in a single HTTP response body. This took forever. Not great.
| Action | From -> to | Approx. observed latency |
|---|---|---|
| Initial request | Client -> server | 100 - 500ms |
| RAG search | Server -> cluster | 1 - 2.5s |
| Call to LLM | Server -> LLM | 1 - 2.5s |
| First streamed byte | LLM -> server -> client | 3 - 6s |
| Total | 5.1 - 11.5 seconds |
Our first line of defense here was a compelling “loading” animation. I wanted something custom, interesting to look at, but also one that stuck very closely to Elastic’s overall brand guidelines. To that end, I decided to use Elastic’s existing EuiIcon component to display three dots, then use Elastic brand colors and EUI’s default animation bezier curves—those mathematical descriptions of how animations appear to accelerate and decelerate—to keep things feeling “Elastic” as it pulsed, blinked and changed colors.

Choreographing bouncing, color-changing and opacity fading in CSS was a bit outside my comfort zone. So instead of spending a whole day guessing at values to use, it occurred to me I had someone I could ask sitting right in front of me. That’s right, I asked for (an early version of) the chatbot to program its own loading animation.
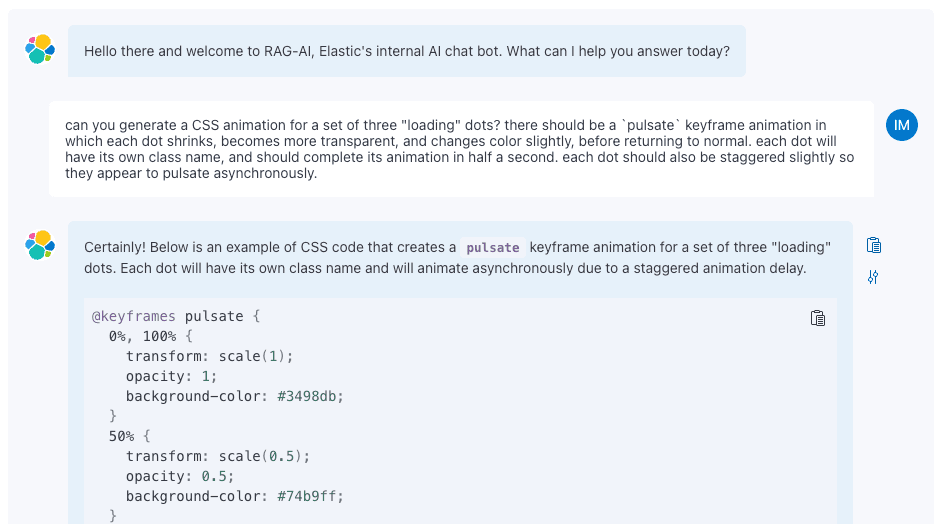
It came up with something very nearly perfect on its first try. After a bit of fine-tuning and code refactoring, this was the result:
(Bonus points if you can figure out which props to edit in the sandbox link above to see these loading dots yourself. All the code’s there!)
This resulted in a pleasing little loading animation that I still enjoy looking at for a few seconds at a time; just what we needed! Now, whether a chatbot programming itself is existentially worrying?... That’s a question I’ll leave to the philosophers. But in my capacity as a web developer, I needed to focus on more practical matters. Like what we should do if the response from the LLM takes too long or drops entirely.
3. Killswitch engage
Handling network timeouts and failures is pretty straightforward in most traditional web apps. Just check the error code of the response and handle those appropriately. Any additional handling for timeouts can be caught in a try/catch block or something similar. Generally, a typical HTTP fetch will know how to handle timeouts, which are usually configured to happen after a reasonably short amount of time and happen relatively rarely.
The current state of generative AI API endpoints is not quite like that. Yes, occasionally, you’ll get a quick failure response with an error code, but remember that we’re streaming the LLM’s response here. Much more often than not, we receive a 200 OK from the API endpoint quickly, which tells us that the large language model is ready to begin streaming its response... But then it can take an exceedingly long time to receive any data at all. Or, partway through the stream, the trail goes cold, and the connection simply hangs.
In either case, we didn’t want to rely on traditional network timeouts to give the user an option to retry their question. It is a much better user experience to have a short timeout on a failed attempt and then a quick, successful retry than a successful response that took way, way too long.
So, after we found most failed streams will take over one minute to resolve, we went to work finding the shortest amount of time that would guarantee the stream was likely going to fail (or take an excessive amount of time to resolve). We kept cutting it shorter and shorter until we found that after only 10 seconds of radio silence, we could be nearly certain that the stream would either eventually fail or take longer than one minute to pick back up.
Here’s some pseudocode illustrating the concept. It’s an example of the kind of code you might find in the primary function that calls a streaming LLM API after a user asks a question. By just being a little clever with AbortController signals and a setTimeout, you can implement a “killswitch” on the fetch() function to quickly return an error to the user if the stream goes dead for more than 10 seconds:
So after solving these problems, and probably about a hundred others, it was time to focus on another challenge unique to site-wide generative AI interfaces: Context.
4. Chat history context
While chatting with an AI assistant, you expect it to have the context of your previous messages. If you ask it to clarify its answer, for example, it needs to “remember” the question you asked it, as well as its own response. You can’t just send “Can you clarify that?” all by itself to the LLM and expect a useful response.
Context, within a conversation, is straightforward to find and send. Just turn all previous chat messages into a JSON object and send it along with the latest question to the LLM endpoint. Although there may be a few smaller considerations to make—like how to serialize and store metadata or RAG results—it is comparatively uncomplicated. Here’s a bit of pseudocode illustrating how to enrich a default prompt with conversational context.
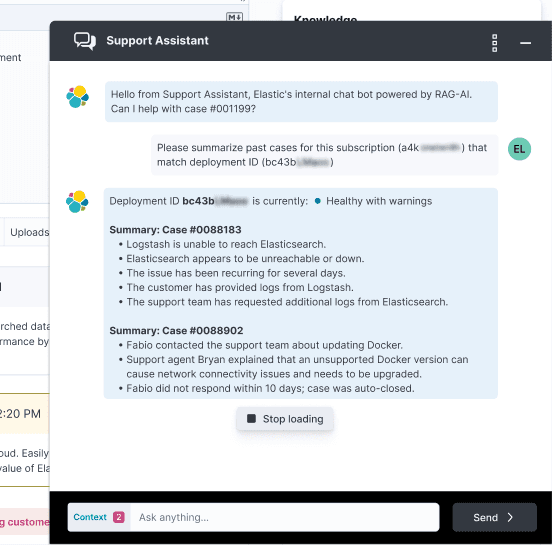
But what about other types of context? For example: When you’re reading a support case and see a chat widget on the page, wouldn’t it make sense to ask the AI assistant “how long has this case been open?”. Well, to provide that answer, we’ll need to pass the support case itself as context to the LLM. But what if you’re reading that support case and one of the replies contains a term you don’t understand. It would make sense to ask the assistant to explain this highly technical term. Well for that, we’ll need to send a different context to the LLM (in our case, the results from a search of our knowledge base for that technical term).
How do we convey to the user something as complex and unique as context, in order to orient them in the conversation? How can we also let users also choose which context to send? And, maybe hardest of all, how do we do all of this with such a limited number of pixels?
After designing and evaluating quite a few options (breadcrumbs? a sticky alert bar within the chat window? tiny little badges??) we settled on a “prepended” element to the text input area. This keeps context right next to the “action item” it describes; context is attached only to your next question, not your last answer!
| UI Element | Pros | Cons |
|---|---|---|
| Breadcrumbs | Small footprint, easy to interact with | Better for representing URLs and paths |
| Banner at top | Out of the way, allows for long description | Not easy to interact with, can get lost |
| Micro-badges | Easy to display multiple contexts | Difficult to edit context |
| Prepended menu w/number badge | Close to input field, easy to interact with | Tight squeeze in the space available |
Additionally, an EUI context menu can be used to allow power users to edit their context. Let’s say you want to ask the Assistant something that would require both the case history and a thorough search of the Elastic knowledge base; those are two very different contexts. “How do I implement the changes the Elastic engineer is asking me to make?” for example. You could then use the context menu to ensure both sources of information are being used for the Assistant’s response.
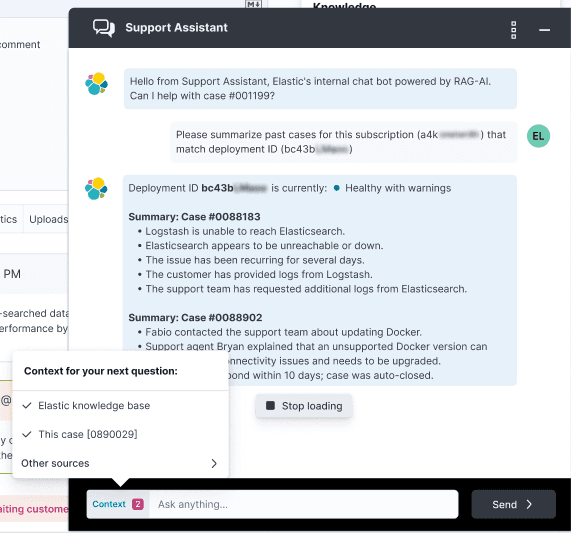
This also gives us more flexibility. If we want the LLM itself to determine context after each question, for example, we’d be able to display that to the user easily, and the little pink notification badge could alert users if there are any updates.
These were just a handful of the many smaller problems we needed to solve while developing our GenAI Support Assistant interface. Even though it seems like everyone’s releasing a chatbot these days, I hadn’t seen many breakdowns of real-life problems one might encounter while engineering the interfaces and experiences. Building a frictionless interface with emphasis on making streaming experiences feel snappy, making affordances for unexpected timeouts and designing for complex concepts like chat context with only a few pixels to spare are just a few of the problems we needed to solve.
Implementing an AI chatbot naturally puts the bulk of the engineering focus on the LLM and backend services. However, it’s important to keep in mind that the UX/UI components of a new tool will require adequate time and attention as well. Even though we’re building a generation of products that use AI technology, it’s always going to be important to design for humans.
Related Content

February 18, 2026
Better text analysis for complex languages with Elasticsearch and neural models
Using neural models and the Elasticsearch inference API to improve search in Hebrew, German, Arabic, and other morphologically complex languages.

February 12, 2026
Entity resolution with Elasticsearch & LLMs, Part 1: Preparing for intelligent entity matching
Learn what entity resolution is and how to prepare both sides of the entity resolution equation: your watch list and the articles you want to search.

February 3, 2026
Building automation with Elastic Workflows
A practical introduction to workflow automation in Elastic. Learn what workflows look like, how they work, and how to build one.

February 3, 2026
Skip MLOps: Managed cloud inference for self-managed Elasticsearch with EIS via Cloud Connect
Introducing Elastic Inference Service (EIS) via Cloud Connect, which provides a hybrid architecture for self-managed Elasticsearch users and removes MLOps and CPU hardware barriers for semantic search and RAG.
February 4, 2026
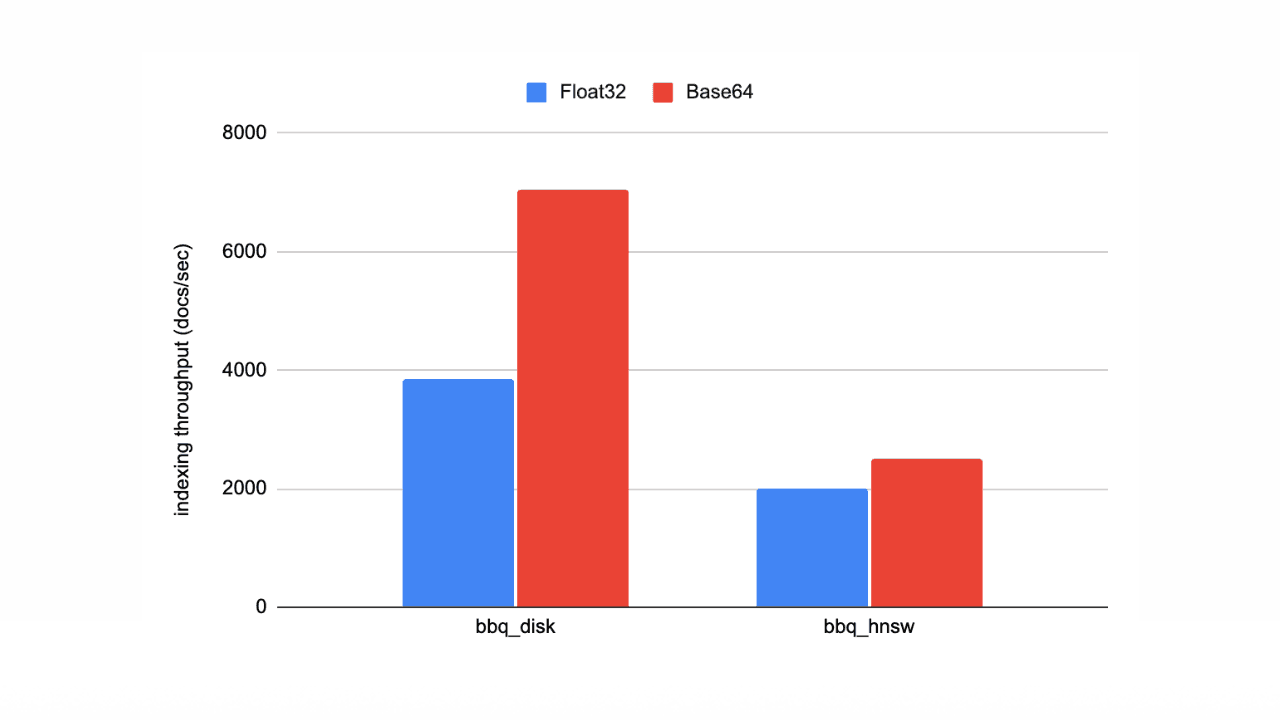
Speed up vector ingestion using Base64-encoded strings
Introducing Base64-encoded strings to speed up vector ingestion in Elasticsearch.