- Elasticsearch Guide: other versions:
- What is Elasticsearch?
- What’s new in 7.10
- Getting started with Elasticsearch
- Set up Elasticsearch
- Installing Elasticsearch
- Configuring Elasticsearch
- Setting JVM options
- Secure settings
- Auditing settings
- Circuit breaker settings
- Cluster-level shard allocation and routing settings
- Cross-cluster replication settings
- Discovery and cluster formation settings
- Field data cache settings
- HTTP
- Index lifecycle management settings
- Index management settings
- Index recovery settings
- Indexing buffer settings
- License settings
- Local gateway settings
- Logging
- Machine learning settings
- Monitoring settings
- Node
- Network settings
- Node query cache settings
- Search settings
- Security settings
- Shard request cache settings
- Snapshot lifecycle management settings
- Transforms settings
- Transport
- Thread pools
- Watcher settings
- Important Elasticsearch configuration
- Important System Configuration
- Bootstrap Checks
- Heap size check
- File descriptor check
- Memory lock check
- Maximum number of threads check
- Max file size check
- Maximum size virtual memory check
- Maximum map count check
- Client JVM check
- Use serial collector check
- System call filter check
- OnError and OnOutOfMemoryError checks
- Early-access check
- G1GC check
- All permission check
- Discovery configuration check
- Bootstrap Checks for X-Pack
- Starting Elasticsearch
- Stopping Elasticsearch
- Discovery and cluster formation
- Add and remove nodes in your cluster
- Full-cluster restart and rolling restart
- Remote clusters
- Set up X-Pack
- Configuring X-Pack Java Clients
- Plugins
- Upgrade Elasticsearch
- Index modules
- Mapping
- Text analysis
- Overview
- Concepts
- Configure text analysis
- Built-in analyzer reference
- Tokenizer reference
- Token filter reference
- Apostrophe
- ASCII folding
- CJK bigram
- CJK width
- Classic
- Common grams
- Conditional
- Decimal digit
- Delimited payload
- Dictionary decompounder
- Edge n-gram
- Elision
- Fingerprint
- Flatten graph
- Hunspell
- Hyphenation decompounder
- Keep types
- Keep words
- Keyword marker
- Keyword repeat
- KStem
- Length
- Limit token count
- Lowercase
- MinHash
- Multiplexer
- N-gram
- Normalization
- Pattern capture
- Pattern replace
- Phonetic
- Porter stem
- Predicate script
- Remove duplicates
- Reverse
- Shingle
- Snowball
- Stemmer
- Stemmer override
- Stop
- Synonym
- Synonym graph
- Trim
- Truncate
- Unique
- Uppercase
- Word delimiter
- Word delimiter graph
- Character filters reference
- Normalizers
- Index templates
- Data streams
- Ingest node
- Search your data
- Query DSL
- Aggregations
- Bucket aggregations
- Adjacency matrix
- Auto-interval date histogram
- Children
- Composite
- Date histogram
- Date range
- Diversified sampler
- Filter
- Filters
- Geo-distance
- Geohash grid
- Geotile grid
- Global
- Histogram
- IP range
- Missing
- Nested
- Parent
- Range
- Rare terms
- Reverse nested
- Sampler
- Significant terms
- Significant text
- Terms
- Variable width histogram
- Subtleties of bucketing range fields
- Metrics aggregations
- Pipeline aggregations
- Bucket aggregations
- EQL
- SQL access
- Overview
- Getting Started with SQL
- Conventions and Terminology
- Security
- SQL REST API
- SQL Translate API
- SQL CLI
- SQL JDBC
- SQL ODBC
- SQL Client Applications
- SQL Language
- Functions and Operators
- Comparison Operators
- Logical Operators
- Math Operators
- Cast Operators
- LIKE and RLIKE Operators
- Aggregate Functions
- Grouping Functions
- Date/Time and Interval Functions and Operators
- Full-Text Search Functions
- Mathematical Functions
- String Functions
- Type Conversion Functions
- Geo Functions
- Conditional Functions And Expressions
- System Functions
- Reserved keywords
- SQL Limitations
- Scripting
- Data management
- ILM: Manage the index lifecycle
- Overview
- Concepts
- Automate rollover
- Manage Filebeat time-based indices
- Index lifecycle actions
- Configure a lifecycle policy
- Migrate index allocation filters to node roles
- Resolve lifecycle policy execution errors
- Start and stop index lifecycle management
- Manage existing indices
- Skip rollover
- Restore a managed data stream or index
- Monitor a cluster
- Frozen indices
- Roll up or transform your data
- Set up a cluster for high availability
- Snapshot and restore
- Secure a cluster
- Overview
- Configuring security
- User authentication
- Built-in users
- Internal users
- Token-based authentication services
- Realms
- Realm chains
- Active Directory user authentication
- File-based user authentication
- LDAP user authentication
- Native user authentication
- OpenID Connect authentication
- PKI user authentication
- SAML authentication
- Kerberos authentication
- Integrating with other authentication systems
- Enabling anonymous access
- Controlling the user cache
- Configuring SAML single-sign-on on the Elastic Stack
- Configuring single sign-on to the Elastic Stack using OpenID Connect
- User authorization
- Built-in roles
- Defining roles
- Granting access to Stack Management features
- Security privileges
- Document level security
- Field level security
- Granting privileges for data streams and index aliases
- Mapping users and groups to roles
- Setting up field and document level security
- Submitting requests on behalf of other users
- Configuring authorization delegation
- Customizing roles and authorization
- Enabling audit logging
- Encrypting communications
- Restricting connections with IP filtering
- Cross cluster search, clients, and integrations
- Tutorial: Getting started with security
- Tutorial: Encrypting communications
- Troubleshooting
- Some settings are not returned via the nodes settings API
- Authorization exceptions
- Users command fails due to extra arguments
- Users are frequently locked out of Active Directory
- Certificate verification fails for curl on Mac
- SSLHandshakeException causes connections to fail
- Common SSL/TLS exceptions
- Common Kerberos exceptions
- Common SAML issues
- Internal Server Error in Kibana
- Setup-passwords command fails due to connection failure
- Failures due to relocation of the configuration files
- Limitations
- Watch for cluster and index events
- Command line tools
- How To
- Glossary of terms
- REST APIs
- API conventions
- Compact and aligned text (CAT) APIs
- cat aliases
- cat allocation
- cat anomaly detectors
- cat count
- cat data frame analytics
- cat datafeeds
- cat fielddata
- cat health
- cat indices
- cat master
- cat nodeattrs
- cat nodes
- cat pending tasks
- cat plugins
- cat recovery
- cat repositories
- cat segments
- cat shards
- cat snapshots
- cat task management
- cat templates
- cat thread pool
- cat trained model
- cat transforms
- Cluster APIs
- Cluster allocation explain
- Cluster get settings
- Cluster health
- Cluster reroute
- Cluster state
- Cluster stats
- Cluster update settings
- Nodes feature usage
- Nodes hot threads
- Nodes info
- Nodes reload secure settings
- Nodes stats
- Pending cluster tasks
- Remote cluster info
- Task management
- Voting configuration exclusions
- Cross-cluster replication APIs
- Data stream APIs
- Document APIs
- Enrich APIs
- Graph explore API
- Index APIs
- Add index alias
- Analyze
- Clear cache
- Clone index
- Close index
- Create index
- Delete index
- Delete index alias
- Delete component template
- Delete index template
- Delete index template (legacy)
- Flush
- Force merge
- Freeze index
- Get component template
- Get field mapping
- Get index
- Get index alias
- Get index settings
- Get index template
- Get index template (legacy)
- Get mapping
- Index alias exists
- Index exists
- Index recovery
- Index segments
- Index shard stores
- Index stats
- Index template exists (legacy)
- Open index
- Put index template
- Put index template (legacy)
- Put component template
- Put mapping
- Refresh
- Rollover index
- Shrink index
- Simulate index
- Simulate template
- Split index
- Synced flush
- Type exists
- Unfreeze index
- Update index alias
- Update index settings
- Resolve index
- List dangling indices
- Import dangling index
- Delete dangling index
- Index lifecycle management APIs
- Ingest APIs
- Info API
- Licensing APIs
- Machine learning anomaly detection APIs
- Add events to calendar
- Add jobs to calendar
- Close jobs
- Create jobs
- Create calendars
- Create datafeeds
- Create filters
- Delete calendars
- Delete datafeeds
- Delete events from calendar
- Delete filters
- Delete forecasts
- Delete jobs
- Delete jobs from calendar
- Delete model snapshots
- Delete expired data
- Estimate model memory
- Find file structure
- Flush jobs
- Forecast jobs
- Get buckets
- Get calendars
- Get categories
- Get datafeeds
- Get datafeed statistics
- Get influencers
- Get jobs
- Get job statistics
- Get machine learning info
- Get model snapshots
- Get overall buckets
- Get scheduled events
- Get filters
- Get records
- Open jobs
- Post data to jobs
- Preview datafeeds
- Revert model snapshots
- Set upgrade mode
- Start datafeeds
- Stop datafeeds
- Update datafeeds
- Update filters
- Update jobs
- Update model snapshots
- Machine learning data frame analytics APIs
- Create data frame analytics jobs
- Create trained models
- Update data frame analytics jobs
- Delete data frame analytics jobs
- Delete trained models
- Evaluate data frame analytics
- Explain data frame analytics
- Get data frame analytics jobs
- Get data frame analytics jobs stats
- Get trained models
- Get trained models stats
- Start data frame analytics jobs
- Stop data frame analytics jobs
- Migration APIs
- Reload search analyzers API
- Repositories metering APIs
- Rollup APIs
- Search APIs
- Searchable snapshots APIs
- Security APIs
- Authenticate
- Change passwords
- Clear cache
- Clear roles cache
- Clear privileges cache
- Clear API key cache
- Create API keys
- Create or update application privileges
- Create or update role mappings
- Create or update roles
- Create or update users
- Delegate PKI authentication
- Delete application privileges
- Delete role mappings
- Delete roles
- Delete users
- Disable users
- Enable users
- Get API key information
- Get application privileges
- Get builtin privileges
- Get role mappings
- Get roles
- Get token
- Get users
- Grant API keys
- Has privileges
- Invalidate API key
- Invalidate token
- OpenID Connect prepare authentication
- OpenID Connect authenticate
- OpenID Connect logout
- SAML prepare authentication
- SAML authenticate
- SAML logout
- SAML invalidate
- SSL certificate
- Snapshot and restore APIs
- Snapshot lifecycle management APIs
- Transform APIs
- Usage API
- Watcher APIs
- Definitions
- Migration guide
- Release notes
- Elasticsearch version 7.10.2
- Elasticsearch version 7.10.1
- Elasticsearch version 7.10.0
- Elasticsearch version 7.9.3
- Elasticsearch version 7.9.2
- Elasticsearch version 7.9.1
- Elasticsearch version 7.9.0
- Elasticsearch version 7.8.1
- Elasticsearch version 7.8.0
- Elasticsearch version 7.7.1
- Elasticsearch version 7.7.0
- Elasticsearch version 7.6.2
- Elasticsearch version 7.6.1
- Elasticsearch version 7.6.0
- Elasticsearch version 7.5.2
- Elasticsearch version 7.5.1
- Elasticsearch version 7.5.0
- Elasticsearch version 7.4.2
- Elasticsearch version 7.4.1
- Elasticsearch version 7.4.0
- Elasticsearch version 7.3.2
- Elasticsearch version 7.3.1
- Elasticsearch version 7.3.0
- Elasticsearch version 7.2.1
- Elasticsearch version 7.2.0
- Elasticsearch version 7.1.1
- Elasticsearch version 7.1.0
- Elasticsearch version 7.0.0
- Elasticsearch version 7.0.0-rc2
- Elasticsearch version 7.0.0-rc1
- Elasticsearch version 7.0.0-beta1
- Elasticsearch version 7.0.0-alpha2
- Elasticsearch version 7.0.0-alpha1
- Dependencies and versions
Assign roles
editAssign roles
editBy default, all users can change their own passwords, get information about
themselves, and run the authenticate API. If you want them to do more than
that, you need to give them one or more roles.
Each role defines a specific set of actions (such as read, create, or delete) that can be performed on specific secured resources (such as data streams, indices, aliases, documents, fields, or clusters). To help you get up and running, there are built-in roles.
Open the menu and go to Stack Management > Security > Roles to see them:
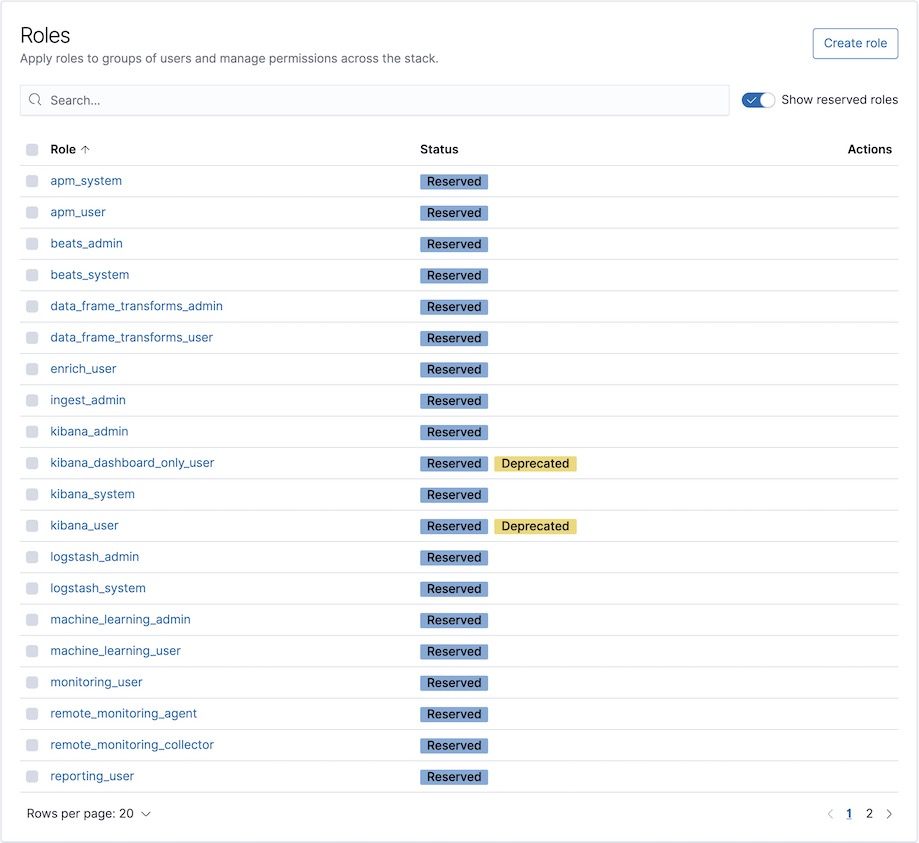
Select a role to see more information about its privileges. For example, select
the kibana_system role to see its list of cluster and index privileges. To
learn more, see Indices privileges.
Let’s assign the kibana_admin role to your user. Go back to the Stack
Management > Security > Users page and select your user. Add the kibana_admin
role and save the change. For example:
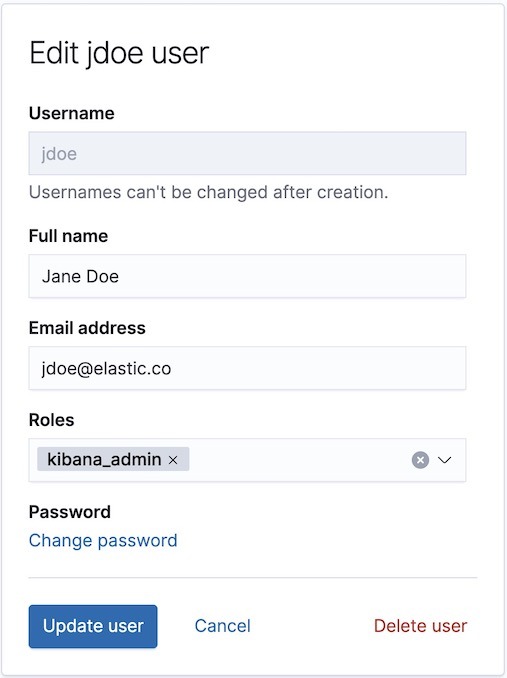
This user now has administrative access to all features in Kibana. For more information about granting access to Kibana see Kibana authorization.
If you completed all of the steps in Getting started with the Elastic Stack, you should have Metricbeat data stored in Elasticsearch. Let’s create two roles that grant different levels of access to that data.
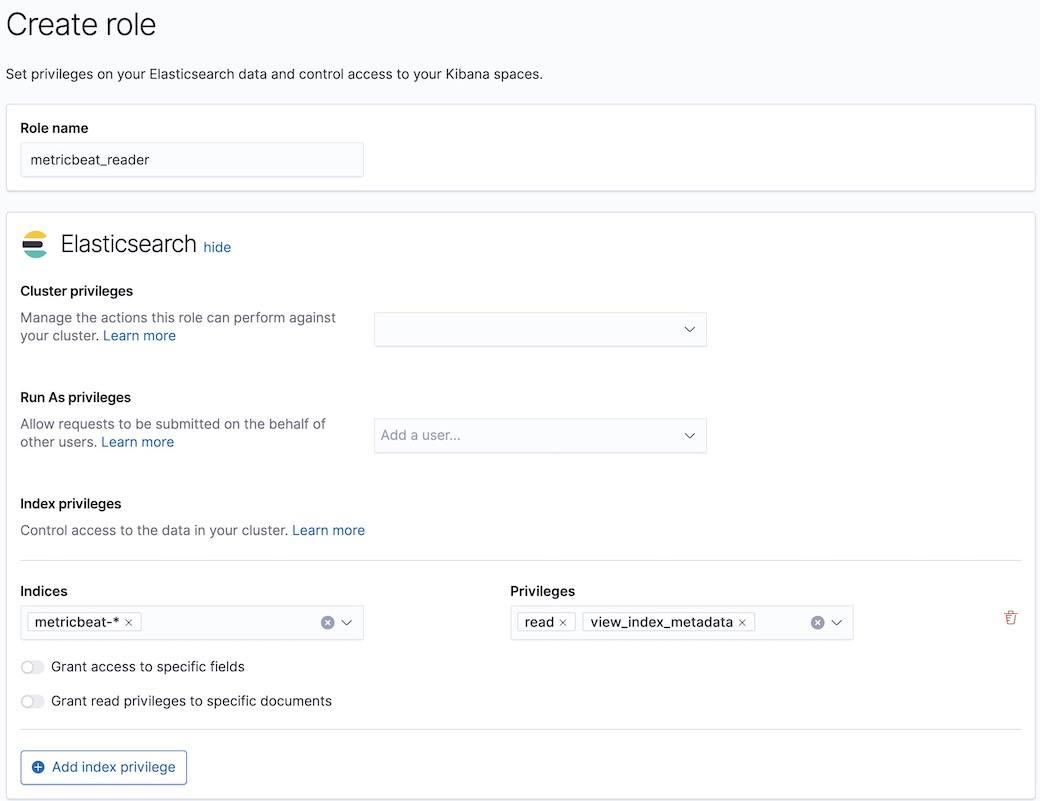
Go to the Stack Management > Security > Roles page and click Create role.
Create a metricbeat_reader role that has read and view_index_metadata
privileges on the metricbeat-* indices:
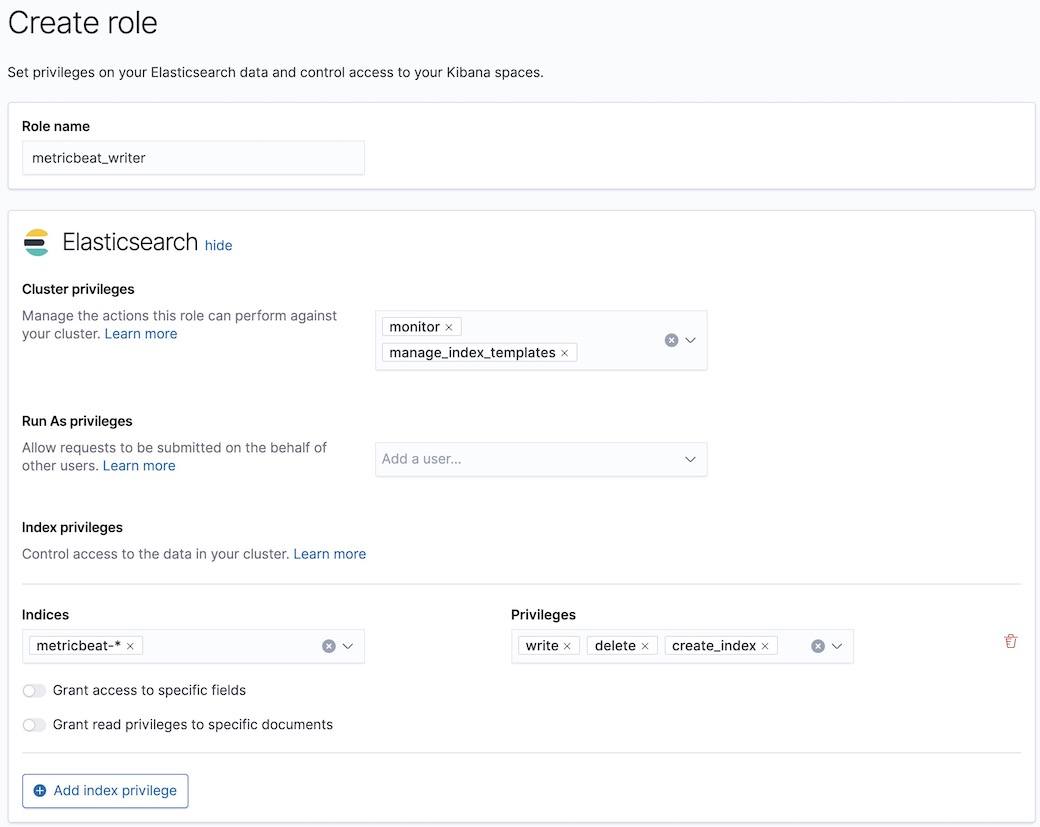
Create a metricbeat_writer role that has manage_index_templates and monitor
cluster privileges, as well as write, delete, and create_index privileges
on the metricbeat-* indices:
Now go back to the Stack
Management > Security > Users page and assign these roles
to the appropriate users. Assign the metricbeat_reader role to your personal
user. Assign the metricbeat_writer role to the logstash_internal user.
The list of users should now contain all of the built-in users as well as the two you created. It should also show the appropriate roles for your users:
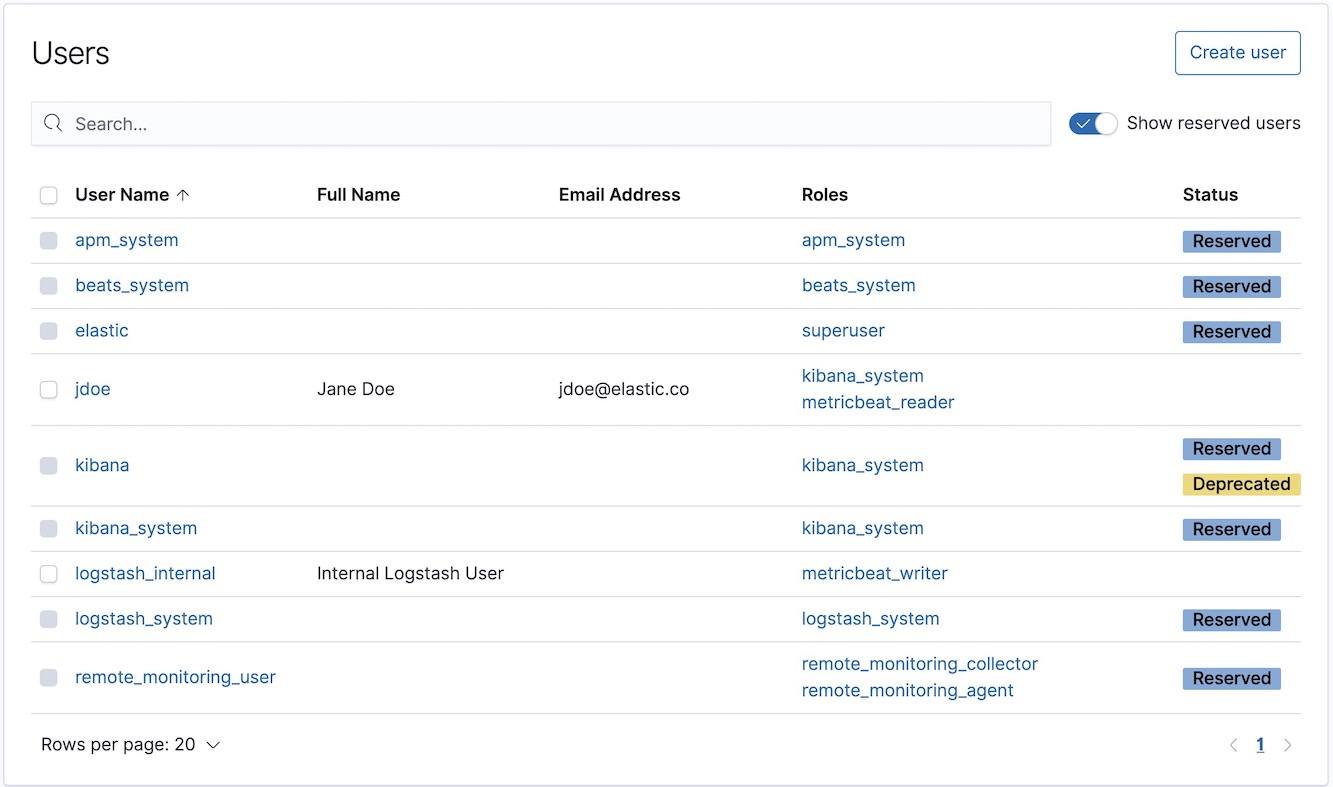
If you want to learn more about authorization and roles, see User authorization.